> ## Documentation Index
> Fetch the complete documentation index at: https://docs.leapter.com/llms.txt
> Use this file to discover all available pages before exploring further.
# Calling Other Blueprints
> Reuse logic by calling one Blueprint from another using Call nodes.
Call nodes let you run another Blueprint as part of your flow. They serve two key purposes:
1. **Breaking down complexity** — split large logic into smaller, focused Blueprints instead of ending up with one giant, hard-to-maintain Blueprint. Each piece handles a specific part of the logic and can be understood on its own.
2. **Reusing logic** — build common operations once (like a validation check or a calculation) and call them from multiple Blueprints without duplicating the logic.
Think of it as delegating a task: your Blueprint hands off data to another Blueprint, waits for it to finish, and continues with the result.
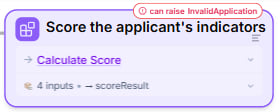 ## How Call nodes work
A Call node has three parts:
1. **Target Blueprint** — which Blueprint to call
2. **Inputs** — the values you pass to the called Blueprint
3. **Result variable** — where to store the result that comes back
When your Blueprint reaches a Call node during execution, it pauses, runs the called Blueprint with the inputs you provided, captures the result, and then continues.
## Adding a Call node
1. In the [Diagram view](/editor/diagram-view), find an open connection point in your flow — the [element palette](/elements/controlling-the-flow) appears next to it.
2. Click the **Call** icon (the purple grid at the right end) in the palette.
## How Call nodes work
A Call node has three parts:
1. **Target Blueprint** — which Blueprint to call
2. **Inputs** — the values you pass to the called Blueprint
3. **Result variable** — where to store the result that comes back
When your Blueprint reaches a Call node during execution, it pauses, runs the called Blueprint with the inputs you provided, captures the result, and then continues.
## Adding a Call node
1. In the [Diagram view](/editor/diagram-view), find an open connection point in your flow — the [element palette](/elements/controlling-the-flow) appears next to it.
2. Click the **Call** icon (the purple grid at the right end) in the palette.
 3. The placed Call node opens **Select Target Blueprint**. Pick which Blueprint to call.
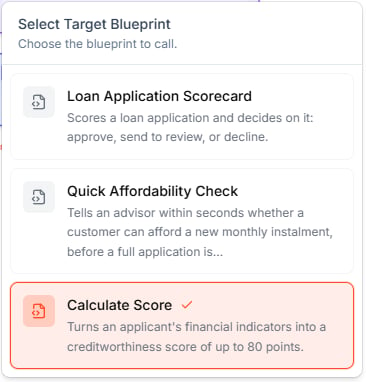 To call a different Blueprint later, click the arrow at the end of the target row in the Call node.
You can only call Blueprints within the same project. The called Blueprint must already exist.
## Mapping inputs
When you call a Blueprint, you map values from your current Blueprint to the inputs that the called Blueprint expects. For each input parameter, you enter an expression — a variable name, calculation, or literal value.
Click the row with the number of inputs to expand the mapping:
To call a different Blueprint later, click the arrow at the end of the target row in the Call node.
You can only call Blueprints within the same project. The called Blueprint must already exist.
## Mapping inputs
When you call a Blueprint, you map values from your current Blueprint to the inputs that the called Blueprint expects. For each input parameter, you enter an expression — a variable name, calculation, or literal value.
Click the row with the number of inputs to expand the mapping:
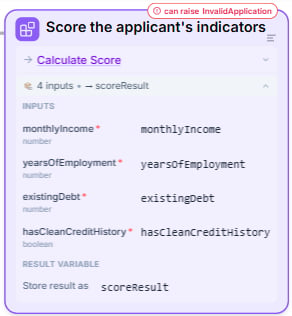 | Target parameter | Expression | What it does |
| :- | :- | :- |
| `monthlyIncome` | `monthlyIncome` | Passes the value of `monthlyIncome` |
| `existingDebt` | `0` | Passes a fixed value |
| `yearsOfEmployment` | `monthsEmployed / 12` | Passes a calculated value |
## Capturing the result
After the called Blueprint finishes, it returns its outputs. You store them in a **result variable** (**Store result as**) so your Blueprint can use them in subsequent elements.
For example, the Loan Application Scorecard calls Calculate Score and stores the result as `scoreResult`. The next step reads one of its outputs with `scoreResult.totalScore`.
## Navigating to called Blueprints
Call nodes show the name of the called Blueprint as a clickable link, both in the [Specification view](/editor/specification-view) document and in the maximized [Diagram view](/editor/diagram-view). Click to preview it, or **Shift+click** to navigate directly to it.
## When to use Call nodes
* **Keeping Blueprints manageable** — if your Blueprint is growing large and hard to follow, split it into smaller pieces connected by Call nodes. Each Blueprint should ideally handle one clear responsibility.
* **Reusing common logic** — build validation, calculations, or formatting once and call from multiple Blueprints
* **Standardizing business rules** — ensure the same logic is used consistently everywhere
* **Team collaboration** — different team members can work on different Blueprints independently, then connect them with Call nodes
## Tips
* Name called Blueprints clearly — the name appears in the Call node, so descriptive names like "Calculate Score" make your flow easier to read
* Keep called Blueprints focused on a single task
* Test called Blueprints independently before calling them
* Avoid deep nesting — while Blueprints can call other Blueprints (and so on), too many levels make the logic hard to follow. Leapter limits call depth to 10 levels.
## What to do next
* **[Controlling the Flow](/elements/controlling-the-flow)** — learn about all the element types
* **[Inputs and Outputs](/editor/inputs-and-outputs)** — define the data contract between Blueprints
* **[Diagram view](/editor/diagram-view)** — see how Call nodes appear in the diagram
This documentation is built and hosted on [Mintlify](https://mintlify.com), a developer documentation platform.
| Target parameter | Expression | What it does |
| :- | :- | :- |
| `monthlyIncome` | `monthlyIncome` | Passes the value of `monthlyIncome` |
| `existingDebt` | `0` | Passes a fixed value |
| `yearsOfEmployment` | `monthsEmployed / 12` | Passes a calculated value |
## Capturing the result
After the called Blueprint finishes, it returns its outputs. You store them in a **result variable** (**Store result as**) so your Blueprint can use them in subsequent elements.
For example, the Loan Application Scorecard calls Calculate Score and stores the result as `scoreResult`. The next step reads one of its outputs with `scoreResult.totalScore`.
## Navigating to called Blueprints
Call nodes show the name of the called Blueprint as a clickable link, both in the [Specification view](/editor/specification-view) document and in the maximized [Diagram view](/editor/diagram-view). Click to preview it, or **Shift+click** to navigate directly to it.
## When to use Call nodes
* **Keeping Blueprints manageable** — if your Blueprint is growing large and hard to follow, split it into smaller pieces connected by Call nodes. Each Blueprint should ideally handle one clear responsibility.
* **Reusing common logic** — build validation, calculations, or formatting once and call from multiple Blueprints
* **Standardizing business rules** — ensure the same logic is used consistently everywhere
* **Team collaboration** — different team members can work on different Blueprints independently, then connect them with Call nodes
## Tips
* Name called Blueprints clearly — the name appears in the Call node, so descriptive names like "Calculate Score" make your flow easier to read
* Keep called Blueprints focused on a single task
* Test called Blueprints independently before calling them
* Avoid deep nesting — while Blueprints can call other Blueprints (and so on), too many levels make the logic hard to follow. Leapter limits call depth to 10 levels.
## What to do next
* **[Controlling the Flow](/elements/controlling-the-flow)** — learn about all the element types
* **[Inputs and Outputs](/editor/inputs-and-outputs)** — define the data contract between Blueprints
* **[Diagram view](/editor/diagram-view)** — see how Call nodes appear in the diagram
This documentation is built and hosted on [Mintlify](https://mintlify.com), a developer documentation platform.