> ## Documentation Index
> Fetch the complete documentation index at: https://docs.leapter.com/llms.txt
> Use this file to discover all available pages before exploring further.
# API Keys
> Create and manage API keys to authenticate your integrations with Leapter.
API keys authenticate external applications that call your Blueprints. You need an API key for any integration that connects to Leapter at runtime — including the [REST API](/executing-blueprints/connect-rest-api), [MCP connections](/executing-blueprints/connect-mcp), and [n8n HTTP workflows](/executing-blueprints/n8n-http).
## Where to find API Keys
Click **API Keys** in the left sidebar of Leapter. This opens the API Keys management page.
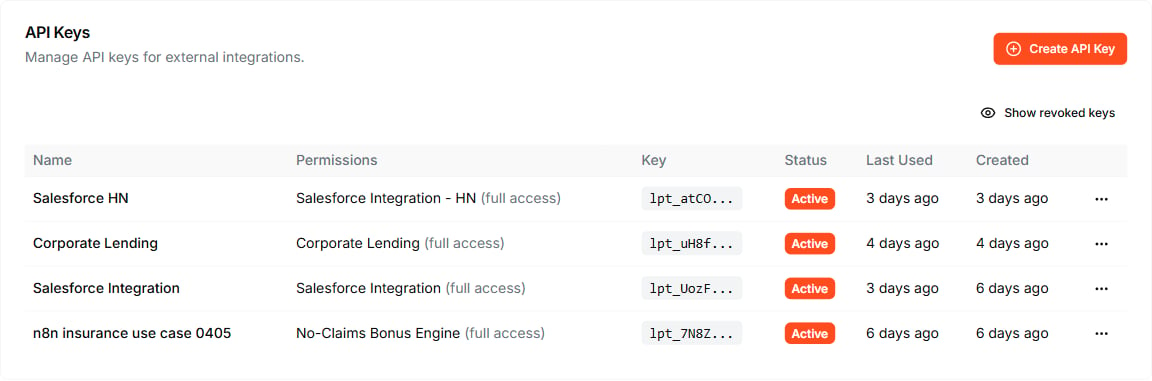 The table shows all your API keys with:
| Column | Description |
| :-------------- | :----------------------------------------------------------- |
| **Name** | The friendly name you gave the key |
| **Permissions** | The projects the key can access |
| **Key** | The key prefix (the full key is only shown once at creation) |
| **Status** | Whether the key is Active or Revoked |
| **Last Used** | When the key was last used to make an API call |
| **Created** | When the key was created |
## Create an API key
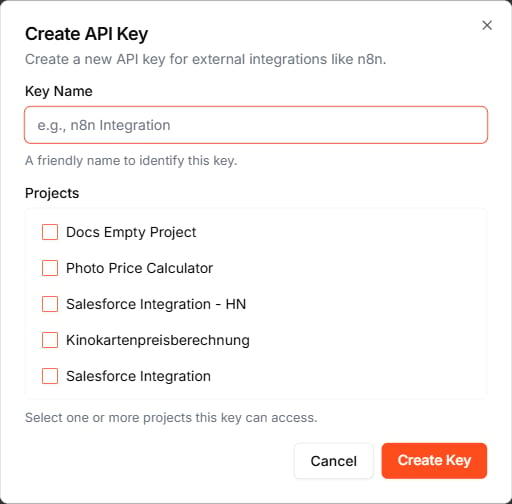
1. Click **Create API Key** in the top right.
2. Enter a **Key Name** — a friendly name to help you identify this key later (e.g., "n8n Integration" or "Production API").
3. Select one or more **Projects** the key should have access to. A single key can grant access to several projects — useful when one integration calls Blueprints from multiple projects.
4. Click **Create Key**.
The table shows all your API keys with:
| Column | Description |
| :-------------- | :----------------------------------------------------------- |
| **Name** | The friendly name you gave the key |
| **Permissions** | The projects the key can access |
| **Key** | The key prefix (the full key is only shown once at creation) |
| **Status** | Whether the key is Active or Revoked |
| **Last Used** | When the key was last used to make an API call |
| **Created** | When the key was created |
## Create an API key
1. Click **Create API Key** in the top right.
2. Enter a **Key Name** — a friendly name to help you identify this key later (e.g., "n8n Integration" or "Production API").
3. Select one or more **Projects** the key should have access to. A single key can grant access to several projects — useful when one integration calls Blueprints from multiple projects.
4. Click **Create Key**.
 After creation, the full API key is displayed. **Copy it immediately** — you will not be able to see the full key again. All keys start with the `lpt_` prefix.
## Edit which projects a key can access
You can change a key's project scope without revoking it. This is useful when you add a new project that an existing integration should also be able to call.
1. Find the key in the table.
2. Click the **three-dot menu** on the right.
3. Select **Edit projects**.
4. Adjust the project selection and confirm.
The key keeps the same value — anything authenticating with it continues to work, with access to the new set of projects.
Store your API key securely. If you lose it, you will need to create a new one. Never share API keys in public repositories or client-side code.
## Use your API key
Pass the API key as a header in all requests to Leapter:
* **Header name:** `X-API-Key`
* **Header value:** your API key
For example, in a curl request that runs a Blueprint:
```bash theme={null}
curl -X POST "https://lab.leapter.com/runtime/api/v1/{appspace}/{project-id}/models/{blueprint-id}/runs" \
-H "Content-Type: application/json" \
-H "X-API-Key: lpt_your-api-key-here" \
-d '{"input1": "value1"}'
```
Each integration page explains where to configure the API key for that specific tool:
* **[MCP connections](/executing-blueprints/connect-mcp)** — set as a header in your MCP client configuration
* **[REST API](/executing-blueprints/connect-rest-api)** — pass as the `X-API-Key` header in HTTP requests
* **[n8n HTTP Workflow](/executing-blueprints/n8n-http)** — configure in the HTTP Request node's authentication settings
* **[n8n MCP Agent Workflow](/executing-blueprints/n8n-mcp-agent)** — set up as a Header Auth credential in the MCP Client node
## Revoke a key
If a key is compromised or no longer needed, you can revoke it:
1. Find the key in the table.
2. Click the **three-dot menu** on the right.
3. Select **Revoke**.
Revoked keys stop working immediately. You can toggle **Show revoked keys** to see previously revoked keys.
## What to do next
* **[AI Protocol (MCP)](/executing-blueprints/connect-mcp)** — connect AI assistants to your Blueprints
* **[Web API (OpenAPI)](/executing-blueprints/connect-rest-api)** — call your Blueprints through a REST API
* **[Deploy & Integrate](/executing-blueprints/introduction)** — explore all deployment options
After creation, the full API key is displayed. **Copy it immediately** — you will not be able to see the full key again. All keys start with the `lpt_` prefix.
## Edit which projects a key can access
You can change a key's project scope without revoking it. This is useful when you add a new project that an existing integration should also be able to call.
1. Find the key in the table.
2. Click the **three-dot menu** on the right.
3. Select **Edit projects**.
4. Adjust the project selection and confirm.
The key keeps the same value — anything authenticating with it continues to work, with access to the new set of projects.
Store your API key securely. If you lose it, you will need to create a new one. Never share API keys in public repositories or client-side code.
## Use your API key
Pass the API key as a header in all requests to Leapter:
* **Header name:** `X-API-Key`
* **Header value:** your API key
For example, in a curl request that runs a Blueprint:
```bash theme={null}
curl -X POST "https://lab.leapter.com/runtime/api/v1/{appspace}/{project-id}/models/{blueprint-id}/runs" \
-H "Content-Type: application/json" \
-H "X-API-Key: lpt_your-api-key-here" \
-d '{"input1": "value1"}'
```
Each integration page explains where to configure the API key for that specific tool:
* **[MCP connections](/executing-blueprints/connect-mcp)** — set as a header in your MCP client configuration
* **[REST API](/executing-blueprints/connect-rest-api)** — pass as the `X-API-Key` header in HTTP requests
* **[n8n HTTP Workflow](/executing-blueprints/n8n-http)** — configure in the HTTP Request node's authentication settings
* **[n8n MCP Agent Workflow](/executing-blueprints/n8n-mcp-agent)** — set up as a Header Auth credential in the MCP Client node
## Revoke a key
If a key is compromised or no longer needed, you can revoke it:
1. Find the key in the table.
2. Click the **three-dot menu** on the right.
3. Select **Revoke**.
Revoked keys stop working immediately. You can toggle **Show revoked keys** to see previously revoked keys.
## What to do next
* **[AI Protocol (MCP)](/executing-blueprints/connect-mcp)** — connect AI assistants to your Blueprints
* **[Web API (OpenAPI)](/executing-blueprints/connect-rest-api)** — call your Blueprints through a REST API
* **[Deploy & Integrate](/executing-blueprints/introduction)** — explore all deployment options