> ## Documentation Index
> Fetch the complete documentation index at: https://docs.leapter.com/llms.txt
> Use this file to discover all available pages before exploring further.
# Calling Other Blueprints
> Reuse logic by calling one Blueprint from another using Call nodes.
Call nodes let you run another Blueprint as part of your flow. They serve two key purposes:
1. **Breaking down complexity** — split large logic into smaller, focused Blueprints instead of ending up with one giant, hard-to-maintain Blueprint. Each piece handles a specific part of the logic and can be understood on its own.
2. **Reusing logic** — build common operations once (like a validation check or a calculation) and call them from multiple Blueprints without duplicating the logic.
Think of it as delegating a task: your Blueprint hands off data to another Blueprint, waits for it to finish, and continues with the result.
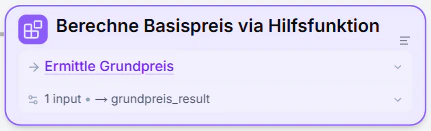 ## How Call nodes work
A Call node has three parts:
1. **Target Blueprint** — which Blueprint to call
2. **Inputs** — the values you pass to the called Blueprint
3. **Result variable** — where to store the result that comes back
When your Blueprint reaches a Call node during execution, it pauses, runs the called Blueprint with the inputs you provided, captures the result, and then continues.
## Adding a Call node
1. In the [Diagram view](/fundamentals/leapter-canvas/diagram-view), find an open connection point in your flow — the [element palette](/fundamentals/leapter-canvas/controlling-the-flow) appears next to it.
2. Click the **Call** icon (the purple grid) in the palette.
## How Call nodes work
A Call node has three parts:
1. **Target Blueprint** — which Blueprint to call
2. **Inputs** — the values you pass to the called Blueprint
3. **Result variable** — where to store the result that comes back
When your Blueprint reaches a Call node during execution, it pauses, runs the called Blueprint with the inputs you provided, captures the result, and then continues.
## Adding a Call node
1. In the [Diagram view](/fundamentals/leapter-canvas/diagram-view), find an open connection point in your flow — the [element palette](/fundamentals/leapter-canvas/controlling-the-flow) appears next to it.
2. Click the **Call** icon (the purple grid) in the palette.
 3. The placed Call node opens a Blueprint selector. Pick which Blueprint to call.
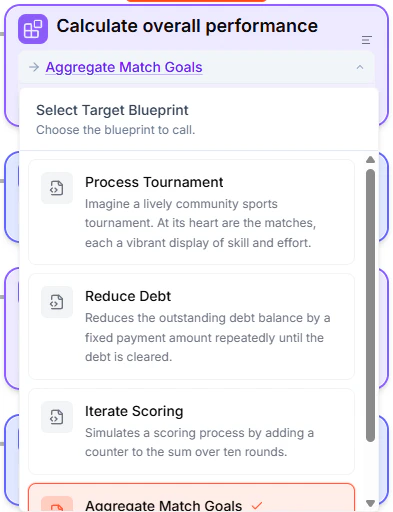 You can only call Blueprints within the same project. The called Blueprint must already exist.
## Mapping inputs
When you call a Blueprint, you map values from your current Blueprint to the inputs that the called Blueprint expects. For each input parameter, you enter an expression — a variable name, calculation, or literal value.
You can only call Blueprints within the same project. The called Blueprint must already exist.
## Mapping inputs
When you call a Blueprint, you map values from your current Blueprint to the inputs that the called Blueprint expects. For each input parameter, you enter an expression — a variable name, calculation, or literal value.
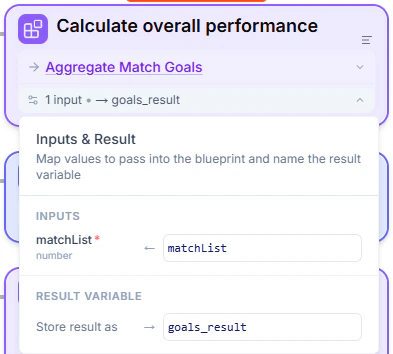 | Target parameter | Expression | What it does |
| :--------------- | :--------------------- | :------------------------------- |
| `amount` | `orderTotal` | Passes the value of `orderTotal` |
| `taxRate` | `0.19` | Passes a fixed value |
| `price` | `basePrice * quantity` | Passes a calculated value |
## Capturing the result
After the called Blueprint finishes, it returns a result. You store this in a **result variable** so your Blueprint can use it in subsequent elements.
For example, if you call a "Calculate Tax" Blueprint, you might store the result in `taxAmount`. You can then use `taxAmount` in any element that comes after the Call node.
## Navigating to called Blueprints
Call nodes show the name of the called Blueprint as a clickable link, both in the [Specification view](/fundamentals/leapter-canvas/specification-view) document and in the maximized [Diagram view](/fundamentals/leapter-canvas/diagram-view). Click to preview it, or **Shift+click** to navigate directly to it.
## When to use Call nodes
* **Keeping Blueprints manageable** — if your Blueprint is growing large and hard to follow, split it into smaller pieces connected by Call nodes. Each Blueprint should ideally handle one clear responsibility.
* **Reusing common logic** — build validation, calculations, or formatting once and call from multiple Blueprints
* **Standardizing business rules** — ensure the same logic is used consistently everywhere
* **Team collaboration** — different team members can work on different Blueprints independently, then connect them with Call nodes
## Tips
* Name called Blueprints clearly — the name appears in the Call node, so descriptive names like "Calculate Tax" make your flow easier to read
* Keep called Blueprints focused on a single task
* Test called Blueprints independently before calling them
* Avoid deep nesting — while Blueprints can call other Blueprints (and so on), too many levels make the logic hard to follow. Leapter limits call depth to 10 levels.
## What to do next
* **[Controlling the Flow](/fundamentals/leapter-canvas/controlling-the-flow)** — learn about all the element types
* **[Inputs and Outputs](/fundamentals/leapter-canvas/inputs-and-outputs)** — define the data contract between Blueprints
* **[Diagram view](/fundamentals/leapter-canvas/diagram-view)** — see how Call nodes appear in the diagram
| Target parameter | Expression | What it does |
| :--------------- | :--------------------- | :------------------------------- |
| `amount` | `orderTotal` | Passes the value of `orderTotal` |
| `taxRate` | `0.19` | Passes a fixed value |
| `price` | `basePrice * quantity` | Passes a calculated value |
## Capturing the result
After the called Blueprint finishes, it returns a result. You store this in a **result variable** so your Blueprint can use it in subsequent elements.
For example, if you call a "Calculate Tax" Blueprint, you might store the result in `taxAmount`. You can then use `taxAmount` in any element that comes after the Call node.
## Navigating to called Blueprints
Call nodes show the name of the called Blueprint as a clickable link, both in the [Specification view](/fundamentals/leapter-canvas/specification-view) document and in the maximized [Diagram view](/fundamentals/leapter-canvas/diagram-view). Click to preview it, or **Shift+click** to navigate directly to it.
## When to use Call nodes
* **Keeping Blueprints manageable** — if your Blueprint is growing large and hard to follow, split it into smaller pieces connected by Call nodes. Each Blueprint should ideally handle one clear responsibility.
* **Reusing common logic** — build validation, calculations, or formatting once and call from multiple Blueprints
* **Standardizing business rules** — ensure the same logic is used consistently everywhere
* **Team collaboration** — different team members can work on different Blueprints independently, then connect them with Call nodes
## Tips
* Name called Blueprints clearly — the name appears in the Call node, so descriptive names like "Calculate Tax" make your flow easier to read
* Keep called Blueprints focused on a single task
* Test called Blueprints independently before calling them
* Avoid deep nesting — while Blueprints can call other Blueprints (and so on), too many levels make the logic hard to follow. Leapter limits call depth to 10 levels.
## What to do next
* **[Controlling the Flow](/fundamentals/leapter-canvas/controlling-the-flow)** — learn about all the element types
* **[Inputs and Outputs](/fundamentals/leapter-canvas/inputs-and-outputs)** — define the data contract between Blueprints
* **[Diagram view](/fundamentals/leapter-canvas/diagram-view)** — see how Call nodes appear in the diagram