> ## Documentation Index
> Fetch the complete documentation index at: https://docs.leapter.com/llms.txt
> Use this file to discover all available pages before exploring further.
# Diagram View
> When you maximize a Blueprint, you see it as an interactive diagram. Build, edit, and debug your logic visually.
When you focus on a single Blueprint inside the [Blueprint Editor](/fundamentals/leapter-canvas/introduction), the editor maximizes that Blueprint and fills the canvas with its diagram. This is the Diagram view — a flowchart of connected elements that represent your business logic.
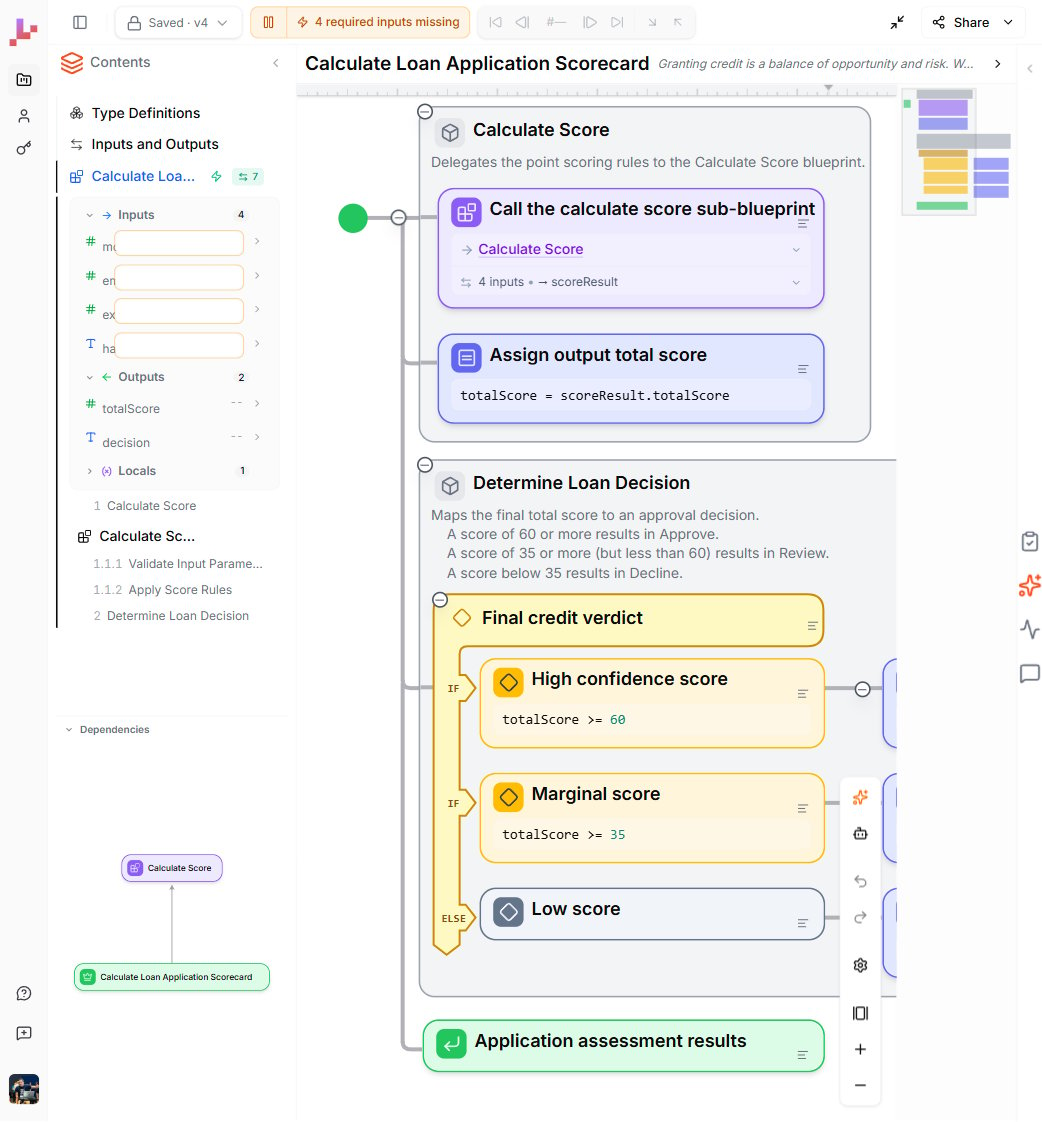 You enter the Diagram view from the [Specification view](/fundamentals/leapter-canvas/specification-view) by:
* Double-clicking a Blueprint's entry in the Contents sidebar
* Clicking the **maximize** icon in a Blueprint's section header
* Clicking a Call node's link to open the called Blueprint
To leave it, click **Minimize** in the top toolbar (or click the **X** on the maximized blueprint pill). You return to the full Specification document with that Blueprint's diagram embedded inline at its section.
## Reading the diagram
Execution flows **top to bottom**. Each element is color-coded by type:
| Color | Element type | Purpose |
| :---------------------- | :------------- | :---------------------------------------------------------------------------- |
| **Green** (circle icon) | Start node | The entry point where execution begins |
| **Yellow** | Decision | Conditional branching — evaluates a condition and routes the flow (IF / ELSE) |
| **Yellow** | Section header | Labeled group with a title and description that explains a part of the logic |
| **Purple** | Assignment | Performs a calculation or sets a variable value |
| **Green** (check icon) | Return | Ends execution successfully and returns output values |
| **Red** | Error | Ends execution with an error condition |
| **Blue** | Call | Calls another Blueprint as a sub-routine |
Sections can be collapsed or expanded by clicking the collapse button in their header.
## The right-edge toolbar
You enter the Diagram view from the [Specification view](/fundamentals/leapter-canvas/specification-view) by:
* Double-clicking a Blueprint's entry in the Contents sidebar
* Clicking the **maximize** icon in a Blueprint's section header
* Clicking a Call node's link to open the called Blueprint
To leave it, click **Minimize** in the top toolbar (or click the **X** on the maximized blueprint pill). You return to the full Specification document with that Blueprint's diagram embedded inline at its section.
## Reading the diagram
Execution flows **top to bottom**. Each element is color-coded by type:
| Color | Element type | Purpose |
| :---------------------- | :------------- | :---------------------------------------------------------------------------- |
| **Green** (circle icon) | Start node | The entry point where execution begins |
| **Yellow** | Decision | Conditional branching — evaluates a condition and routes the flow (IF / ELSE) |
| **Yellow** | Section header | Labeled group with a title and description that explains a part of the logic |
| **Purple** | Assignment | Performs a calculation or sets a variable value |
| **Green** (check icon) | Return | Ends execution successfully and returns output values |
| **Red** | Error | Ends execution with an error condition |
| **Blue** | Call | Calls another Blueprint as a sub-routine |
Sections can be collapsed or expanded by clicking the collapse button in their header.
## The right-edge toolbar
 A vertical toolbar runs along the right edge of the diagram canvas:
| Icon | Action |
| :----------- | :----------------------------------------------------------------------------------------------- |
| Sparkles | Open the [AI prompt](/fundamentals/change-your-blueprint/ai-editing) for the current selection |
| Bot | Open the [Lab Agent](/fundamentals/change-your-blueprint/lab-agent) to build or edit by chatting |
| Undo / Redo | Step through your edit history |
| Settings | Canvas display options |
| Fit to view | Center and fit the diagram in the canvas |
| Plus / Minus | Zoom in and out |
## Building and editing
### Adding elements
You add new elements at **connection points** in the diagram — the small circles between existing elements. Click one to open the element palette, then select the element type you want to add.
The palette offers: Assignment, Decision, Loop (items), Loop (counter), Loop (while), Error, Return, and Call.
For a detailed guide on each element type, see [Controlling the Flow](/fundamentals/leapter-canvas/controlling-the-flow).
### Editing elements
Double-click any element on the diagram to edit its configuration inline:
* **Decision nodes** — edit the condition expression and branch labels
* **Assignment nodes** — edit the calculation or variable assignment
* **Call nodes** — select which Blueprint to call and configure input / output mapping
When you click an element, it becomes selected and a small node toolbar appears with copy, settings, run-from-here, add-element, and delete actions. See [Inline editing](/fundamentals/change-your-blueprint/inline-editing) for details.
### AI editing
Press **Ctrl+I** (or **Cmd+I** on Mac) — or click the sparkles icon in the right-edge toolbar — to open the AI prompt. The scope adapts to your selection: a single node, a section, or the whole Blueprint. See [AI editing](/fundamentals/change-your-blueprint/ai-editing). For a conversation that can build across Blueprints and run your tests, open the [Lab Agent](/fundamentals/change-your-blueprint/lab-agent) (the bot icon in the same toolbar).
## Running and tracing
You can run the maximized Blueprint directly from the diagram. After a run, the execution path is highlighted on the canvas and the **trace controls** in the [top toolbar](/fundamentals/leapter-canvas/introduction#top-toolbar) become active — Step in, Step out, Previous, Next — so you can replay the execution step by step.
While [Live mode](/fundamentals/test-your-blueprint#live-mode) is running, the Blueprint re-runs automatically as you edit, and the Outputs footer at the bottom of the canvas updates continuously.
For detailed instructions, see [Test your Blueprint](/fundamentals/test-your-blueprint).
## What to do next
* **[Specification view](/fundamentals/leapter-canvas/specification-view)** — return to the document view of your whole project
* **[Controlling the Flow](/fundamentals/leapter-canvas/controlling-the-flow)** — learn about each element type in detail
* **[Inline editing](/fundamentals/change-your-blueprint/inline-editing)** — edit nodes directly on the canvas
* **[AI editing](/fundamentals/change-your-blueprint/ai-editing)** — modify your Blueprint with natural language
A vertical toolbar runs along the right edge of the diagram canvas:
| Icon | Action |
| :----------- | :----------------------------------------------------------------------------------------------- |
| Sparkles | Open the [AI prompt](/fundamentals/change-your-blueprint/ai-editing) for the current selection |
| Bot | Open the [Lab Agent](/fundamentals/change-your-blueprint/lab-agent) to build or edit by chatting |
| Undo / Redo | Step through your edit history |
| Settings | Canvas display options |
| Fit to view | Center and fit the diagram in the canvas |
| Plus / Minus | Zoom in and out |
## Building and editing
### Adding elements
You add new elements at **connection points** in the diagram — the small circles between existing elements. Click one to open the element palette, then select the element type you want to add.
The palette offers: Assignment, Decision, Loop (items), Loop (counter), Loop (while), Error, Return, and Call.
For a detailed guide on each element type, see [Controlling the Flow](/fundamentals/leapter-canvas/controlling-the-flow).
### Editing elements
Double-click any element on the diagram to edit its configuration inline:
* **Decision nodes** — edit the condition expression and branch labels
* **Assignment nodes** — edit the calculation or variable assignment
* **Call nodes** — select which Blueprint to call and configure input / output mapping
When you click an element, it becomes selected and a small node toolbar appears with copy, settings, run-from-here, add-element, and delete actions. See [Inline editing](/fundamentals/change-your-blueprint/inline-editing) for details.
### AI editing
Press **Ctrl+I** (or **Cmd+I** on Mac) — or click the sparkles icon in the right-edge toolbar — to open the AI prompt. The scope adapts to your selection: a single node, a section, or the whole Blueprint. See [AI editing](/fundamentals/change-your-blueprint/ai-editing). For a conversation that can build across Blueprints and run your tests, open the [Lab Agent](/fundamentals/change-your-blueprint/lab-agent) (the bot icon in the same toolbar).
## Running and tracing
You can run the maximized Blueprint directly from the diagram. After a run, the execution path is highlighted on the canvas and the **trace controls** in the [top toolbar](/fundamentals/leapter-canvas/introduction#top-toolbar) become active — Step in, Step out, Previous, Next — so you can replay the execution step by step.
While [Live mode](/fundamentals/test-your-blueprint#live-mode) is running, the Blueprint re-runs automatically as you edit, and the Outputs footer at the bottom of the canvas updates continuously.
For detailed instructions, see [Test your Blueprint](/fundamentals/test-your-blueprint).
## What to do next
* **[Specification view](/fundamentals/leapter-canvas/specification-view)** — return to the document view of your whole project
* **[Controlling the Flow](/fundamentals/leapter-canvas/controlling-the-flow)** — learn about each element type in detail
* **[Inline editing](/fundamentals/change-your-blueprint/inline-editing)** — edit nodes directly on the canvas
* **[AI editing](/fundamentals/change-your-blueprint/ai-editing)** — modify your Blueprint with natural language