> ## Documentation Index
> Fetch the complete documentation index at: https://docs.leapter.com/llms.txt
> Use this file to discover all available pages before exploring further.
# Key Concepts
> A guided overview of how Leapter works — from Blueprints and Projects to testing, deploying, and collaborating.
This page walks you through the core ideas behind Leapter, following the journey from creating your first Blueprint to deploying it in production. Each section links to the detailed documentation where you can learn more.
Build a Blueprint with AI, from a template, or from scratch
Modify your logic inline or with AI assistance
Run your Blueprint and verify it works correctly
Connect via API, export to n8n, embed, or generate code
## Blueprints
A **Blueprint** is the central building block in Leapter. It is a visual, executable representation of your business logic — displayed as a flowchart-like diagram that you can run, test, and deploy.
Unlike logic written inside AI prompts, a Blueprint executes **deterministically**: the same inputs always produce the same outputs. This makes Blueprints reliable enough for billing, compliance, risk calculations, and any other scenario where "close enough" is not acceptable.
## Projects
A **[Project](/fundamentals/projects)** is a container that groups related Blueprints together. For example, a **Loan Decisioning** project might contain Blueprints for application scoring, affordability checks, and risk rating.
One Blueprint in a project is the active **Execution Scope** — the entry point that runs when the project is invoked from outside. Its [signature](/fundamentals/leapter-canvas/inputs-and-outputs) is the project's external interface, exposed to the [REST API](/executing-blueprints/connect-rest-api), [MCP](/executing-blueprints/connect-mcp), and other integrations. The other Blueprints in the project are reusable sub-routines that the Execution Scope calls via [Call nodes](/fundamentals/leapter-canvas/calling-other-blueprints).
Projects are also the unit of sharing — when you work in a [team](/fundamentals/teams), all team members can access the team's projects and the Blueprints inside them. To share a project read-only with someone outside your team, generate a [public link](/fundamentals/sharing).
## Creating a Blueprint
Leapter gives you three ways to create a Blueprint:
* **[Generate with AI](/fundamentals/create-blueprint/ai-prompt)** — describe your logic in plain language and Leapter builds the full Blueprint for you. This is the fastest way to get started.
* **[From Example Template](/fundamentals/create-blueprint/from-template)** — start from a pre-built example (like a pricing calculator or greeting logic) and customize it.
* **[From Scratch](/fundamentals/create-blueprint/from-scratch)** — create an empty Blueprint and build every node yourself.
## The Blueprint Editor
The **[Blueprint Editor](/fundamentals/leapter-canvas/introduction)** is a single workspace where you build, inspect, and run every Blueprint in your project. The editor opens directly into a structured document — the **[Specification view](/fundamentals/leapter-canvas/specification-view)** — that shows your project's [Type Definitions](/fundamentals/leapter-canvas/type-definitions), [Inputs and Outputs](/fundamentals/leapter-canvas/inputs-and-outputs), and each Blueprint with its interactive diagram embedded inline.
To focus on a single Blueprint, you maximize it in place and the canvas fills with its **[Diagram view](/fundamentals/leapter-canvas/diagram-view)**. There is no separate "diagram page" — the diagram view is just one mode of the same editor.
## Blueprint Elements
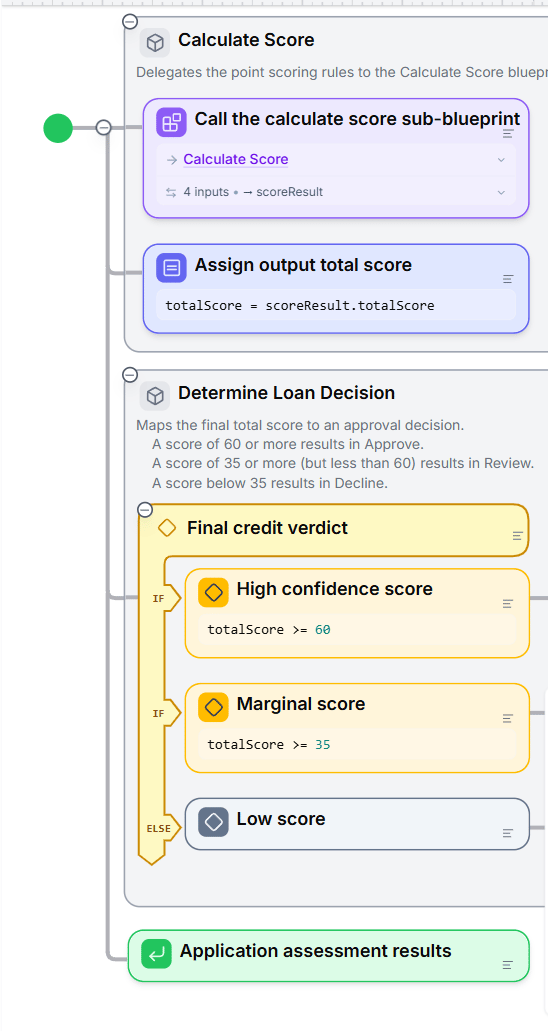
Blueprints are made up of different types of nodes, each with a specific purpose. Here is a real Blueprint showing several element types working together — a Call node and an Assignment node (blue/purple), Decision nodes (yellow), and a Return node (green), organized into group boxes:
 | Element | What it does |
| :------------- | :------------------------------------------------------------------------------------ |
| **Assignment** | Performs calculations and stores results in variables |
| **Decision** | Creates conditional branches — routes the flow based on true/false conditions |
| **Loop** | Repeats a section of logic (over items, with a counter, or while a condition is true) |
| **Return** | Ends execution — either successfully or with an error |
| **Call** | Calls another Blueprint as a sub-routine, enabling modular, reusable logic |
Learn more in [Controlling the Flow](/fundamentals/leapter-canvas/controlling-the-flow) and [Calling Other Blueprints](/fundamentals/leapter-canvas/calling-other-blueprints).
## Editing a Blueprint
Once a Blueprint exists, you can modify it several ways:
* **[Lab Agent](/fundamentals/change-your-blueprint/lab-agent)** — open the **Agent** tab and describe the change in plain language. The agent builds and edits across your Blueprints, runs your tests, and proposes changes for you to approve. This is the main way to make AI-assisted changes.
* **[Inline Editing](/fundamentals/change-your-blueprint/inline-editing)** — click on any node, description, or heading to edit it in place.
* **[AI Editing](/fundamentals/change-your-blueprint/ai-editing)** — select a node, press **Ctrl+I** (**Cmd+I** on Mac), and describe a quick, scoped change in natural language.
* **[Logic & Descriptions](/fundamentals/change-your-blueprint/sync-and-suggestions)** — the descriptions you write and the logic in your diagrams describe the same thing; when they drift apart, ask the Lab Agent to bring them back in line.
## Testing
Before deploying, you can verify your Blueprint works correctly:
* **[Test your Blueprint](/fundamentals/test-your-blueprint)** — run your Blueprint with sample inputs directly in the editor and inspect the outputs step by step.
* **[Test Suites](/fundamentals/test-suites)** — create reusable sets of test cases that you can run repeatedly to catch regressions. You can also auto-generate test cases with AI.
## Deploying
Once tested, you can connect your Blueprint to the outside world through multiple channels:
| Method | Description |
| :----------------------------------------------------------- | :----------------------------------------------------------------------------------------------------- |
| **[AI Protocol (MCP)](/executing-blueprints/connect-mcp)** | Connect AI assistants like Claude Desktop or Cursor to your Blueprint using the Model Context Protocol |
| **[Web API (REST)](/executing-blueprints/connect-rest-api)** | Call your Blueprint through a standard REST API from any application |
| **[n8n Workflows](/executing-blueprints/n8n-http)** | Export ready-made n8n workflows that call or embed your Blueprint logic |
| **[Export as Code](/executing-blueprints/export-code)** | View your Blueprint transpiled to JavaScript or Python |
| **[Embed in Websites](/executing-blueprints/embed)** | Embed an interactive, read-only Blueprint viewer in any webpage |
All API-based integrations require an **[API Key](/fundamentals/api-keys)** for authentication.
After deployment, you can monitor executions in the **Prod Runs** panel inside the editor — see inputs, outputs, and replay any run. Learn more in [Deploy & Integrate](/executing-blueprints/introduction).
## Teams and Collaboration
Leapter supports working together through **[Teams](/fundamentals/teams)**. Create a team, invite members, and share projects. Inside shared projects you can use **[Comments](/fundamentals/collaborating)** to discuss specific nodes, mention team members, and track open feedback. To share a project with someone outside your team, generate a **[public read-only link](/fundamentals/sharing)** — the recipient sees the same Specification view you do, no account required.
## What to do next
Ready to build? Head to **[Generate with AI](/fundamentals/create-blueprint/ai-prompt)** to create your first Blueprint in minutes.
| Element | What it does |
| :------------- | :------------------------------------------------------------------------------------ |
| **Assignment** | Performs calculations and stores results in variables |
| **Decision** | Creates conditional branches — routes the flow based on true/false conditions |
| **Loop** | Repeats a section of logic (over items, with a counter, or while a condition is true) |
| **Return** | Ends execution — either successfully or with an error |
| **Call** | Calls another Blueprint as a sub-routine, enabling modular, reusable logic |
Learn more in [Controlling the Flow](/fundamentals/leapter-canvas/controlling-the-flow) and [Calling Other Blueprints](/fundamentals/leapter-canvas/calling-other-blueprints).
## Editing a Blueprint
Once a Blueprint exists, you can modify it several ways:
* **[Lab Agent](/fundamentals/change-your-blueprint/lab-agent)** — open the **Agent** tab and describe the change in plain language. The agent builds and edits across your Blueprints, runs your tests, and proposes changes for you to approve. This is the main way to make AI-assisted changes.
* **[Inline Editing](/fundamentals/change-your-blueprint/inline-editing)** — click on any node, description, or heading to edit it in place.
* **[AI Editing](/fundamentals/change-your-blueprint/ai-editing)** — select a node, press **Ctrl+I** (**Cmd+I** on Mac), and describe a quick, scoped change in natural language.
* **[Logic & Descriptions](/fundamentals/change-your-blueprint/sync-and-suggestions)** — the descriptions you write and the logic in your diagrams describe the same thing; when they drift apart, ask the Lab Agent to bring them back in line.
## Testing
Before deploying, you can verify your Blueprint works correctly:
* **[Test your Blueprint](/fundamentals/test-your-blueprint)** — run your Blueprint with sample inputs directly in the editor and inspect the outputs step by step.
* **[Test Suites](/fundamentals/test-suites)** — create reusable sets of test cases that you can run repeatedly to catch regressions. You can also auto-generate test cases with AI.
## Deploying
Once tested, you can connect your Blueprint to the outside world through multiple channels:
| Method | Description |
| :----------------------------------------------------------- | :----------------------------------------------------------------------------------------------------- |
| **[AI Protocol (MCP)](/executing-blueprints/connect-mcp)** | Connect AI assistants like Claude Desktop or Cursor to your Blueprint using the Model Context Protocol |
| **[Web API (REST)](/executing-blueprints/connect-rest-api)** | Call your Blueprint through a standard REST API from any application |
| **[n8n Workflows](/executing-blueprints/n8n-http)** | Export ready-made n8n workflows that call or embed your Blueprint logic |
| **[Export as Code](/executing-blueprints/export-code)** | View your Blueprint transpiled to JavaScript or Python |
| **[Embed in Websites](/executing-blueprints/embed)** | Embed an interactive, read-only Blueprint viewer in any webpage |
All API-based integrations require an **[API Key](/fundamentals/api-keys)** for authentication.
After deployment, you can monitor executions in the **Prod Runs** panel inside the editor — see inputs, outputs, and replay any run. Learn more in [Deploy & Integrate](/executing-blueprints/introduction).
## Teams and Collaboration
Leapter supports working together through **[Teams](/fundamentals/teams)**. Create a team, invite members, and share projects. Inside shared projects you can use **[Comments](/fundamentals/collaborating)** to discuss specific nodes, mention team members, and track open feedback. To share a project with someone outside your team, generate a **[public read-only link](/fundamentals/sharing)** — the recipient sees the same Specification view you do, no account required.
## What to do next
Ready to build? Head to **[Generate with AI](/fundamentals/create-blueprint/ai-prompt)** to create your first Blueprint in minutes.