> ## Documentation Index
> Fetch the complete documentation index at: https://docs.leapter.com/llms.txt
> Use this file to discover all available pages before exploring further.
# Test Suites
> Create test suites to systematically validate your Blueprint — manually or auto-generated with AI for maximum coverage.
A test suite is a collection of test cases that validate your Blueprint against different scenarios. Instead of manually running your Blueprint with one set of inputs at a time, test suites let you define multiple scenarios and run them all at once.
## Opening the Tests panel
Click the **Tests** button in the right sidebar of the editor to open the Tests panel.
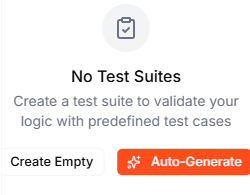 ## Creating a test suite
You have two options:
### Auto-Generate with AI
Click **Auto-Generate** to let the [Lab Agent](/editing/lab-agent) analyze your Blueprint and create a comprehensive test suite automatically. It examines your logic — decision branches, boundary conditions, error paths — and generates test cases that cover each scenario.
For example, for the Loan Application Scorecard, the AI might generate tests like:
* **Strong applicant approved** — high income and a clean credit history produce an Approve decision
* **Approve boundary** — tests the boundary at totalScore = 60
* **Review band** — tests a borderline score of 35 or more but below 60
* **High existing debt penalty** — debt over 10,000 subtracts points
* **Clean credit bonus** — a clean credit history adds points
* **Low income, short employment → Decline** — exercises the decline path
This is the fastest way to get thorough test coverage. The AI typically generates 8–12 test cases that exercise all major paths through your Blueprint.
### Create Empty
Click **Create Empty** to start with a blank test suite, then add test cases manually using the **Add Test** button. This is useful when you want to test very specific scenarios or edge cases.
## Running tests
### Run all tests
Click **Run All** to execute every test case in the suite. The results appear immediately:
## Creating a test suite
You have two options:
### Auto-Generate with AI
Click **Auto-Generate** to let the [Lab Agent](/editing/lab-agent) analyze your Blueprint and create a comprehensive test suite automatically. It examines your logic — decision branches, boundary conditions, error paths — and generates test cases that cover each scenario.
For example, for the Loan Application Scorecard, the AI might generate tests like:
* **Strong applicant approved** — high income and a clean credit history produce an Approve decision
* **Approve boundary** — tests the boundary at totalScore = 60
* **Review band** — tests a borderline score of 35 or more but below 60
* **High existing debt penalty** — debt over 10,000 subtracts points
* **Clean credit bonus** — a clean credit history adds points
* **Low income, short employment → Decline** — exercises the decline path
This is the fastest way to get thorough test coverage. The AI typically generates 8–12 test cases that exercise all major paths through your Blueprint.
### Create Empty
Click **Create Empty** to start with a blank test suite, then add test cases manually using the **Add Test** button. This is useful when you want to test very specific scenarios or edge cases.
## Running tests
### Run all tests
Click **Run All** to execute every test case in the suite. The results appear immediately:
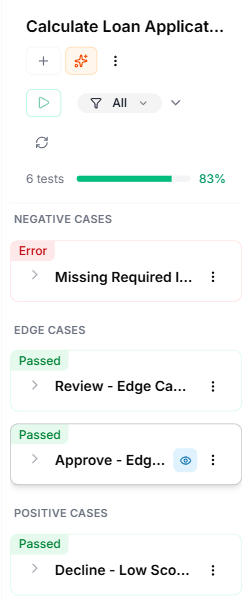 The summary bar shows:
* **Total tests** — how many test cases are in the suite
* **Passed** — tests where the actual output matched the expected output
* **Failed** — tests where the output didn't match
* **Pass rate** — the percentage as a progress bar (e.g., 90%)
### Run individual tests
Each test case has its own **Run** button, so you can re-run a single test without running the entire suite.
## Understanding test results
Each test case shows one of three statuses:
| Status | Meaning |
| :- | :- |
| **Passed** (green) | The actual output matched the expected output |
| **Failed** (red) | The actual output differed from the expected output |
| **Not Run** (gray) | The test hasn't been executed yet |
### Investigating failures
When a test fails, it expands to show the **Output Mismatch** — a table comparing the expected and actual values for each output field that differs.
For example, an "Approve boundary" test might show:
| Field | Expected | Actual |
| :- | :- | :- |
| decision | Approve | Review |
This tells you exactly which output value was wrong and by how much, helping you pinpoint the issue in your logic.
You can also click **Run** on a failed test to execute it individually, then use the [trace controls](/test-and-validate/test-your-blueprint#stepping-through-a-trace) to step through the execution and understand where the logic diverged from your expectations.
## Managing test suites
### Adding tests
Click **Add Test** in the test suite header to add a new test case manually. You define the input values and the expected output values.
### Testing for errors
A test case can expect an [error](/elements/error-handling) instead of outputs — for example, that an application without an income is rejected with `InvalidApplication`. In the test case, set the **Expected Error**: choose the **Error type**, and optionally the **Expected error fields**. The test passes only when the Blueprint raises exactly that error.
### Adding tests with AI
Click the **Auto-Generate** (sparkles) button next to "Add Test" to have the [Lab Agent](/editing/lab-agent) suggest additional test cases based on your Blueprint's logic. This is useful for improving coverage after you've already created a suite.
### Adding tests from production runs
Real cases from production make good regression tests. In [Insights](/release-and-integrate/insights#create-a-test-case-from-a-run), open **Prod Runs** and click **Create test case from run** on a run. Leapter prefills a new test case with the run's inputs and result, and adds it to a test suite of your choice.
### Filtering tests
Use the **Filter** dropdown to show only specific test statuses:
* **All** — shows every test
* **Passed** — shows only passing tests
* **Failed** — shows only failing tests
* **Not Run** — shows tests that haven't been executed
## What to do next
* **[Test your Blueprint](/test-and-validate/test-your-blueprint)** — run individual tests and use Replay to debug
* **[Inline Editing](/editing/inline-editing)** — fix issues found during testing
This documentation is built and hosted on [Mintlify](https://mintlify.com), a developer documentation platform.
The summary bar shows:
* **Total tests** — how many test cases are in the suite
* **Passed** — tests where the actual output matched the expected output
* **Failed** — tests where the output didn't match
* **Pass rate** — the percentage as a progress bar (e.g., 90%)
### Run individual tests
Each test case has its own **Run** button, so you can re-run a single test without running the entire suite.
## Understanding test results
Each test case shows one of three statuses:
| Status | Meaning |
| :- | :- |
| **Passed** (green) | The actual output matched the expected output |
| **Failed** (red) | The actual output differed from the expected output |
| **Not Run** (gray) | The test hasn't been executed yet |
### Investigating failures
When a test fails, it expands to show the **Output Mismatch** — a table comparing the expected and actual values for each output field that differs.
For example, an "Approve boundary" test might show:
| Field | Expected | Actual |
| :- | :- | :- |
| decision | Approve | Review |
This tells you exactly which output value was wrong and by how much, helping you pinpoint the issue in your logic.
You can also click **Run** on a failed test to execute it individually, then use the [trace controls](/test-and-validate/test-your-blueprint#stepping-through-a-trace) to step through the execution and understand where the logic diverged from your expectations.
## Managing test suites
### Adding tests
Click **Add Test** in the test suite header to add a new test case manually. You define the input values and the expected output values.
### Testing for errors
A test case can expect an [error](/elements/error-handling) instead of outputs — for example, that an application without an income is rejected with `InvalidApplication`. In the test case, set the **Expected Error**: choose the **Error type**, and optionally the **Expected error fields**. The test passes only when the Blueprint raises exactly that error.
### Adding tests with AI
Click the **Auto-Generate** (sparkles) button next to "Add Test" to have the [Lab Agent](/editing/lab-agent) suggest additional test cases based on your Blueprint's logic. This is useful for improving coverage after you've already created a suite.
### Adding tests from production runs
Real cases from production make good regression tests. In [Insights](/release-and-integrate/insights#create-a-test-case-from-a-run), open **Prod Runs** and click **Create test case from run** on a run. Leapter prefills a new test case with the run's inputs and result, and adds it to a test suite of your choice.
### Filtering tests
Use the **Filter** dropdown to show only specific test statuses:
* **All** — shows every test
* **Passed** — shows only passing tests
* **Failed** — shows only failing tests
* **Not Run** — shows tests that haven't been executed
## What to do next
* **[Test your Blueprint](/test-and-validate/test-your-blueprint)** — run individual tests and use Replay to debug
* **[Inline Editing](/editing/inline-editing)** — fix issues found during testing
This documentation is built and hosted on [Mintlify](https://mintlify.com), a developer documentation platform.