Element of the Blueprint
The blueprint wires different elements together and those element eighter control the flow of action or execute actions. The Control flow elements are the building blocks that define the logic and execution path of your Leapter Blueprints. When you add a control flow element to your Leapter Blueprint you will get a palette allowing you to pick one element.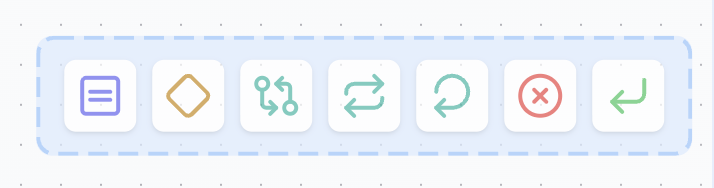
- Make decisions based on conditions (Decision)
- Repeat operations (Loops)
- Control loop execution (Continue, Exit Loop)
- Return results or handle errors (Return)
Action Elements
Assignment
When would you use this? Use the Assignment element to store information — like saving a customer’s name, calculating a total price, or keeping track of how many items you’ve processed. Think of it as your Blueprint’s memory. The Assignment element helps you store and work with information in your Blueprint. It’s the blue block that lets you save numbers, text, or calculated results that your Blueprint will need later.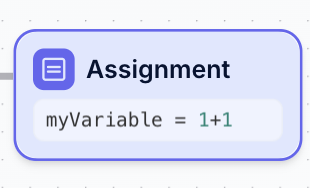
Structure
An Assignment element consists of two editable parts:-
Variable Name (left side of the
=sign)- The name of the variable you want to create or update
- Must be a valid identifier (letters, numbers, underscores)
- Example:
myVariable,totalPrice,counter_1
-
Expression (right side of the
=sign)- The value or calculation to assign to the variable
- Can be a literal value, mathematical expression, or reference to other variables
- Supports standard mathematical operators:
+,-,*,/ - Example:
1+1,price * 0.19,"Hello World"
Use Cases
Assignment elements are essential for:- Storing input data: Save values passed into your blueprint
- Performing calculations: Compute mathematical operations
- Building strings: Concatenate or format text
- Updating counters: Increment or modify loop variables
- Intermediate results: Store temporary values for later use
Example
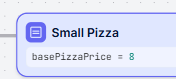
basePizzaPrice and sets it to 8.
Best Practices
- Use descriptive variable names that clearly indicate their purpose
- Keep expressions simple and readable
- Break complex calculations into multiple assignment steps
- Initialize variables before using them in conditions or loops
Control Elements Elements
Decision
When would you use this? Use the Decision element when your Blueprint needs to choose between different actions — like sending a reminder if a payment is late, or continuing if it’s already paid. It’s how you teach your Blueprint to make smart choices. The Decision element helps your Blueprint make choices based on the rules you set. It’s the yellow/orange block that looks at your data and decides which path to follow next.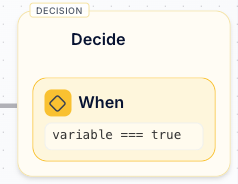
Structure
A Decision element consists of two main parts:- Element Header - Shows “Decide” to identify this as a decision point
-
Condition Block - The “When” section containing:
-
Variable or Expression (left side of the comparison)
- Can be a variable name, input value, or calculated result
- Example:
variable,totalPrice,userAge
-
Comparison Operator (middle)
- Supports standard comparison operators:
===,!==,>,<,>=,<= - Example:
===(equals),>(greater than),<(less than)
- Supports standard comparison operators:
-
Comparison Value (right side)
- The value to compare against
- Can be a literal value, variable, or expression
- Example:
true,100,"approved",minAge
-
Variable or Expression (left side of the comparison)
Multiple Conditions
Decision elements require at least one condition block, but you can create multiple condition blocks to handle complex logic scenarios. Each condition is evaluated in order from top to bottom. Adding Additional Conditions To add more conditions, click the “Create a condition” button that appears below your existing conditions: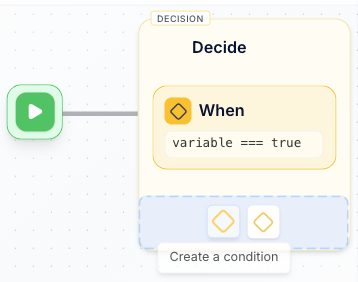
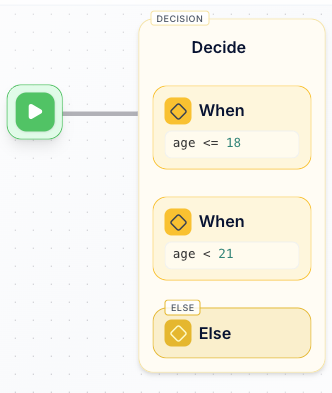
- First condition:
age <= 18- Handles minors (18 and under) - Second condition:
age < 21- Handles young adults (ages 19-20) - Else condition: Handles adults (21 and over)
age < 21 captures ages 19-20 because anyone 18 or under is already handled by the first condition.
Sequential Evaluation: Conditions are evaluated from top to bottom, and execution stops at the first true condition. For example, if the age is 15, only the first condition age <= 18 is checked and found true - the second condition age < 21 is never evaluated.
Evaluation Order
When multiple conditions exist, Leapter evaluates them in this order:- First condition is checked first
- Second condition is checked only if the first is false
- Additional conditions are checked in sequence
- Else condition executes only if all previous conditions are false
Use Cases
Decision elements are essential for:- Conditional logic: Execute different actions based on data values
- Validation: Check if inputs meet certain criteria
- Business rules: Implement if-then logic for business processes
- Error handling: Route to different paths based on success or failure
- User permissions: Grant or deny access based on user roles
Flow Control
Decision elements create two possible execution paths:- True path: Executes when the condition evaluates to true
- False/Else path: Executes when the condition evaluates to false
Example
Using the age-based decision shown above, the Blueprint will execute different paths based on the age value: For age = 15:- First condition
age <= 18evaluates to true - Execution follows the path for minors (18 and under)
- Remaining conditions are not checked
- First condition
age <= 18evaluates to false - Second condition
age < 21evaluates to true - Execution follows the path for young adults (19-20)
- First condition
age <= 18evaluates to false - Second condition
age < 21evaluates to false - Execution follows the Else path for adults (21 and over)
Best Practices
- Use clear, descriptive variable names in your conditions
- Choose appropriate comparison operators for your data types
- Consider all possible values when designing your decision logic
- Test both true and false paths to ensure correct behavior
- Keep conditions simple and readable
Loop over Items
When would you use this? Use the Loop over Items element when you have a list of things and need to do something with each one — like calculating the total from a list of prices, or sending an email to each customer in your database. The Loop over Items element helps you work with lists of information. It’s the teal/green block that takes each item from your list and does something with it, one at a time.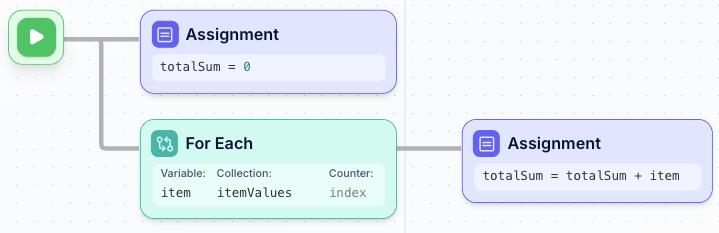
Structure
A Loop over Items element consists of three configurable parts:-
Variable - The name for the current item in each iteration
- This variable holds the value of the current item being processed
- Example:
item,product,user
-
Collection - The list or array you want to iterate through
- Can be a variable containing an array, or a direct reference to a collection
- Example:
itemValues,productList,customers
-
Counter (optional) - A variable that tracks the current iteration number
- Starts at 0 for the first item, increments by 1 for each iteration
- Useful when you need to know the position of the current item
- Example:
index,position,counter
How It Works
The loop executes the elements inside it once for each item in the collection:- First iteration: Variable gets the first item, counter = 0
- Second iteration: Variable gets the second item, counter = 1
- Continues: Until all items in the collection have been processed
- After loop: Execution continues to the next element after the loop
Use Cases
Loop over Items is essential for:- Calculating totals: Sum values from a list of numbers
- Data transformation: Convert or modify each item in a collection
- Filtering: Process items based on certain criteria
- Batch processing: Perform the same operation on multiple items
- Report generation: Aggregate data from multiple records
Example
In the example above, the Blueprint calculates the total sum of all values initemValues:
- Initialize:
totalSum = 0 - Loop setup:
- Variable:
item(holds current value) - Collection:
itemValues(the array to process) - Counter:
index(tracks position)
- Variable:
- Loop body:
totalSum = totalSum + item(adds current item to running total)
itemValues contains [5, 10, 15], the loop executes:
- Iteration 1:
item = 5,totalSum = 0 + 5 = 5 - Iteration 2:
item = 10,totalSum = 5 + 10 = 15 - Iteration 3:
item = 15,totalSum = 15 + 15 = 30
totalSum = 30
You may have also noticed that the variable totalSum had to be initialized to be ready for usage in the loop.
Best Practices
- Use descriptive names for your loop variable that match the data type (e.g.,
userfor user objects) - Initialize accumulator variables (like
totalSum) before the loop - Keep the loop body simple and focused on a single task
- Use the counter variable when you need to track position or create indexed operations
- Ensure your collection variable actually contains an array or list
Loop with Counter
When would you use this? Use the Loop with Counter element when you need to repeat a task a specific number of times — like “send 5 reminder emails” or “process the first 10 orders.” It’s perfect when you know exactly how many times something should happen. The Loop with Counter element repeats a task a certain number of times. It’s the teal/green block that counts for you — just tell it how many times to repeat, and it handles the rest.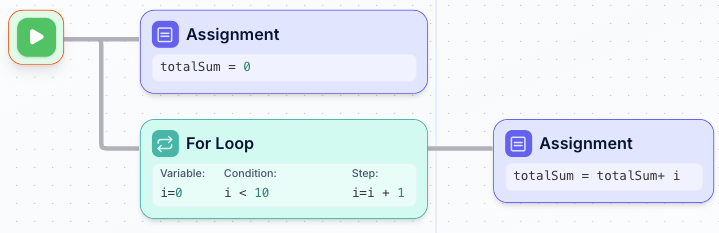
Structure
A Loop with Counter element consists of three configurable parts:-
Variable - The counter variable with its starting value
- Defines the loop counter and its initial value
- Example:
i=0,counter=1,index=0
-
Condition - The condition that must be true for the loop to continue
- Evaluated before each iteration
- When false, the loop stops and execution continues after the loop
- Example:
i < 10,counter <= 100,index < items.length
-
Step - How the counter variable changes after each iteration
- Usually increments or decrements the counter
- Executed at the end of each iteration
- Example:
i=i + 1,counter=counter + 2,index=index - 1
How It Works
The loop follows this execution pattern:- Initialize: Set the counter variable to its starting value
- Check condition: If condition is false, exit the loop
- Execute loop body: Run all elements inside the loop
- Update counter: Apply the step operation
- Repeat: Go back to step 2
Use Cases
Loop with Counter is essential for:- Counting operations: Repeat something a specific number of times
- Mathematical calculations: Generate sequences, calculate series
- Index-based processing: Access array elements by position
- Batch operations: Process data in chunks or batches
- Time-based loops: Repeat actions for specific durations
Example
In the example above, the Blueprint calculates the sum of numbers from 0 to 9:- Initialize:
totalSum = 0(prepare accumulator) - Loop setup:
- Variable:
i=0(starts counting from 0) - Condition:
i < 10(continues while i is less than 10) - Step:
i=i + 1(increments i by 1 each iteration)
- Variable:
- Loop body:
totalSum = totalSum + i(adds current counter to total)
- Iteration 1:
i=0,totalSum = 0 + 0 = 0, theni=1 - Iteration 2:
i=1,totalSum = 0 + 1 = 1, theni=2 - Iteration 3:
i=2,totalSum = 1 + 2 = 3, theni=3 - …continues…
- Iteration 10:
i=9,totalSum = 36 + 9 = 45, theni=10 - Exit:
i=10, condition10 < 10is false, loop ends
totalSum = 45 (sum of 0+1+2+3+4+5+6+7+8+9)
Best Practices
- Initialize accumulator variables (like
totalSum) before the loop - Use clear, meaningful names for your counter variable
- Ensure your condition will eventually become false to avoid infinite loops
- Keep the step operation simple (usually increment by 1)
- Double-check your starting value and condition to get the correct number of iterations
- Use Loop with Counter when you know exactly how many times to repeat something
Loop with While Condition
When would you use this? Use the Loop with While Condition element when you need to keep doing something until a goal is reached — like “keep making payments until the debt is zero” or “keep trying to connect until successful.” It’s perfect when you don’t know how many tries it will take. The Loop with While Condition element keeps repeating a task until you achieve your goal. It’s the teal/green block that checks your progress and automatically stops when you’re done.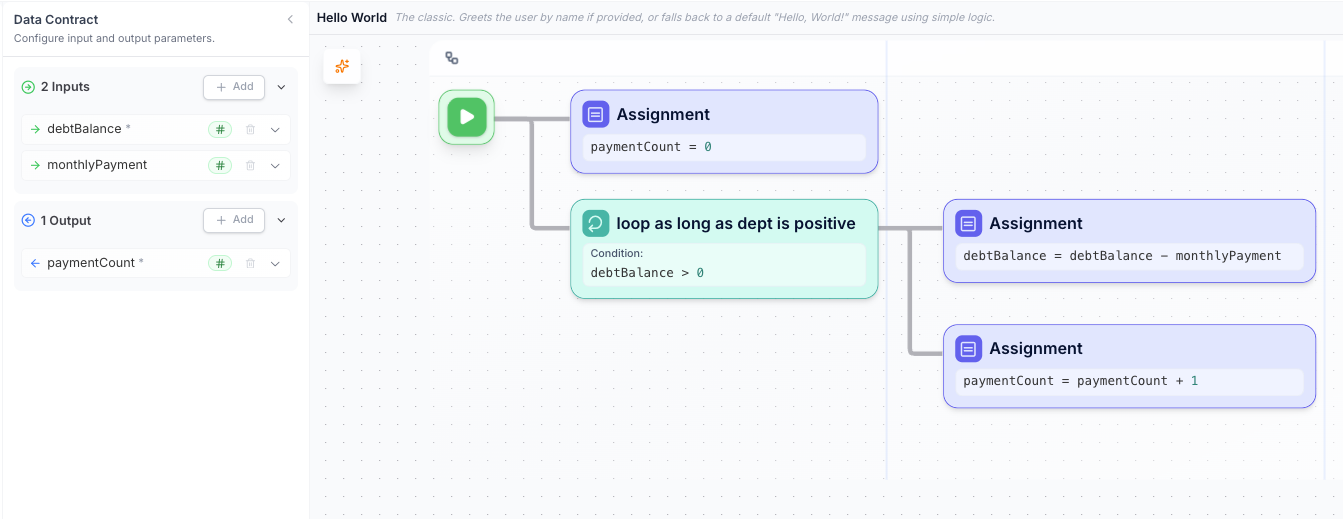
Structure
A Loop with While Condition element consists of one main component:- Condition - The condition that must be true for the loop to continue
- Evaluated before each iteration
- When false, the loop stops and execution continues after the loop
- Can reference variables that change during loop execution
- Example:
debtBalance > 0,attempts < maxRetries,userInput !== "quit"
How It Works
The loop follows this execution pattern:- Check condition: If condition is false, skip the loop entirely
- Execute loop body: Run all elements inside the loop
- Repeat: Go back to step 1
Use Cases
Loop with While Condition is essential for:- Unknown iteration count: When you don’t know how many times to repeat
- Condition-based termination: Stop when a business condition is met
- Processing until completion: Continue until a task is finished
- User interaction loops: Repeat until user provides valid input
- Financial calculations: Process payments, compound interest, etc.
- Retry mechanisms: Attempt operations until successful
Example
In the example above, the Blueprint calculates how many monthly payments are needed to pay off a debt: Inputs:debtBalance: The initial debt amountmonthlyPayment: How much is paid each month
- Initialize:
paymentCount = 0(track number of payments) - While condition:
debtBalance > 0(continue while debt remains) - Loop body:
debtBalance = debtBalance - monthlyPayment(reduce debt)paymentCount = paymentCount + 1(count the payment)
- Iteration 1:
debtBalance = 5000 > 0(true) →debtBalance = 4700,paymentCount = 1 - Iteration 2:
debtBalance = 4700 > 0(true) →debtBalance = 4400,paymentCount = 2 - …continues…
- Iteration 17:
debtBalance = 200 > 0(true) →debtBalance = -100,paymentCount = 17 - Check:
debtBalance = -100 > 0(false) → loop ends
paymentCount = 17 payments needed to pay off the debt
Key Differences from Other Loops
- vs Loop with Counter: While loops don’t require knowing the iteration count upfront
- vs Loop over Items: While loops don’t iterate through collections, they repeat based on conditions
- Unique benefit: Naturally handles dynamic stopping conditions that depend on calculations performed during execution
Best Practices
- Ensure the condition will eventually become false to avoid infinite loops
- Initialize all variables used in the condition before the loop
- Modify variables inside the loop that affect the condition
- Use meaningful condition expressions that clearly indicate the loop’s purpose
- Consider edge cases where the condition might be false initially
- Add safeguards (like maximum iteration counts) for critical applications
Continue
When would you use this? Use the Continue element when you want to skip the rest of the current loop iteration and jump directly to the next one — like skipping invalid data items or moving to the next customer when certain conditions aren’t met. The Continue element lets you skip ahead to the next iteration of your loop without executing the remaining elements in the current iteration. It’s only available when you’re inside a loop element.
Structure
The Continue element is simple and has no configurable parts:- It immediately stops processing the current iteration
- Jumps to the next iteration of the containing loop
- Only appears in the element palette when you’re inside a loop
- Displays as a green block with “Continue Loop” label
How It Works
When a Continue element is executed:- Skip remaining elements: Any elements after Continue in the current iteration are not executed
- Move to next iteration: The loop immediately moves to the next item or iteration
- Loop continues: The loop keeps running until its normal end condition is met
Use Cases
Continue is essential for:- Data filtering: Skip invalid or unwanted items in a collection
- Conditional processing: Only process items that meet certain criteria
- Error handling: Skip problematic items without stopping the entire loop
- Optimization: Avoid unnecessary processing for certain items
- Business rules: Skip items that don’t meet business conditions
Example
In a customer processing loop, you might use Continue to skip inactive customers:Best Practices
- Use Continue early in the loop when you identify items to skip
- Make Continue conditions clear and well-documented
- Consider if filtering data before the loop might be more efficient
- Ensure your loop will still terminate properly with Continue statements
Exit Loop
When would you use this? Use the Exit Loop element when you need to completely stop a loop before it naturally ends — like stopping a search when you find what you’re looking for, or stopping processing when you hit an error condition. The Exit Loop element immediately terminates the current loop and continues execution after the loop. It’s only available when you’re inside a loop element.
Structure
The Exit Loop element is simple and has no configurable parts:- It immediately stops the entire loop
- Execution continues with the first element after the loop
- Only appears in the element palette when you’re inside a loop
- Displays as a green block with “Exit Loop” label
How It Works
When an Exit Loop element is executed:- Immediate termination: The loop stops completely, regardless of remaining items or iterations
- Skip remaining items: Any unprocessed items in the collection are skipped
- Continue after loop: Execution resumes with the next element after the loop
Use Cases
Exit Loop is essential for:- Search operations: Stop when you find the target item
- Early completion: Exit when you’ve accomplished your goal
- Error conditions: Stop processing when something goes wrong
- Performance optimization: Avoid unnecessary processing
- Business rules: Stop when certain thresholds or conditions are met
Example
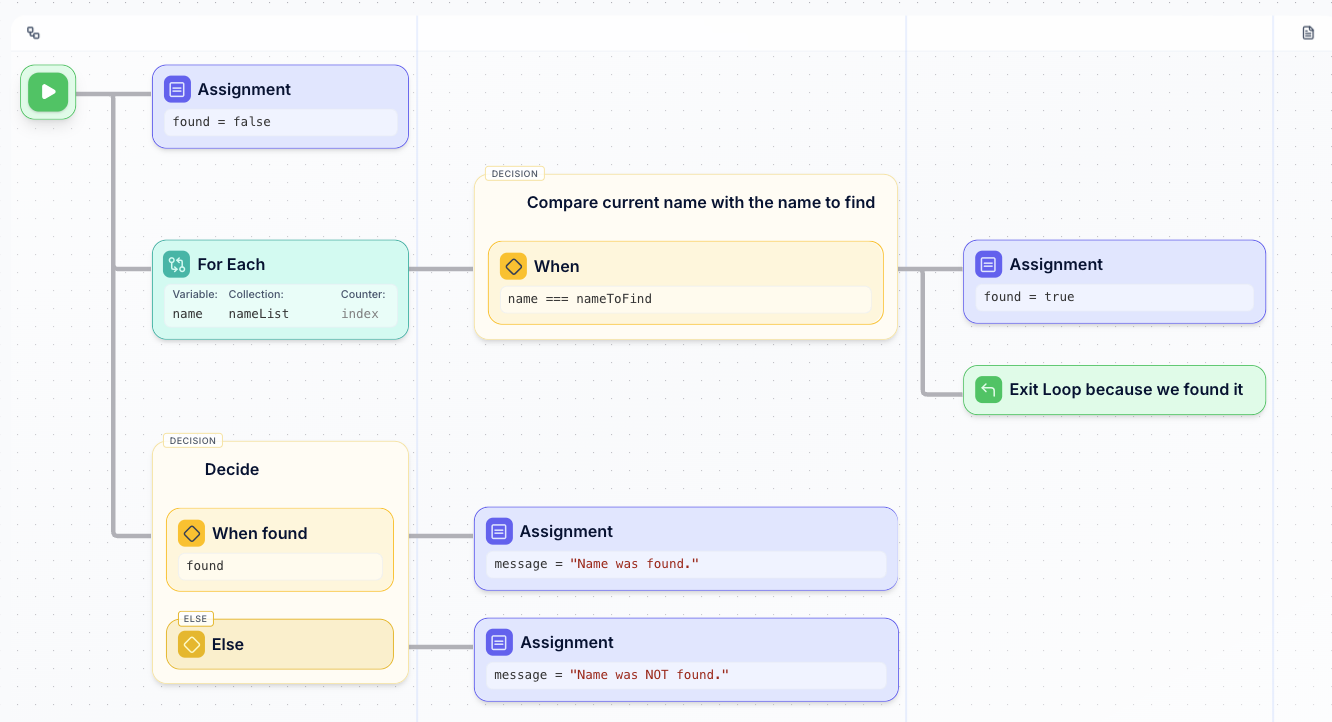
- Initialize:
found = false(track search status) - Loop over nameList: Check each name in the collection
- For each name: Check if
name === nameToFind - If match found:
- Set
found = true(mark as found) - Exit Loop (stop searching immediately)
- Set
- After loop: Check
foundvariable to determine next action- If
found: Setmessage = "Name was found." - If not
found: Setmessage = "Name was NOT found."
- If
Key Differences from Continue
- Continue: Skips current iteration, moves to next one
- Exit Loop: Stops the entire loop, moves to after the loop
- Continue: Loop keeps running
- Exit Loop: Loop terminates completely
Best Practices
- Use Exit Loop when you’ve found what you’re looking for
- Combine with assignments to capture results before exiting
- Document why the loop exits early for future maintainers
- Consider if the exit condition could be built into the loop condition instead
Return with Error
When would you use this? Use the Return with Error element when something goes wrong and your Blueprint can’t continue — like when someone enters invalid information, or a required file is missing. It’s like putting up a “STOP” sign with an explanation. The Return with Error element stops your Blueprint and shows an error message when something isn’t right. It’s the red block that protects your Blueprint from bad data or impossible situations.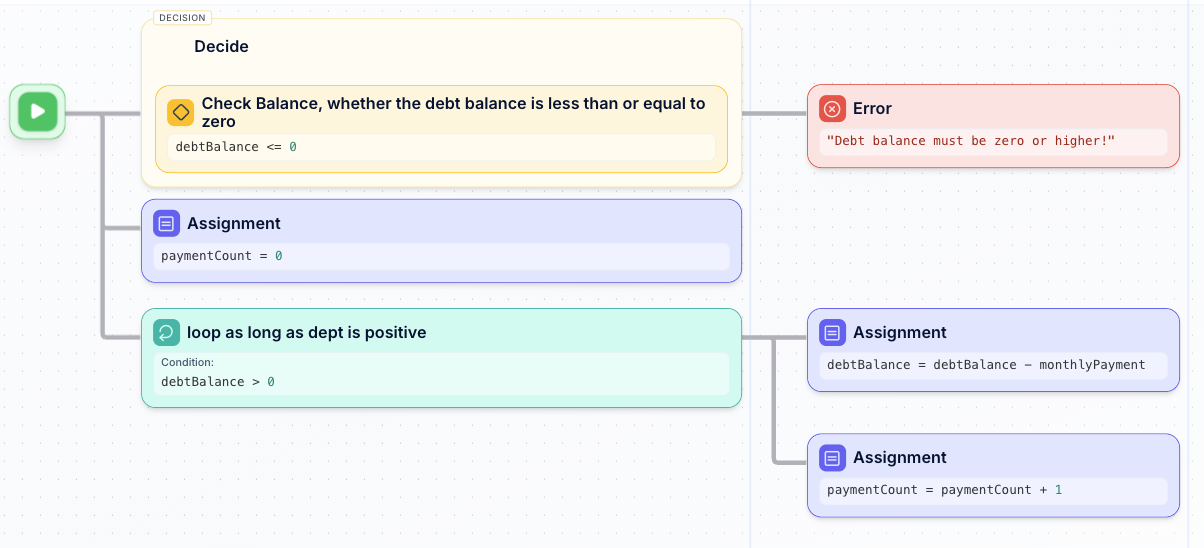
Structure
A Return with Error element consists of one main component:- Error Message - The message returned to explain what went wrong
- Can be a literal string or a variable containing the error description
- Should be clear and actionable for the caller
- Example:
"Debt balance must be zero or higher!","Invalid user credentials","Required field missing"
How It Works
When a Return with Error element is executed:- Immediate termination: Blueprint execution stops instantly
- Error propagation: The error message is returned to the caller
- No further processing: Any elements after the error return are not executed
- Exception handling: The calling system can catch and handle the error appropriately
Use Cases
Return with Error is essential for:- Input validation: Reject invalid or missing data
- Business rule enforcement: Stop processing when rules are violated
- Security checks: Prevent unauthorized access or operations
- Data integrity: Ensure data meets required standards
- Resource validation: Check if required resources are available
- Precondition checking: Verify conditions before expensive operations
Example
In the example above, the Blueprint validates the debt balance before processing payments: Validation Logic:- Decision: Check if
debtBalance <= 0 - If true (invalid): Return error “Debt balance must be zero or higher!”
- If false (valid): Continue with normal processing (initialize
paymentCount = 0and proceed with the payment loop)
- Negative debt balances are rejected (doesn’t make business sense)
- Zero debt balances are rejected (no payments needed)
- Only positive debt balances proceed to payment calculation
- Input:
debtBalance = -1000→ Error: “Debt balance must be zero or higher!” - Input:
debtBalance = 0→ Error: “Debt balance must be zero or higher!” - Input:
debtBalance = 5000→ Success: Proceeds to calculate payments
When to Use Error Returns
Use Return with Error when:- Input data is invalid and cannot be processed
- Business rules are violated and processing should stop
- Security requirements are not met
- System resources are unavailable or insufficient
- Preconditions fail and continuing would cause issues
Error Handling Best Practices
- Clear error messages: Explain what’s wrong and how to fix it
- Early validation: Check for errors before expensive processing
- Consistent error format: Use standardized error message structures
- Appropriate error placement: Position error returns where validation makes sense
- Document error conditions: Clearly specify when errors occur in your Blueprint documentation
- Test error paths: Ensure error conditions are properly handled
Key Benefits
- Fail fast: Stop processing immediately when problems are detected
- Clear feedback: Provide specific error messages to help users understand issues
- Resource efficiency: Avoid wasting processing on invalid data
- System reliability: Prevent downstream errors by catching issues early
- User experience: Give users actionable feedback instead of silent failures
Return with Success
When would you use this? Use the Return with Success element when your Blueprint finds what it’s looking for and can stop early — like finding a customer in a database and not needing to search the rest, or reaching a sales target and celebrating the achievement. The Return with Success element stops your Blueprint with good news when the job is done. It’s the green block that says “mission accomplished” and saves time by not doing unnecessary work.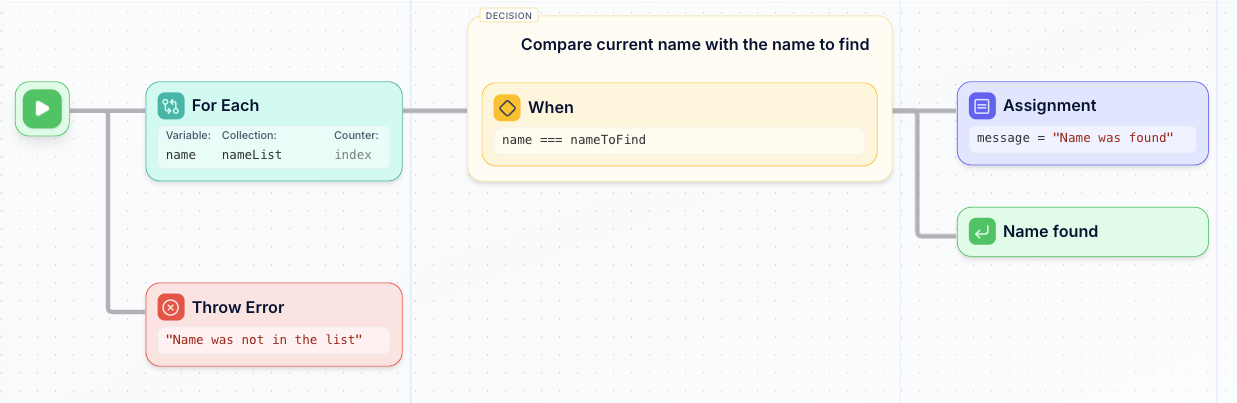
Structure
A Return with Success element consists of one main component:- Success Message/Value - The result returned to indicate successful completion
- Can be a literal string, variable, or calculated result
- Should clearly indicate what was accomplished
- Example:
"Name found",foundUser,calculationResult,"Task completed successfully"
How It Works
When a Return with Success element is executed:- Immediate termination: Blueprint execution stops instantly
- Success propagation: The success result is returned to the caller
- No further processing: Any elements after the success return are not executed
- Early completion: Achieves efficiency by stopping when the goal is reached
Use Cases
Return with Success is essential for:- Search operations: Stop searching once the item is found
- Goal achievement: Complete when target is reached
- Early validation: Return success when conditions are met
- Performance optimization: Avoid unnecessary processing
- Cache hits: Return cached results immediately
- Fast path execution: Skip expensive operations when possible
Example
In the example above, the Blueprint searches for a specific name in a list: Search Logic:- Loop setup: Iterate through
nameListwith variablenameand counterindex - For each name: Check if
name === nameToFind - If match found:
- Set
message = "Name was found" - Return with Success: “Name found” (terminates immediately)
- Set
- If loop completes without finding the name:
- Return with Error: “Name was not in the list”
- Without early return: Would check all 1000 names even if target is the 2nd name
- With early return: Stops immediately when name is found, saving processing time
- Search for “Alice” in
["Bob", "Alice", "Charlie"]→ Success after 2 iterations: “Name found” - Search for “David” in
["Bob", "Alice", "Charlie"]→ Error after 3 iterations: “Name was not in the list”
Benefits of Early Success Returns
- Performance: Stop processing as soon as the goal is achieved
- Resource efficiency: Avoid unnecessary computation or data processing
- Clear outcomes: Provide immediate feedback when successful
- Simplified logic: Clean separation between success and failure paths
- User experience: Faster response times for successful operations
When to Use Success Returns
Use Return with Success when:- Search operations: Finding items in collections
- Threshold checking: Meeting minimum requirements
- Validation passes: All checks are successful
- Goal achievement: Reaching targets or quotas
- Fast path conditions: Optimized scenarios are met
- Cache hits: Cached data is available and valid
Success Return Best Practices
- Meaningful results: Return useful information, not just “success”
- Consistent format: Use standardized success response structures
- Strategic placement: Position returns where early completion makes sense
- Clear success criteria: Define exactly when to return success
- Document success paths: Specify what triggers successful completion
- Include relevant data: Return the found item or calculated result, not just a status message
Key Differences from Error Returns
- Purpose: Success returns indicate goal achievement; error returns indicate problems
- Timing: Success returns often occur mid-processing; error returns typically occur early (validation)
- Color coding: Green for success, red for errors
- Follow-up: Success returns complete the task; error returns require user action
Adding Control Elements
To add a control element to your blueprint:- Click the Add button or use the element palette
- Select the desired control element from the available options
- Configure the element’s properties
- Connect it to other elements in your flow
Best Practices
- Use clear, descriptive names for your conditions and variables
- Keep decision branches simple and easy to understand
- Consider edge cases when setting up error handling
- Document complex logic with comments or annotations