Release a Lab project, deploy it to a runtime cluster, create an evaluation key, and call a blueprint with curl.
In this tutorial you take a project from the Lab to a runtime cluster and call it from a terminal. You create a release, deploy it to an environment, create an evaluation key in the Admin UI, and run a blueprint with curl. Afterwards, any system that can send an HTTP request can use your blueprint.The tutorial uses the Pizza Pricing Calculator project. Its blueprint Pizza Pricing calculates the price of a pizza from its size, toppings, crust and day of the week. You can follow the same steps with your own project: the names on your screen will be different.
A Lab account and a project with at least one public blueprint that was never deployed. The Pizza Pricing Calculator project comes from the Leapter examples.
The right to deploy to an environment of your runtime cluster, and to create evaluation keys there. Who may do what explains the rights.
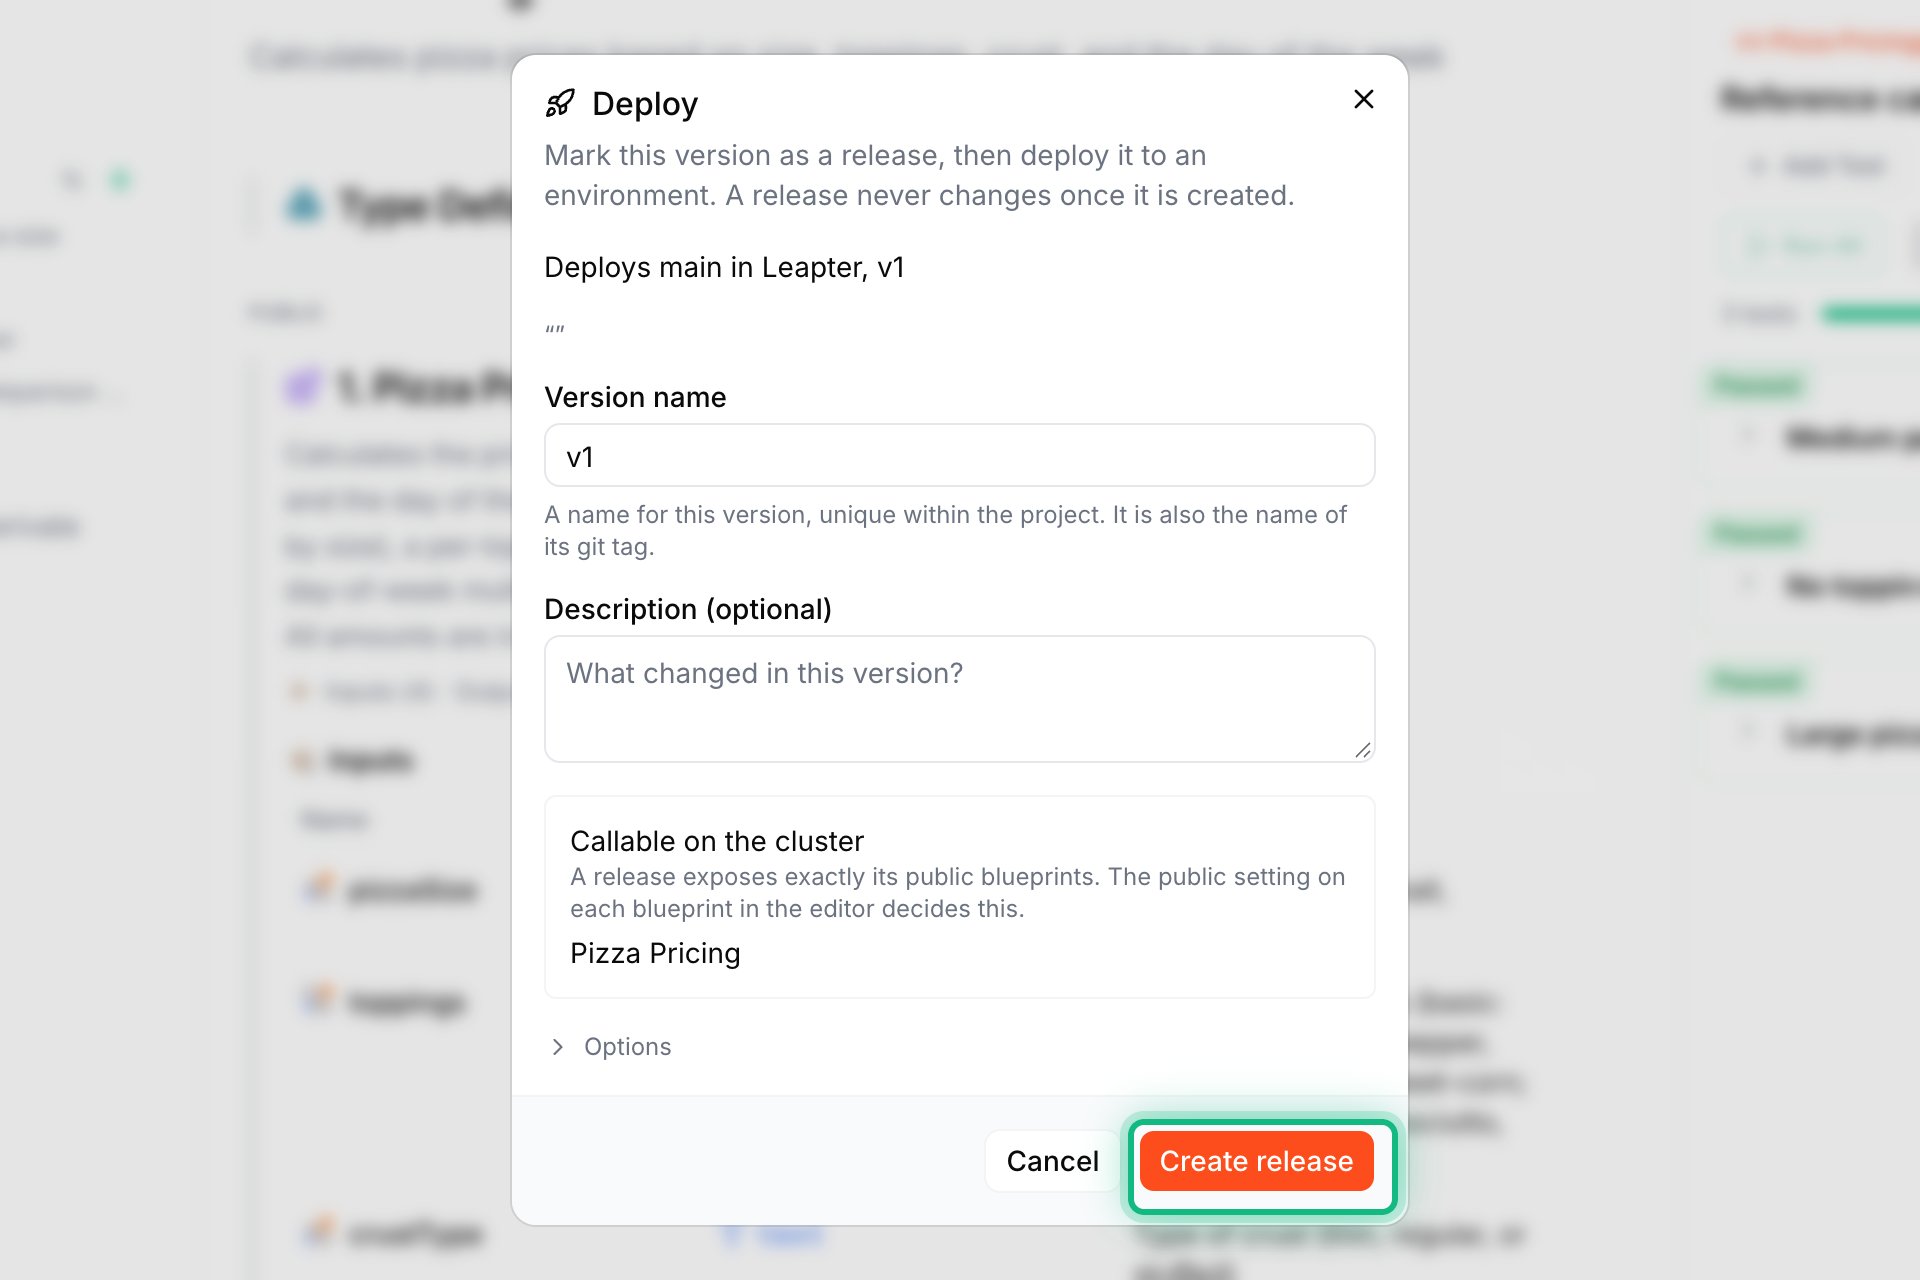
Open the project in the Lab and click Deploy in the toolbar.You should see the Deploy dialog. Version name is filled in with the next version, for example v1. Under Callable on the cluster you see the public blueprints that callers can run.
The Deploy dialog with the version name and Create release.
2
Create the release
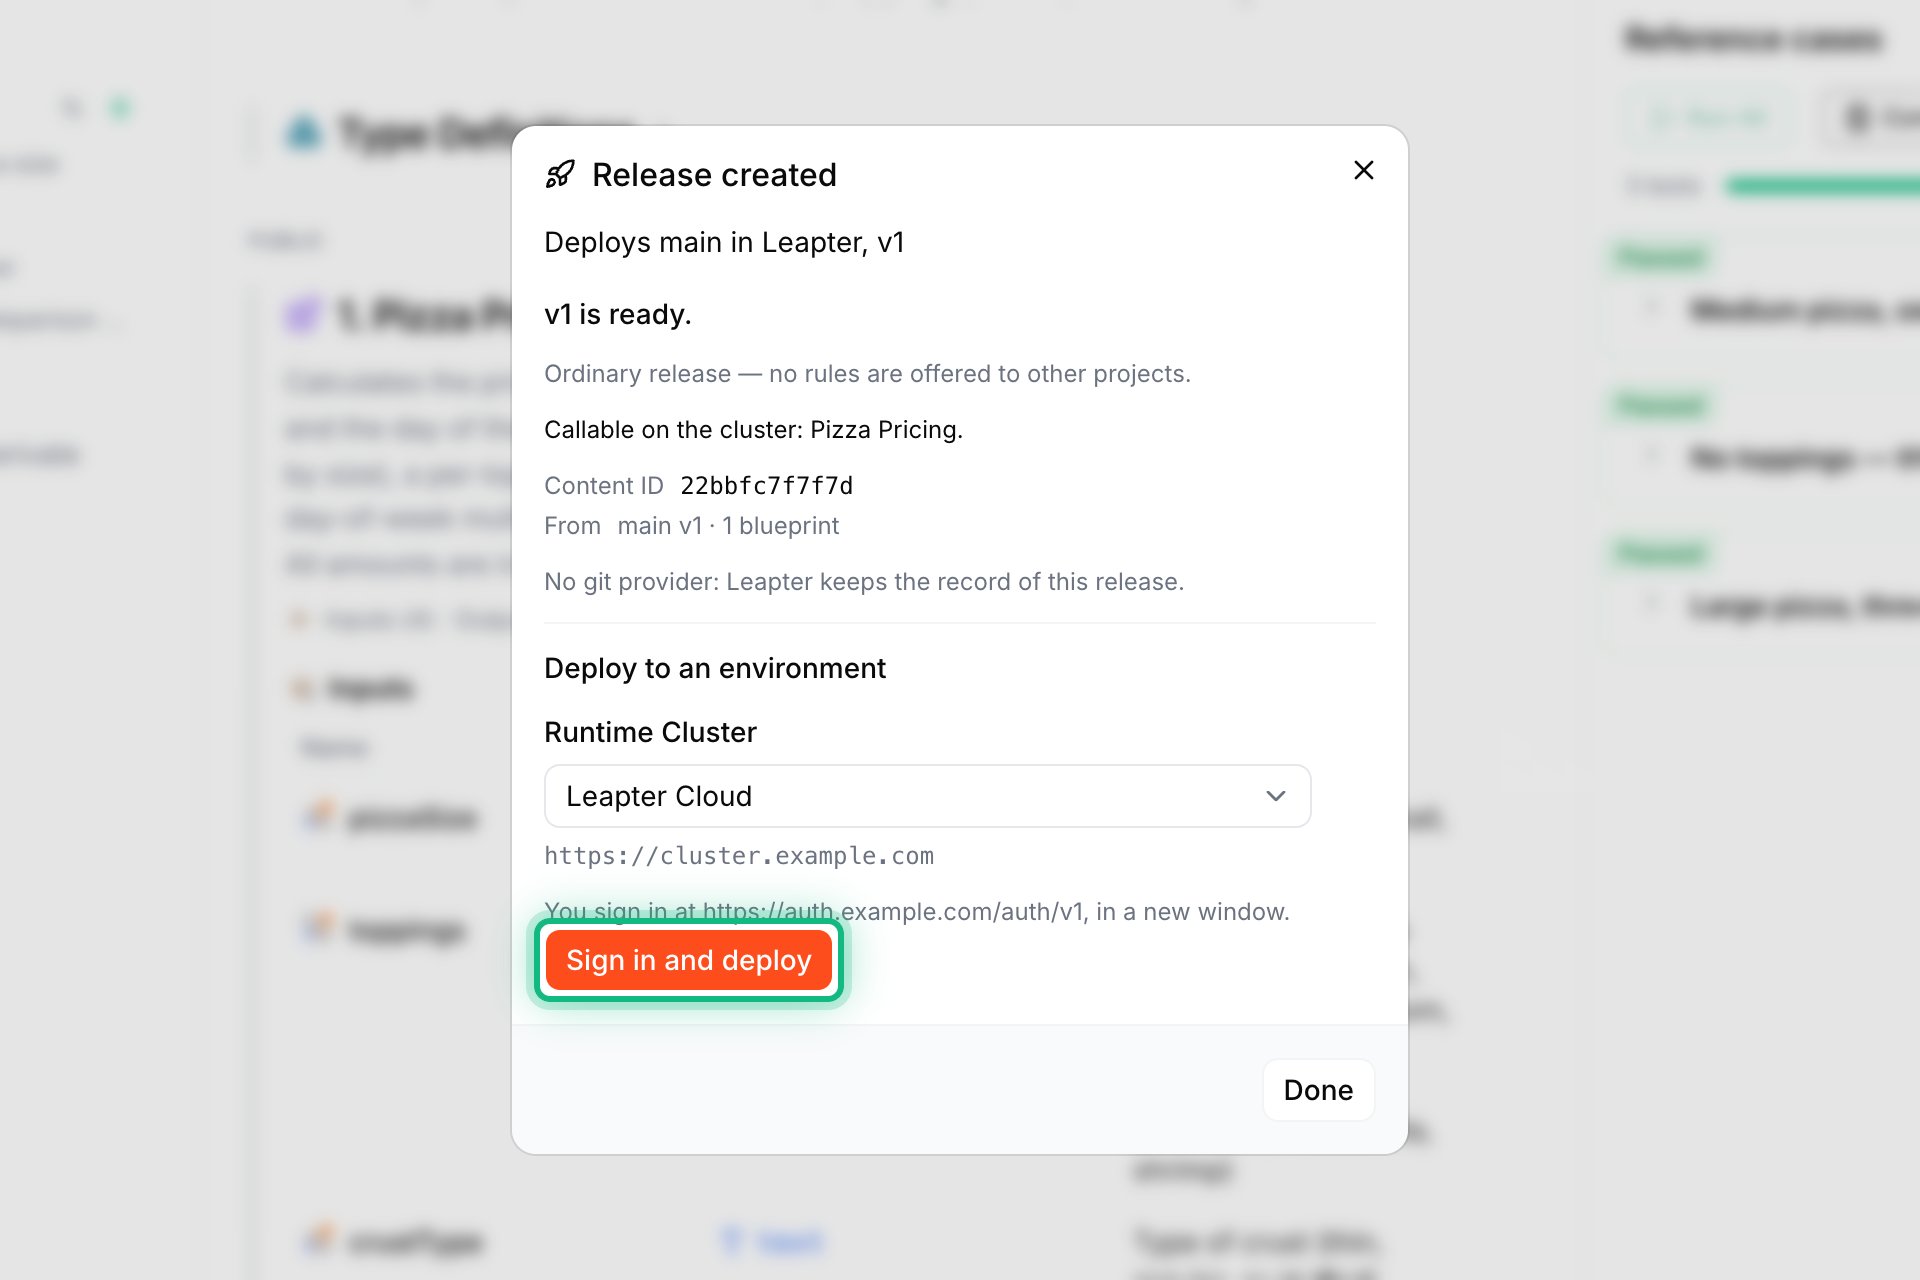
Click Create release.You should see Release created and “v1 is ready.” Below it, under Deploy to an environment, the dialog says where the release goes:
When your workspace uses only Leapter Cloud, it says Deploys to Leapter Cloud, with the address of the runtime cluster below it, for example https://cluster.example.com.
When your workspace has runtime clusters of its own, it shows Runtime Cluster with Choose a cluster. Choose yours in the list, and its address appears below it.
After Create release, the dialog offers to deploy to the runtime cluster.
3
Sign in to the runtime cluster and deploy
The button below says what it does:
Deploy to playground (or another environment): the Lab has already signed you in to the runtime cluster. Click it.
Sign in and deploy: click it. A sign-in window opens. If it asks you to allow the runtime cluster to sign you in, click Allow. The window closes by itself. When you are already signed in to the Lab, it can close before you see it.
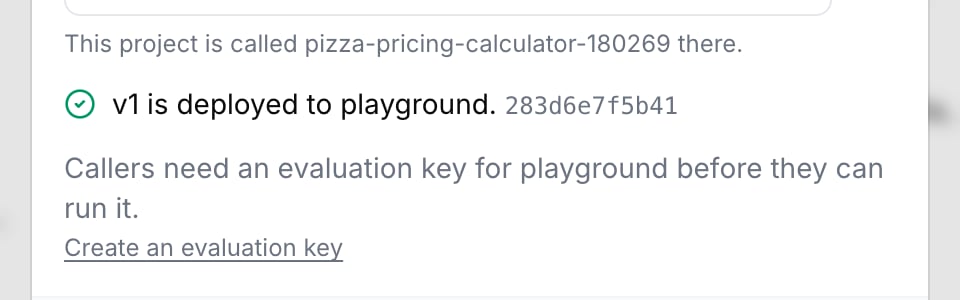
If you may deploy to only one environment, the Lab deploys to it. On Leapter Cloud the line above the button then names it, for example Deploys to Leapter Cloud · playground. If you may deploy to more than one, choose the one your callers should use in Environment, for example the environment for trying things out (here playground). Then click the button Deploy to with the environment’s name.On Leapter’s own runtime cluster, the Lab first prepares playground for your project, so playground is always in the list there. While it does this, the dialog shows Preparing playground access…. The first deploy of a project to playground gives you the rights on that application in playground, so you need no one to give them to you. If the project’s name is already used in playground by another workspace, the dialog says that the name is already in use and asks you to rename the project. The Lab then sends nothing to playground, but you can still sign in and deploy to another environment.You should see three lines like these:
The release is deployed. The dialog names the application and says that callers need a key.
Click Create an evaluation key below the last line. The Admin UI of your runtime cluster opens in a new tab.
4
Open your application in the Admin UI
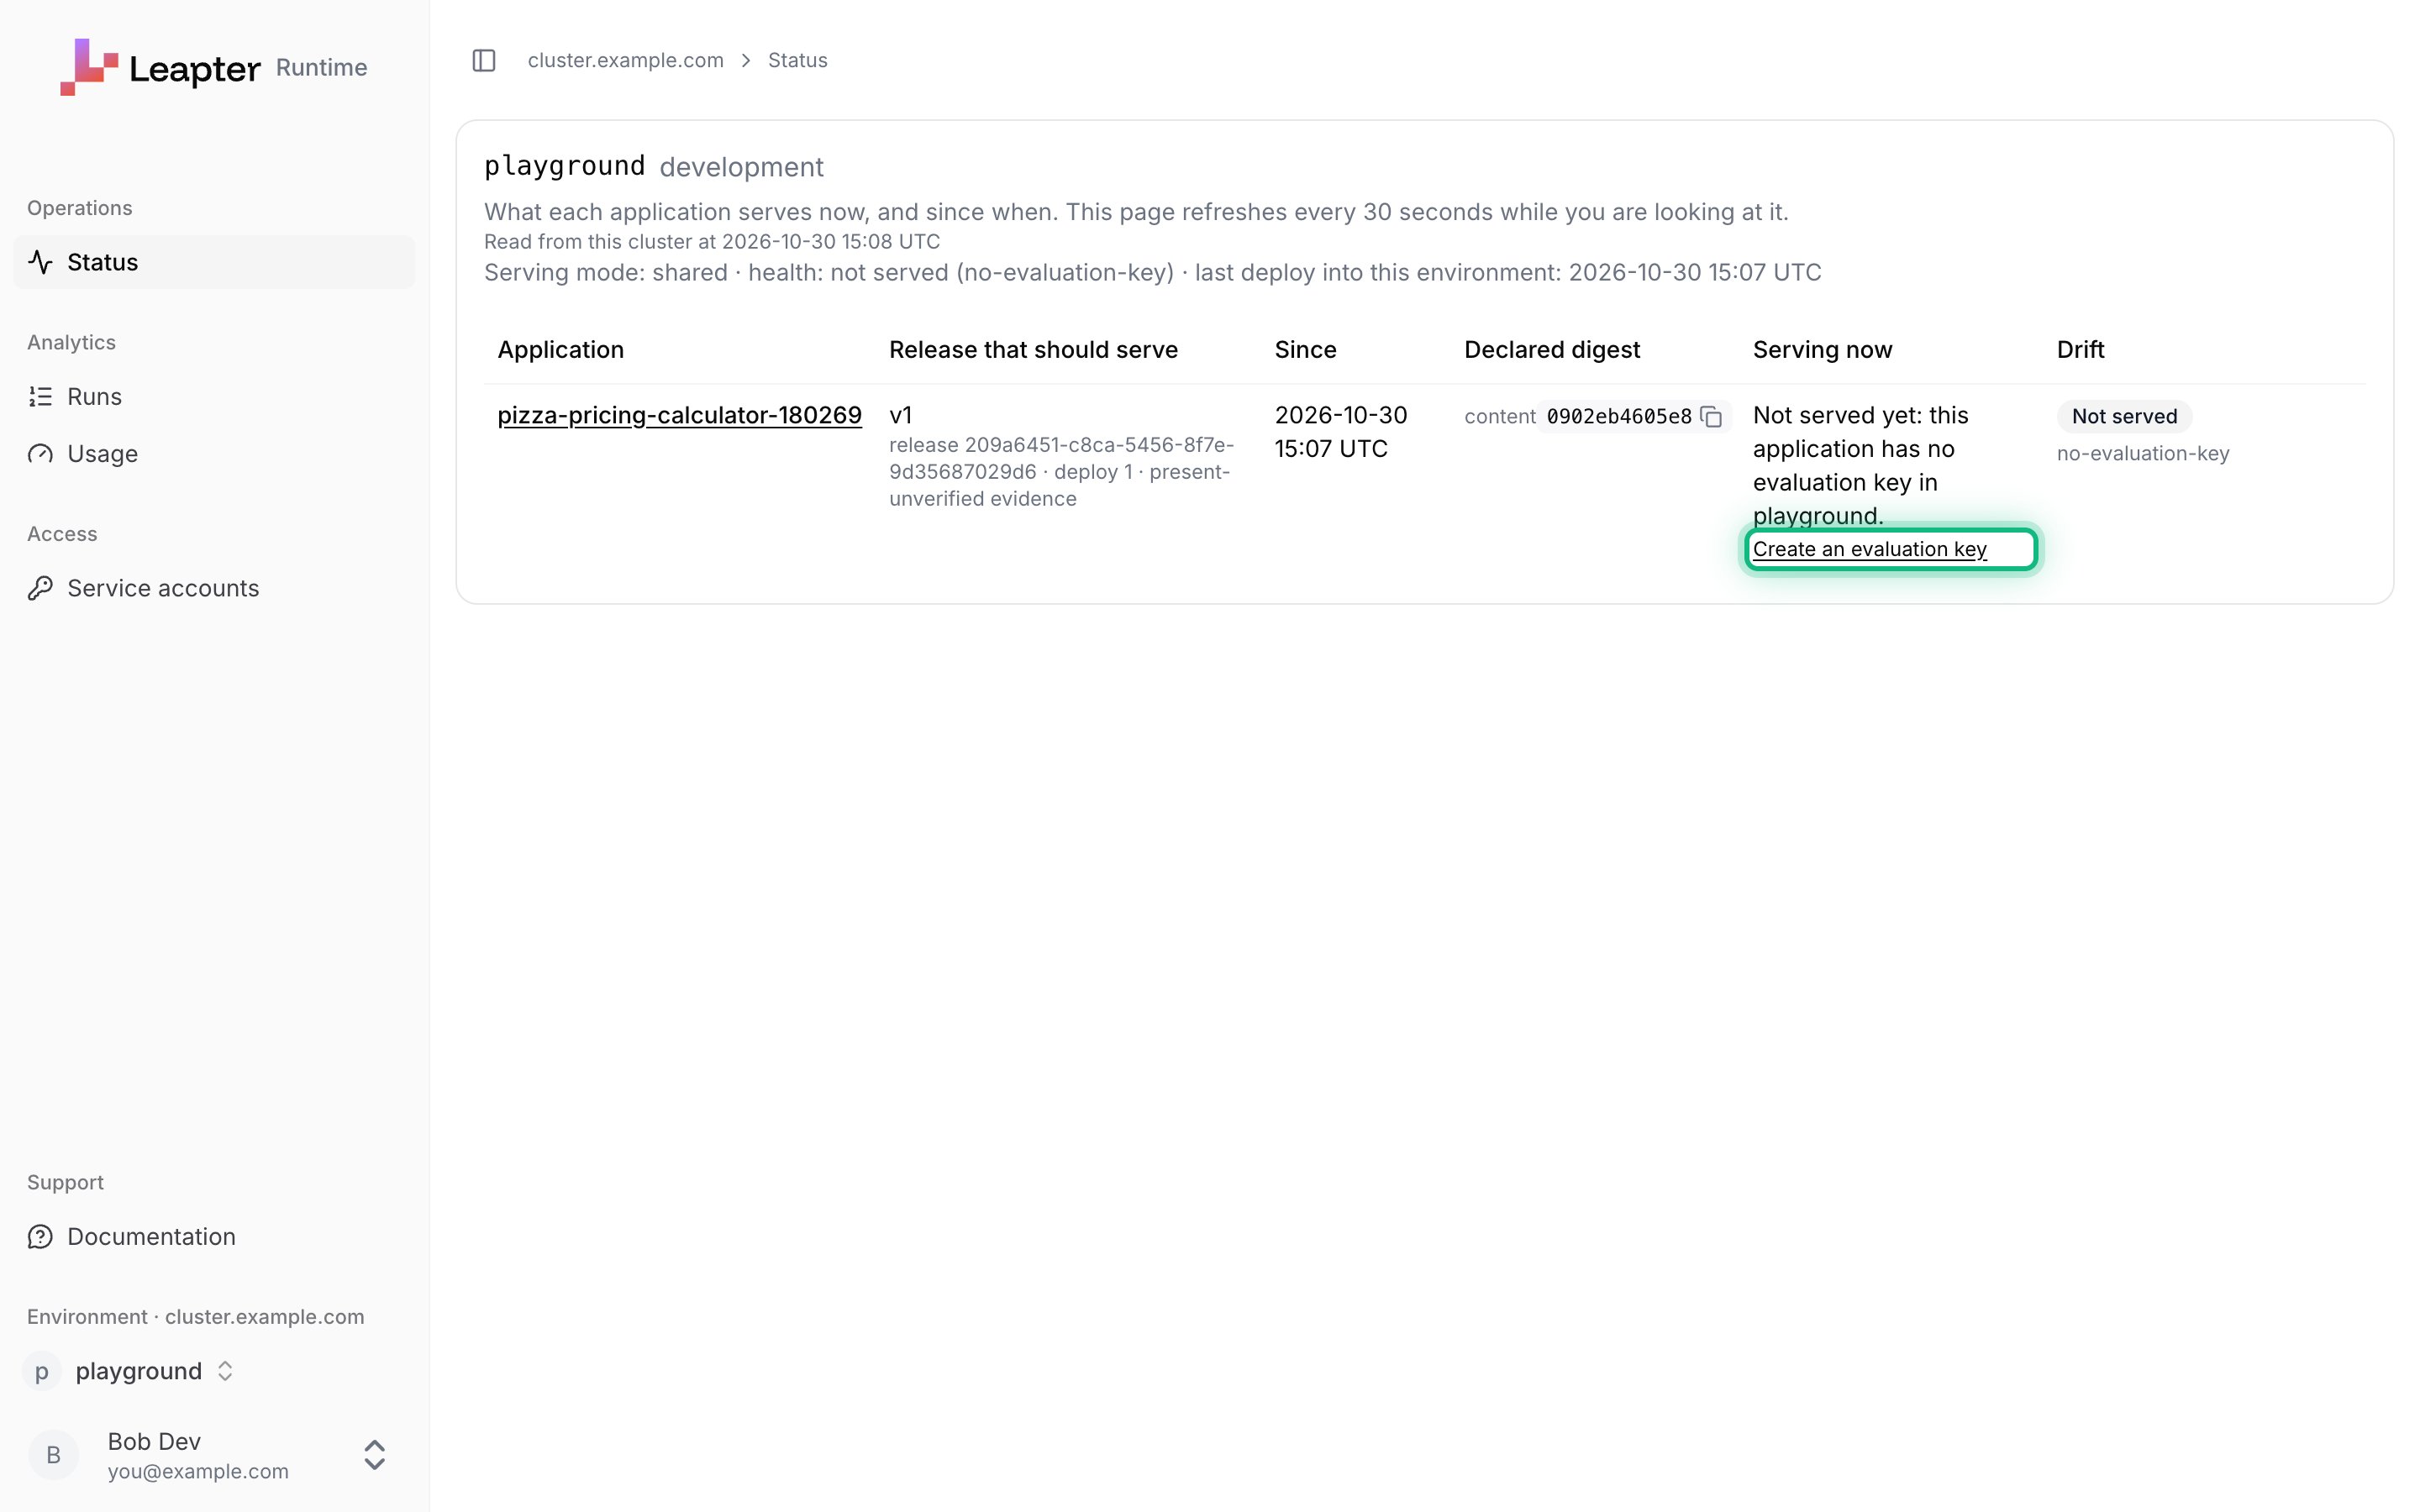
If the Admin UI asks you to sign in, click Sign in with Leapter. Your application’s page opens.If you closed the Lab dialog, open the Admin UI yourself. Its address is the cluster address followed by /runtime-management/ui/, for example https://cluster.example.com/runtime-management/ui/. Click Sign in with Leapter. The Status page opens. At the bottom of the sidebar, choose your environment in the environment list. Your application is in the table. Serving now says “Not served yet: this application has no evaluation key in playground.”, and Drift says Not served. In your application’s row, click Create an evaluation key.
The Status page before the application has a key.
5
Create an evaluation key
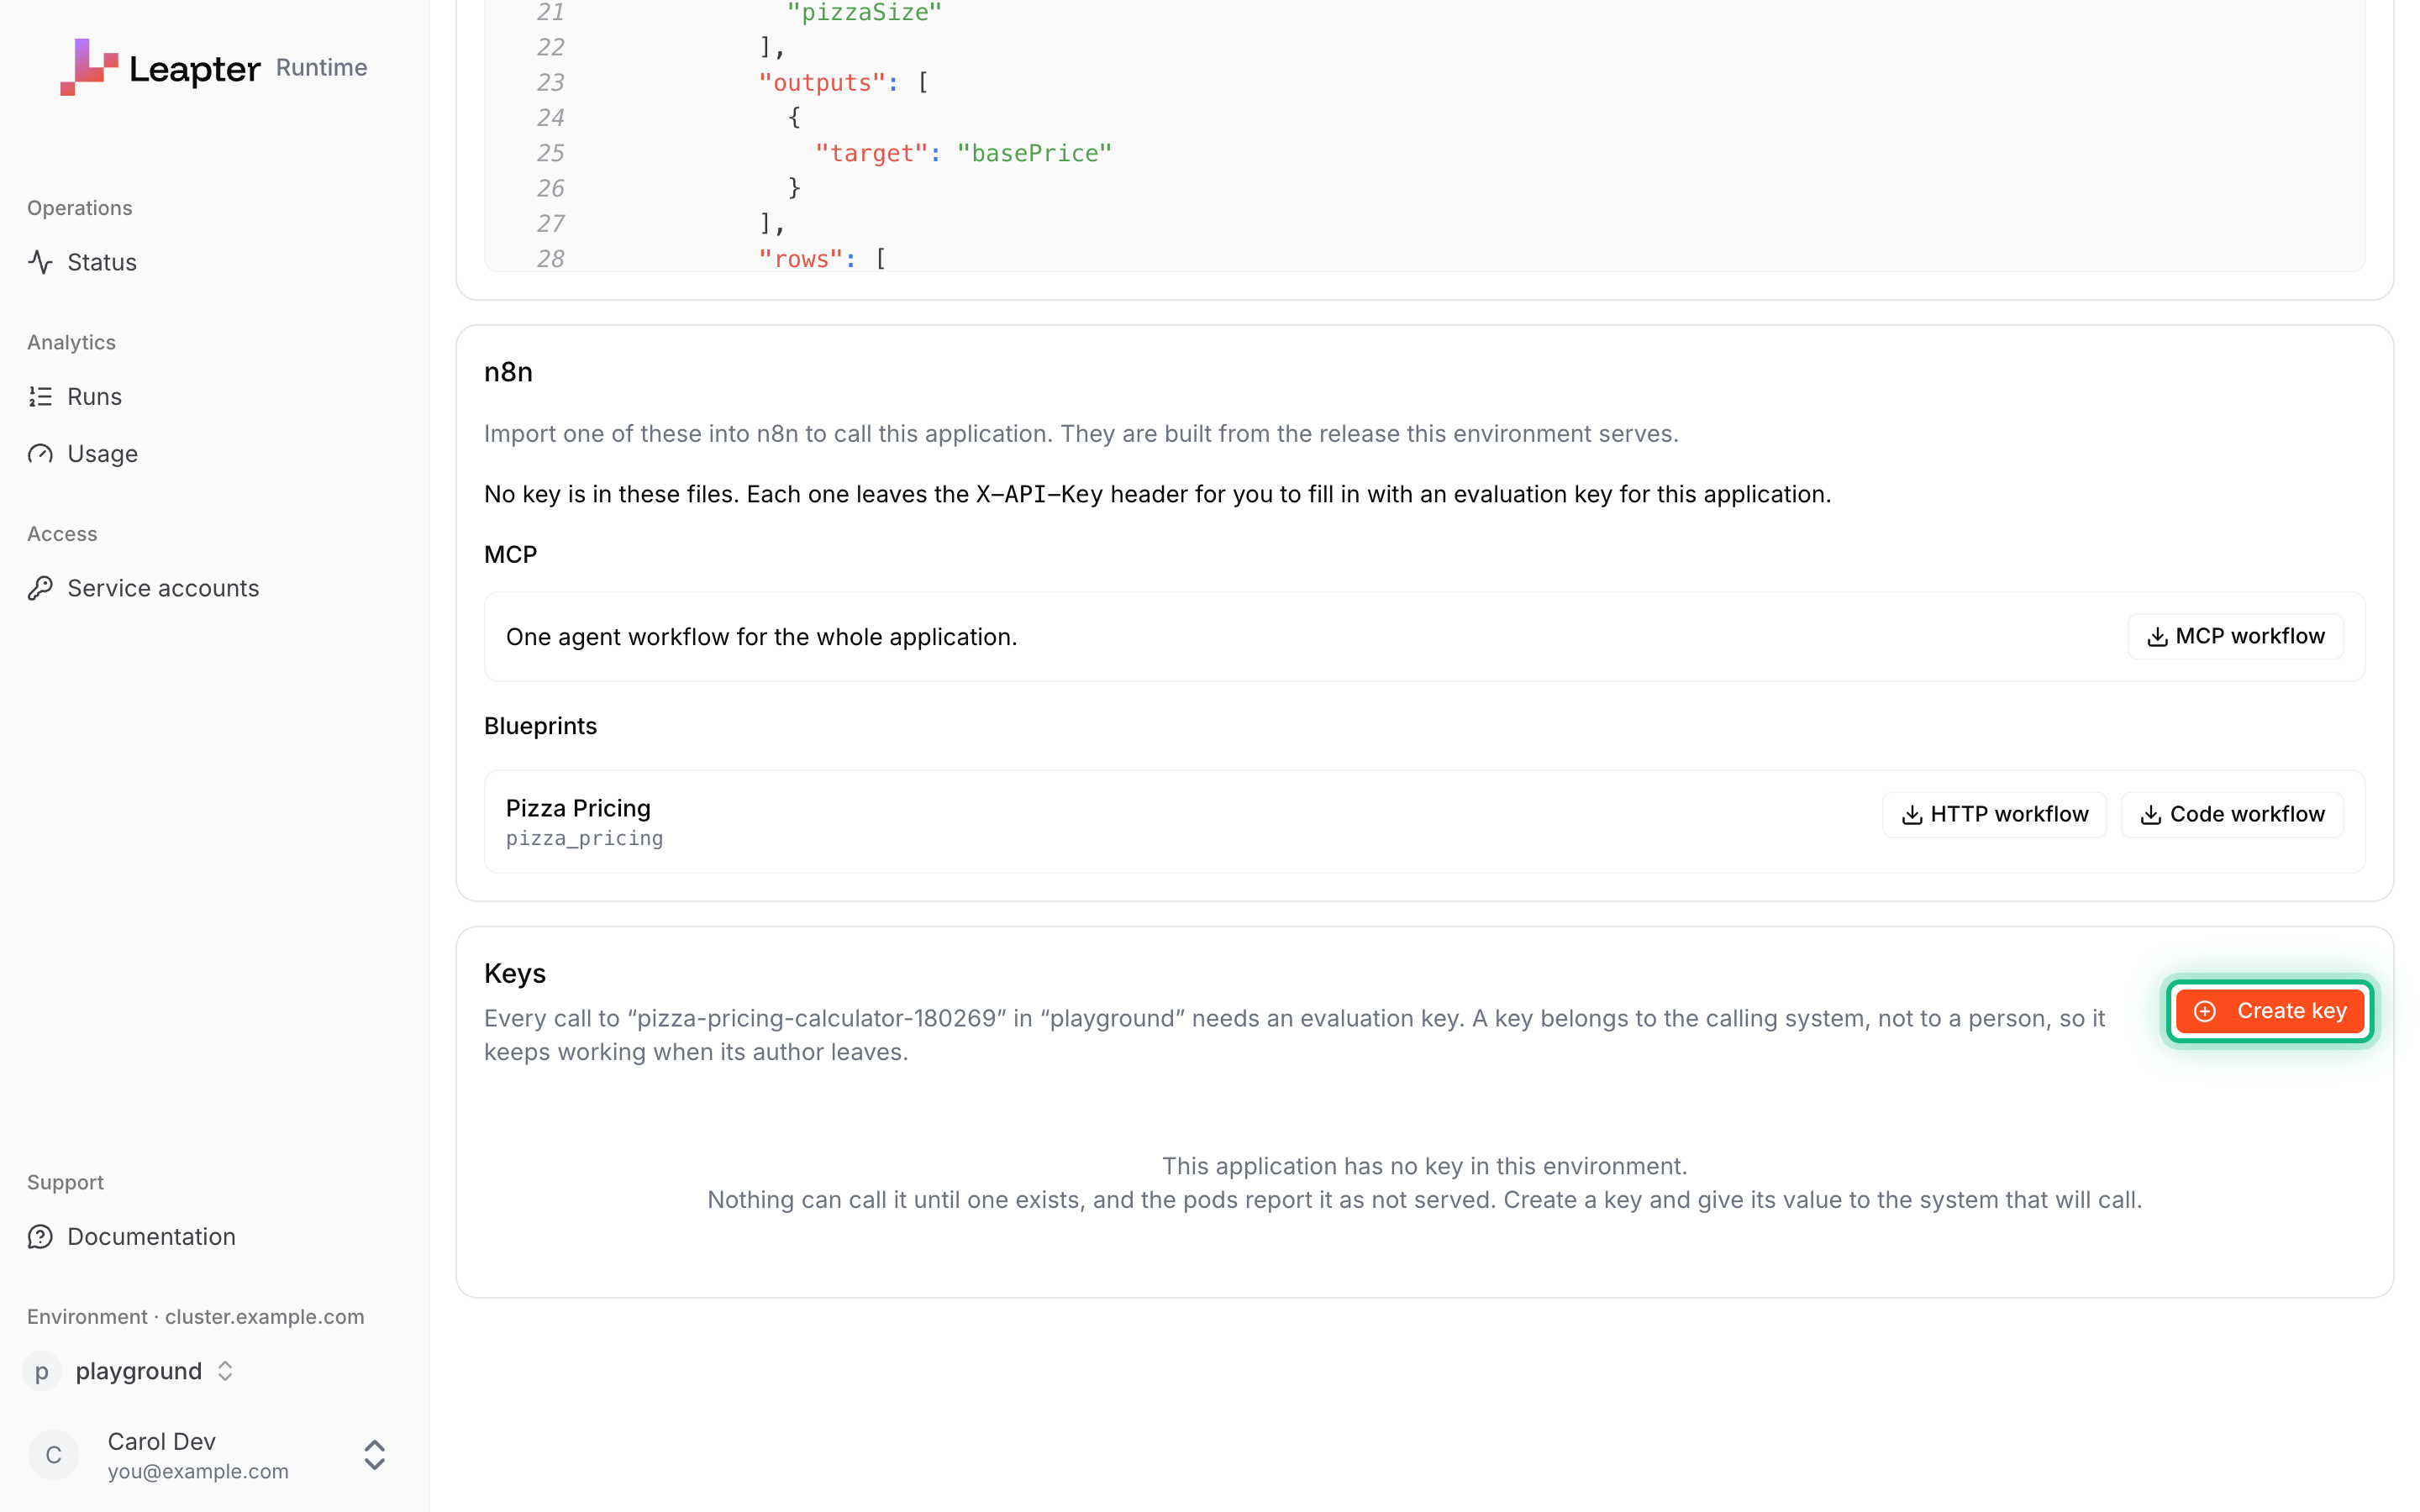
On your application’s page, go to the last card, Keys, and click Create key.
The Keys card of the application, before it has a key.
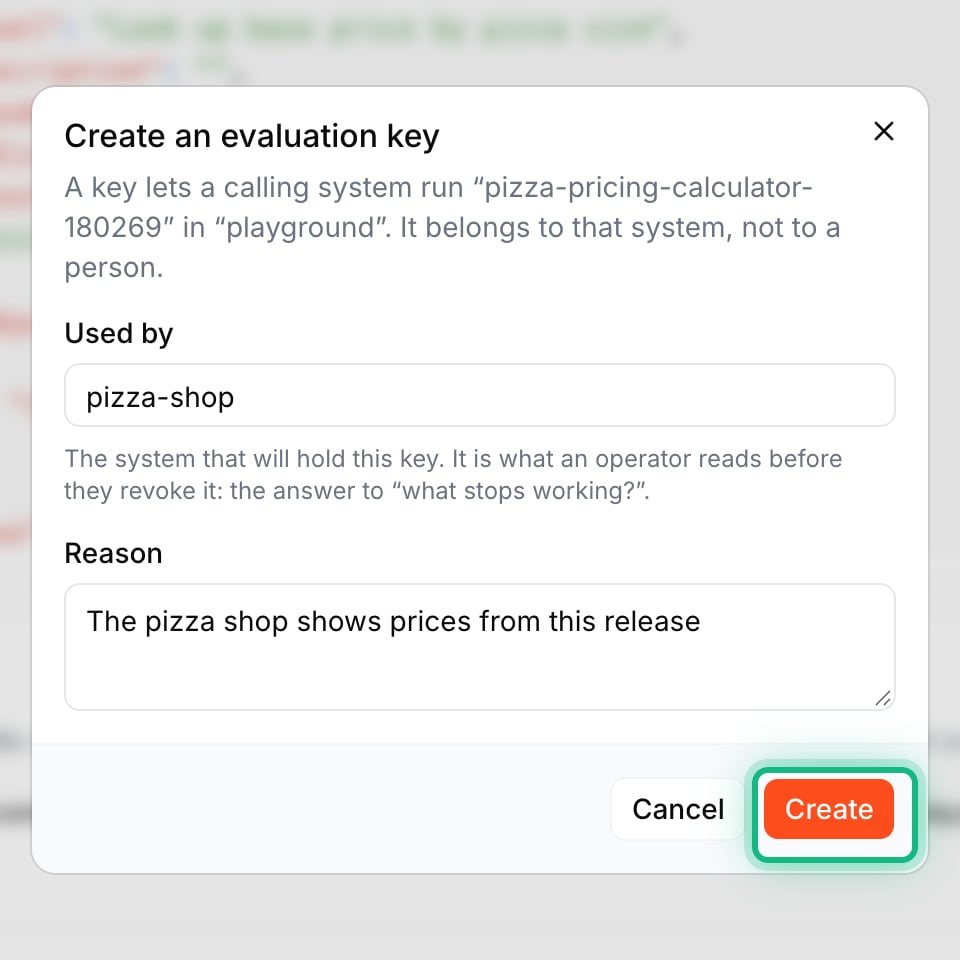
In the dialog Create an evaluation key, type the system that will call in Used by, for example pizza-shop. Type why it needs the key in Reason, for example The pizza shop shows prices from this release. Click Create.
Used by names the calling system, Reason says why it needs the key.
6
Copy the key
The dialog Copy this key now shows the start of the key. Click the copy button next to it. Copied appears below the key.
The key is shown only once. The copy button puts it on your clipboard.
Paste the key into a safe place now. The Admin UI never shows it again. Then click Done.
7
Copy the run address
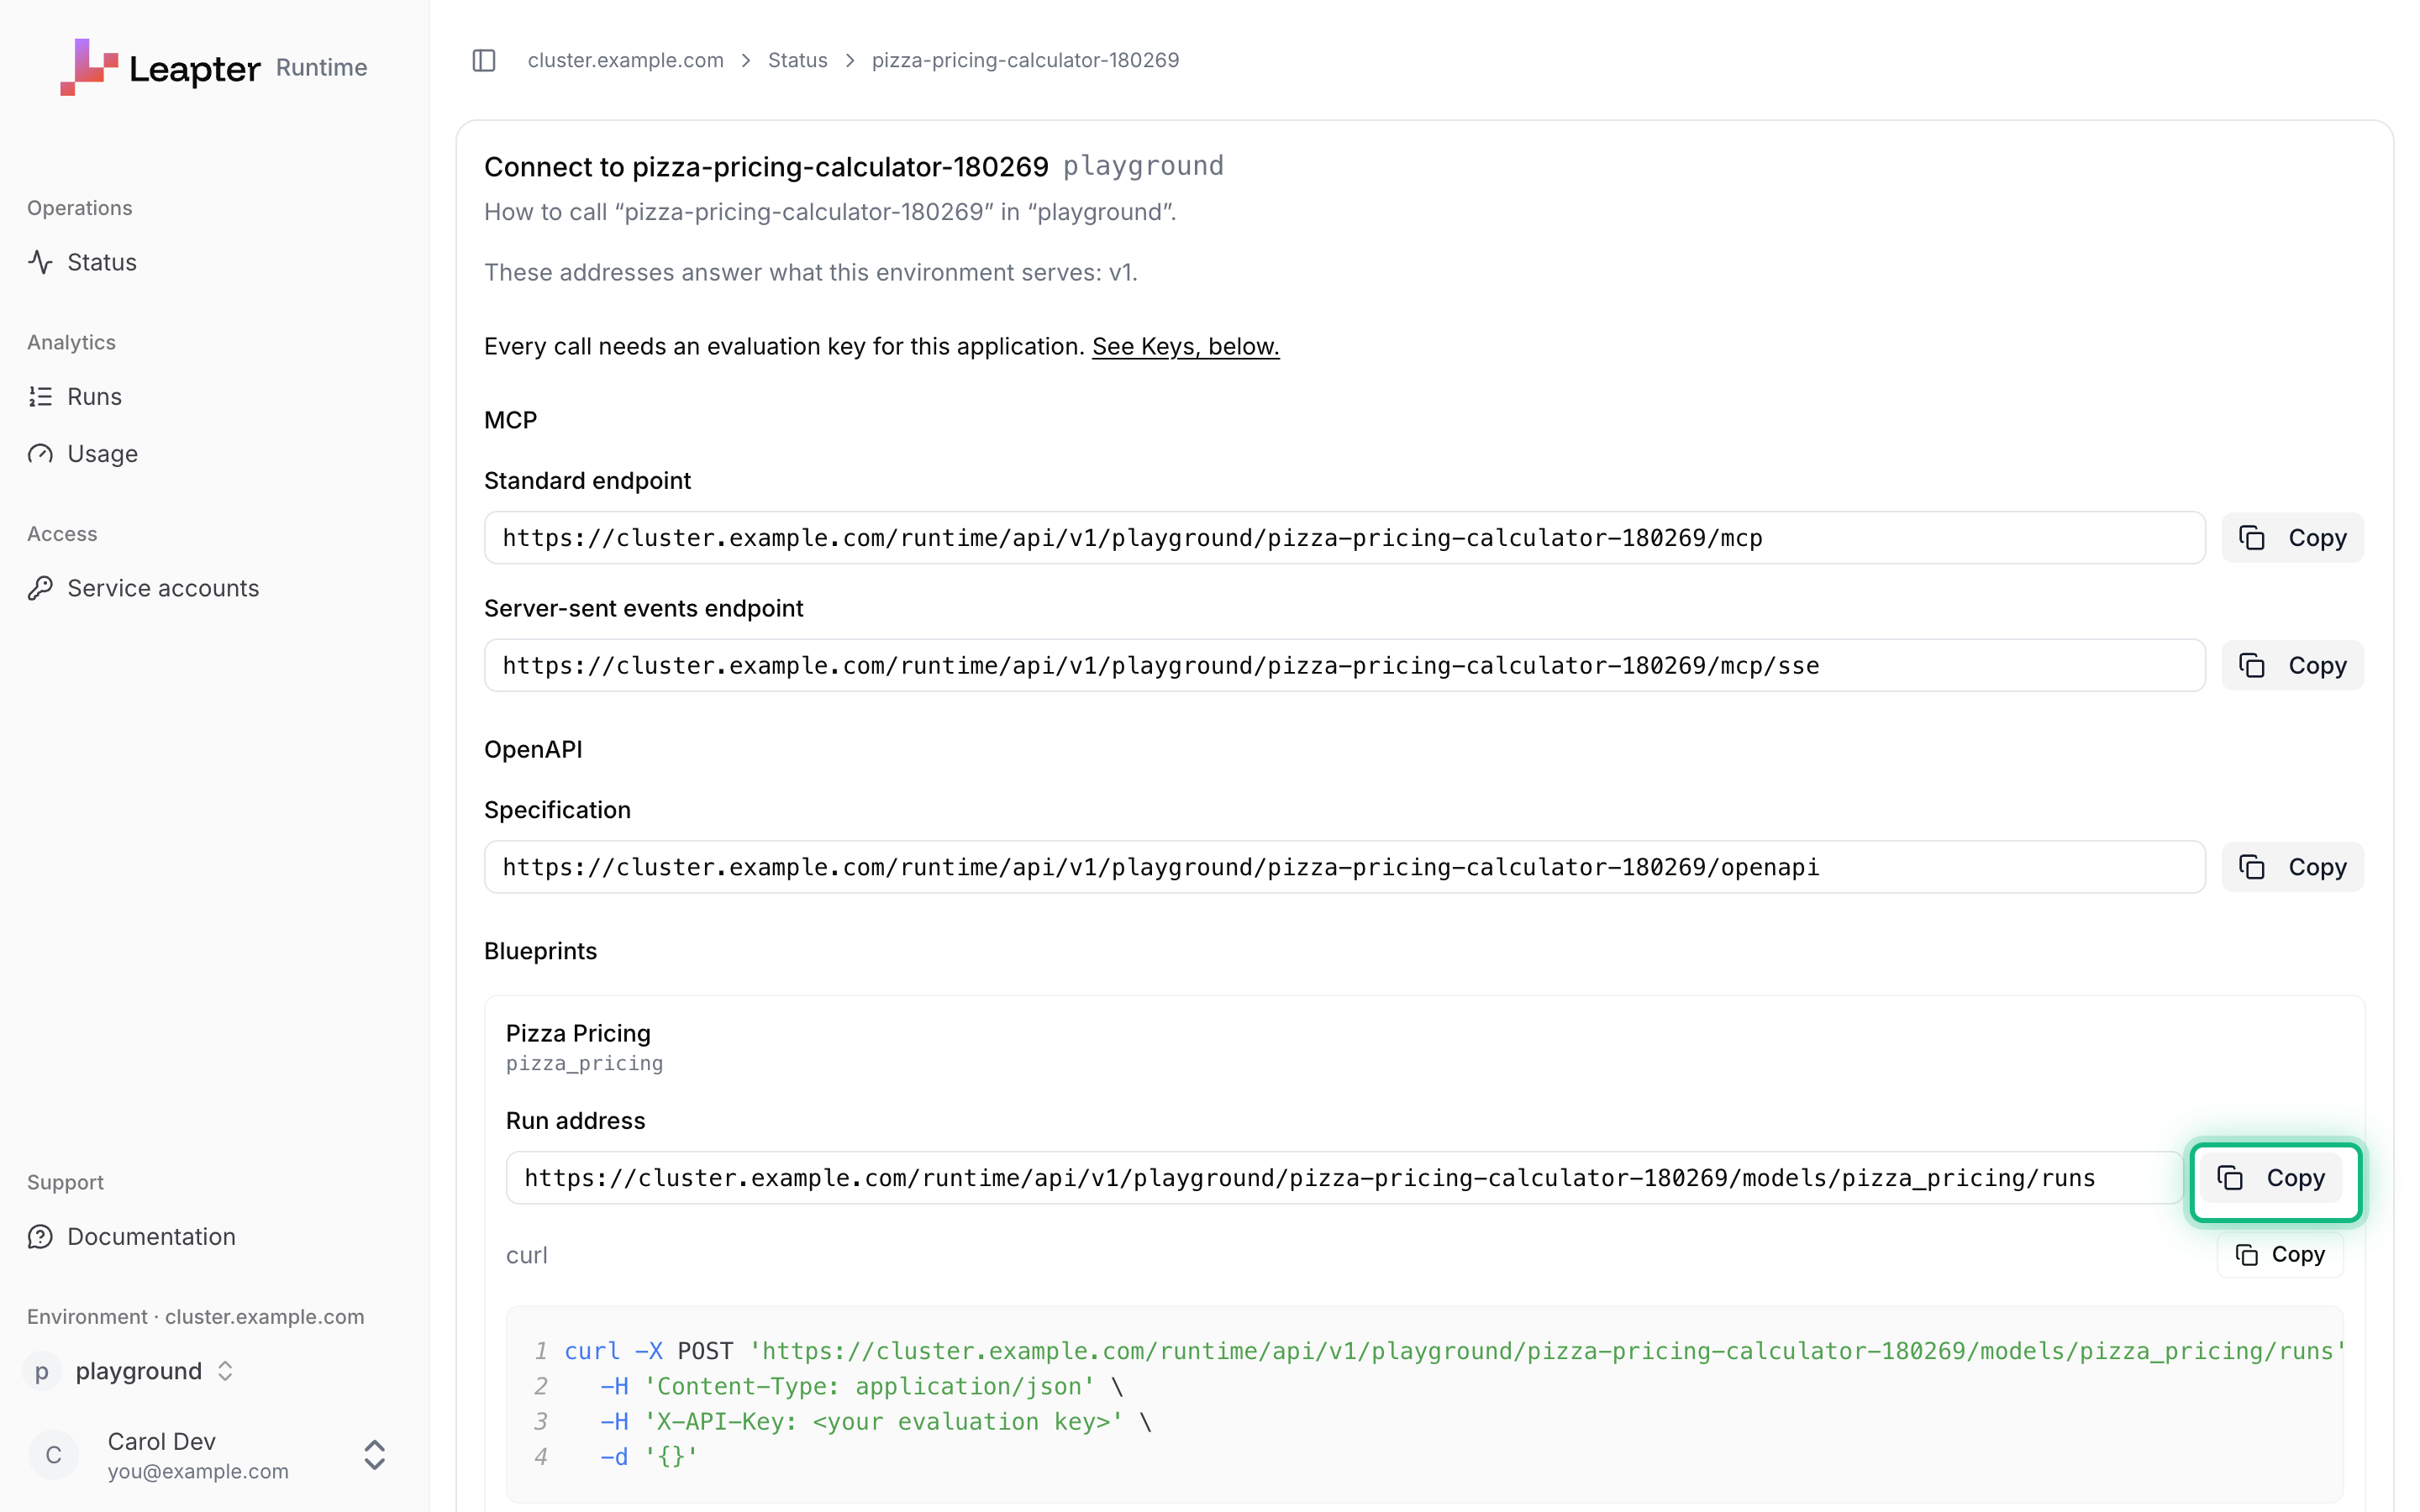
Scroll up to the card Connect to with your application’s name. Under Blueprints, find Pizza Pricing. Next to Run address, click Copy.
Each callable blueprint has its own run address.
8
Call the blueprint
In a terminal, store the run address and the key in two variables. Replace the two values with the ones you copied:
Then call the blueprint with a large thin-crust pizza with two toppings on a Friday. The body is a JSON object with the blueprint’s inputs. For your own project, use your blueprint’s inputs: Call a release over REST shows where to read them.
The first key of an application needs about a minute to reach the cluster. Until then, the call answers 404 page not found. Wait a minute and call again.
Release v1 of your project runs in an environment of your runtime cluster, and a system that holds the evaluation key can call it. The total price for the pizza is 20.9. Click Status in the sidebar of the Admin UI: after a short time, Drift for your application says No drift.
{"docsConfig":{"theme":"aspen","$schema":"https://mintlify.com/docs.json","name":"Leapter Documentation","colors":{"primary":"#FA4B00","light":"#FF7A45","dark":"#FA4B00"},"logo":{"light":"https://mintcdn.com/leapter/n-gCe0s55i-T1r4S/logo/leapter-logo-horizontal-dark.svg?fit=max\u0026auto=format\u0026n=n-gCe0s55i-T1r4S\u0026q=85\u0026s=aa6ff0318f24b8562163ccbe2c6d72f1","dark":"https://mintcdn.com/leapter/n-gCe0s55i-T1r4S/logo/leapter-logo-horizontal-white.svg?fit=max\u0026auto=format\u0026n=n-gCe0s55i-T1r4S\u0026q=85\u0026s=d7c1732991fb6a811bb7d3d49acf8b1e"},"favicon":"https://mintcdn.com/leapter/f4oBwv4ei0bdQSOY/favicon.png?fit=max\u0026auto=format\u0026n=f4oBwv4ei0bdQSOY\u0026q=85\u0026s=e95dc9c2b2dfd0712c9417ae054962df","navbar":{"links":[{"href":"mailto:support@leapter.com","label":"Support"}],"primary":{"type":"button","label":"Leapter","href":"https://lab.leapter.com"}},"footer":{"socials":{"youtube":"https://www.youtube.com/@Leapter-Corp","linkedin":"https://www.linkedin.com/company/leapter"},"links":[{"items":[{"label":"Privacy Policy","href":"https://www.leapter.com/privacy-policy"},{"label":"Cookies","href":"https://www.leapter.com/cookies"}]}]},"fonts":{"heading":{"family":"Funnel Display"},"body":{"family":"Inter"}},"integrations":{"gtm":{"tagId":"GTM-KR74BFGF"}},"banner":{"content":"🚀 **New:** Leapter now runs your releases on the Runtime Cluster. [See how to deploy »](/release-and-integrate/releases)","dismissible":true,"type":"info"},"contextual":{"options":["copy","chatgpt","claude","perplexity","mcp","cursor","vscode"],"display":"header"},"styling":{"latex":false},"navigation":{"global":{"anchors":[{"anchor":"Homepage","icon":"book-open-cover","href":"https://www.leapter.com"},{"anchor":"Blog","icon":"newspaper","href":"https://www.leapter.com/blog"}]},"pages":[]}},"deployment":{"deploymentMetadataValue":{"subdomain":"leapter","hasAudioNarration":false,"actualSubdomain":"leapter","customDomains":["docs.leapter.com"],"gitSource":{"type":"github","owner":"leapter","repo":"docs","deployBranch":"main","contentDirectory":"","isPrivate":true,"mountPath":"","label":""},"chroma":{"liveDeploymentHistoryId":"6aec4a5607f9eeebb2937b54","collectionId":"c9d78a34-eb4f-4f02-85c5-8f4541112b0e","schemaVersion":"v3","latestBuiltDeploymentHistoryId":"6aec4a5607f9eeebb2937b54"},"entitlements":{"AI_CHAT":{"status":"DISABLED"},"REMOVE_BRANDING":{"status":"DISABLED"},"CONTEXTUAL_FEEDBACK":{"status":"DISABLED"},"CODE_SNIPPET_FEEDBACK":{"status":"DISABLED"}},"buildId":"6aec5d07aceee0d6e0b03bfa","clientVersion":"0.0.4067","searchFilterCounts":[{"language":"default","tag":"Lab User Guide","count":36},{"language":"default","tag":"Create \u0026 Edit Blueprints","count":15},{"language":"default","tag":"Runtime Cluster User Guide","count":12},{"language":"default","tag":"The Blueprint Editor","count":6},{"language":"default","tag":"Blueprint Elements","count":5},{"language":"default","tag":"Get Started","count":5},{"language":"default","tag":"Release \u0026 Integrate","count":5},{"language":"default","tag":"Workspace \u0026 Collaboration","count":5},{"language":"default","tag":"n8n","count":4},{"language":"default","tag":"Test \u0026 Validate","count":4}]},"assistantConfig":{"enableStarterQuestions":false},"basePath":"","hasChatPermissions":false,"hasWebMcpPermissions":false,"toggles":[{"name":"kill-isr","enabled":true,"variant":{"name":"disabled","enabled":false,"feature_enabled":true},"impressionData":false},{"name":"agent-mintlify-slack","enabled":true,"variant":{"name":"disabled","enabled":false,"feature_enabled":true},"impressionData":false},{"name":"agent-integrations-settings","enabled":true,"variant":{"name":"disabled","enabled":false,"feature_enabled":true},"impressionData":false},{"name":"rbac-expansion","enabled":true,"variant":{"name":"disabled","enabled":false,"feature_enabled":true},"impressionData":false},{"name":"automations-pr-grouping","enabled":true,"variant":{"name":"disabled","enabled":false,"feature_enabled":true},"impressionData":false},{"name":"custom-prefix","enabled":true,"variant":{"name":"disabled","enabled":false,"feature_enabled":true},"impressionData":false},{"name":"analytics-v7","enabled":true,"variant":{"name":"disabled","enabled":false,"feature_enabled":true},"impressionData":false},{"name":"user-flows-analytics","enabled":true,"variant":{"name":"disabled","enabled":false,"feature_enabled":true},"impressionData":false},{"name":"no-publish-flow","enabled":true,"variant":{"name":"disabled","enabled":false,"feature_enabled":true},"impressionData":false},{"name":"workos-onboarding","enabled":true,"variant":{"name":"disabled","enabled":false,"feature_enabled":true},"impressionData":false},{"name":"llms-txt-v2","enabled":true,"variant":{"name":"disabled","enabled":false,"feature_enabled":true},"impressionData":false},{"name":"snapshot-serving-live","enabled":true,"variant":{"name":"disabled","enabled":false,"feature_enabled":true},"impressionData":false},{"name":"stripTemperatureMiddleware","enabled":true,"variant":{"name":"disabled","enabled":false,"feature_enabled":true},"impressionData":false},{"name":"support-platform-pylon-zendesk","enabled":true,"variant":{"name":"disabled","enabled":false,"feature_enabled":true},"impressionData":false},{"name":"snapshot-serving","enabled":true,"variant":{"name":"disabled","enabled":false,"feature_enabled":true},"impressionData":false},{"name":"instant-rollback","enabled":true,"variant":{"name":"disabled","enabled":false,"feature_enabled":true},"impressionData":false},{"name":"granular-notifications-server","enabled":true,"variant":{"name":"disabled","enabled":false,"feature_enabled":true},"impressionData":false},{"name":"granular-notifications","enabled":true,"variant":{"name":"disabled","enabled":false,"feature_enabled":true},"impressionData":false},{"name":"automations-fable","enabled":true,"variant":{"name":"disabled","enabled":false,"feature_enabled":true},"impressionData":false},{"name":"fixed-ai-action-pricing","enabled":true,"variant":{"name":"disabled","enabled":false,"feature_enabled":true},"impressionData":false},{"name":"automation-resolve-merge-conflict","enabled":true,"variant":{"name":"disabled","enabled":false,"feature_enabled":true},"impressionData":false},{"name":"scoped-publishing","enabled":true,"variant":{"name":"disabled","enabled":false,"feature_enabled":true},"impressionData":false},{"name":"mintql","enabled":true,"variant":{"name":"disabled","enabled":false,"feature_enabled":true},"impressionData":false},{"name":"page-level-analytics","enabled":true,"variant":{"name":"disabled","enabled":false,"feature_enabled":true},"impressionData":false},{"name":"editor-version-history-v2","enabled":true,"variant":{"name":"disabled","enabled":false,"feature_enabled":true},"impressionData":false},{"name":"billing-page-v2","enabled":true,"variant":{"name":"disabled","enabled":false,"feature_enabled":true},"impressionData":false},{"name":"full-page-search","enabled":true,"variant":{"name":"disabled","enabled":false,"feature_enabled":true},"impressionData":false},{"name":"workspace-projects","enabled":true,"variant":{"name":"disabled","enabled":false,"feature_enabled":true},"impressionData":false},{"name":"assistant-v5","enabled":true,"variant":{"name":"disabled","enabled":false,"feature_enabled":true},"impressionData":false},{"name":"fork-pr-previews","enabled":true,"variant":{"name":"disabled","enabled":false,"feature_enabled":true},"impressionData":false},{"name":"revalidation-jwt","enabled":true,"variant":{"name":"disabled","enabled":false,"feature_enabled":true},"impressionData":false},{"name":"vite-origin","enabled":true,"variant":{"name":"disabled","enabled":false,"feature_enabled":true},"impressionData":false},{"name":"workos-sso-scim","enabled":true,"variant":{"name":"disabled","enabled":false,"feature_enabled":true},"impressionData":false},{"name":"hobby-abuse-scan","enabled":true,"variant":{"name":"disabled","enabled":false,"feature_enabled":true},"impressionData":false},{"name":"dashboard-inbox","enabled":true,"variant":{"name":"disabled","enabled":false,"feature_enabled":true},"impressionData":false},{"name":"workos-signup","enabled":true,"variant":{"name":"disabled","enabled":false,"feature_enabled":true},"impressionData":false},{"name":"turbopuffer-dual-write","enabled":true,"variant":{"name":"disabled","enabled":false,"feature_enabled":true},"impressionData":false},{"name":"workos-enabled","enabled":true,"variant":{"name":"disabled","enabled":false,"feature_enabled":true},"impressionData":false},{"name":"approve-review-flow","enabled":true,"variant":{"name":"disabled","enabled":false,"feature_enabled":true},"impressionData":false},{"name":"sso-setup-deadline-banner","enabled":true,"variant":{"name":"disabled","enabled":false,"feature_enabled":true},"impressionData":false},{"name":"turbopuffer-serve","enabled":true,"variant":{"name":"disabled","enabled":false,"feature_enabled":true},"impressionData":false},{"name":"live-agents","enabled":true,"variant":{"name":"disabled","enabled":false,"feature_enabled":true},"impressionData":false}],"googleFontsInlined":true},"customCss":[{"filePath":"consent-overrides.css","content":":root{--cc-bg: #ffffff;--cc-text: #0f172a;--cc-btn-primary-bg: #6A6CF2;--cc-btn-primary-text: #ffffff;--cc-btn-primary-hover-bg: #5558d9;--cc-btn-secondary-bg: #f1f5f9;--cc-btn-secondary-text: #334155;--cc-btn-secondary-hover-bg: #e2e8f0;--cc-toggle-on-bg: #6A6CF2;--cc-toggle-off-bg: #cbd5e1;--cc-toggle-on-knob-bg: #ffffff;--cc-toggle-off-knob-bg: #ffffff;--cc-separator-border-color: #e2e8f0;--cc-cookie-category-block-bg: #f8fafc;--cc-cookie-category-block-bg-hover: #f1f5f9;--cc-overlay-bg: rgba(15, 23, 42, 0.5);--cc-webkit-scrollbar-bg: #f1f5f9;--cc-webkit-scrollbar-hover-bg: #cbd5e1}html.dark :root{--cc-bg: #1e293b;--cc-text: #f8fafc;--cc-btn-primary-bg: #6A6CF2;--cc-btn-primary-text: #ffffff;--cc-btn-primary-hover-bg: #5558d9;--cc-btn-secondary-bg: #334155;--cc-btn-secondary-text: #f1f5f9;--cc-btn-secondary-hover-bg: #475569;--cc-toggle-on-bg: #6A6CF2;--cc-toggle-off-bg: #475569;--cc-separator-border-color: #334155;--cc-cookie-category-block-bg: #0f172a;--cc-cookie-category-block-bg-hover: #1e293b;--cc-overlay-bg: rgba(0, 0, 0, 0.7);--cc-webkit-scrollbar-bg: #334155;--cc-webkit-scrollbar-hover-bg: #475569}#cc-main{font-family:inherit;z-index:2147483647;font-size:14px}#cc-main .cm{border-radius:12px;box-shadow:0 20px 25px -5px rgba(0, 0, 0, 0.1), 0 10px 10px -5px rgba(0, 0, 0, 0.04)}html.dark #cc-main .cm{box-shadow:0 20px 25px -5px rgba(0, 0, 0, 0.5), 0 10px 10px -5px rgba(0, 0, 0, 0.3)}#cc-main button{border-radius:6px;font-weight:500;transition:all 0.2s ease}#cc-main button:hover{transform:translateY(-1px)}#cc-main button:active{transform:translateY(0)}#cc-main a{color:#6A6CF2;text-decoration:underline;text-decoration-color:rgba(106, 108, 242, 0.3);transition:text-decoration-color 0.2s ease}#cc-main a:hover{text-decoration-color:rgba(106, 108, 242, 1)}html.dark #cc-main a{color:#8b8dff}#cc-main .section-toggle{transition:all 0.3s ease}#cc-main .cookie-category-block{border-radius:8px;border:1px solid var(--cc-separator-border-color);transition:background-color 0.2s ease}#cc-main button:focus,#cc-main .section-toggle:focus{outline:2px solid #6A6CF2;outline-offset:2px}#cc-main,#cc-main .cm,#cc-main button,#cc-main .cookie-category-block{transition:background-color 0.3s ease, color 0.3s ease, border-color 0.3s ease}@media (max-width: 640px){#cc-main .cm{border-radius:12px 12px 0 0;max-height:85vh}}@keyframes cc-fade-in{from{opacity:0;transform:translateY(20px)}to{opacity:1;transform:translateY(0)}}#cc-main .cm{animation:cc-fade-in 0.3s ease-out}"},{"filePath":"cookieconsent.css","content":"#cc-main{background:transparent;color:var(--cc-primary-color);font-family:var(--cc-font-family);font-size:16px;font-weight:400;-webkit-font-smoothing:antialiased;-moz-osx-font-smoothing:grayscale;line-height:1.15;position:relative;text-rendering:optimizeLegibility;-webkit-text-size-adjust:100%;position:fixed;z-index:var(--cc-z-index)}#cc-main :after,#cc-main :before,#cc-main a,#cc-main button,#cc-main div,#cc-main h2,#cc-main input,#cc-main p,#cc-main span{all:unset;box-sizing:border-box}#cc-main .pm__badge,#cc-main button{all:initial;box-sizing:border-box;color:unset;visibility:unset}#cc-main .pm__badge,#cc-main a,#cc-main button,#cc-main input{-webkit-appearance:none;appearance:none;cursor:pointer;font-family:inherit;font-size:100%;line-height:normal;margin:0;outline:revert;outline-offset:2px;overflow:hidden}#cc-main table,#cc-main tbody,#cc-main td,#cc-main th,#cc-main thead,#cc-main tr{all:revert;color:inherit;font-family:inherit;font-size:inherit;font-weight:inherit}:root{--cc-font-family:-apple-system,BlinkMacSystemFont,\"Segoe UI\",Roboto,Helvetica,Arial,sans-serif,\"Apple Color Emoji\",\"Segoe UI Emoji\",\"Segoe UI Symbol\";--cc-modal-border-radius:.5rem;--cc-btn-border-radius:.4rem;--cc-modal-transition-duration:.25s;--cc-link-color:var(--cc-btn-primary-bg);--cc-modal-margin:1rem;--cc-z-index:2147483647;--cc-bg:#fff;--cc-primary-color:#2c2f31;--cc-secondary-color:#5e6266;--cc-btn-primary-bg:#30363c;--cc-btn-primary-color:#fff;--cc-btn-primary-border-color:var(--cc-btn-primary-bg);--cc-btn-primary-hover-bg:#000;--cc-btn-primary-hover-color:#fff;--cc-btn-primary-hover-border-color:var(--cc-btn-primary-hover-bg);--cc-btn-secondary-bg:#eaeff2;--cc-btn-secondary-color:var(--cc-primary-color);--cc-btn-secondary-border-color:var(--cc-btn-secondary-bg);--cc-btn-secondary-hover-bg:#d4dae0;--cc-btn-secondary-hover-color:#000;--cc-btn-secondary-hover-border-color:#d4dae0;--cc-separator-border-color:#f0f4f7;--cc-toggle-on-bg:var(--cc-btn-primary-bg);--cc-toggle-off-bg:#667481;--cc-toggle-on-knob-bg:#fff;--cc-toggle-off-knob-bg:var(--cc-toggle-on-knob-bg);--cc-toggle-enabled-icon-color:var(--cc-bg);--cc-toggle-disabled-icon-color:var(--cc-bg);--cc-toggle-readonly-bg:#d5dee2;--cc-toggle-readonly-knob-bg:#fff;--cc-toggle-readonly-knob-icon-color:var(--cc-toggle-readonly-bg);--cc-section-category-border:var(--cc-cookie-category-block-bg);--cc-cookie-category-block-bg:#f0f4f7;--cc-cookie-category-block-border:#f0f4f7;--cc-cookie-category-block-hover-bg:#e9eff4;--cc-cookie-category-block-hover-border:#e9eff4;--cc-cookie-category-expanded-block-bg:transparent;--cc-cookie-category-expanded-block-hover-bg:#dee4e9;--cc-overlay-bg:rgba(0,0,0,.65);--cc-webkit-scrollbar-bg:var(--cc-section-category-border);--cc-webkit-scrollbar-hover-bg:var(--cc-btn-primary-hover-bg);--cc-footer-bg:var(--cc-btn-secondary-bg);--cc-footer-color:var(--cc-secondary-color);--cc-footer-border-color:#e4eaed;--cc-pm-toggle-border-radius:4em}#cc-main.cc--rtl{direction:rtl}#cc-main .cm__title,#cc-main a,#cc-main b,#cc-main em,#cc-main strong{font-weight:600}#cc-main button>span{pointer-events:none}#cc-main .cc__link,#cc-main a{background-image:linear-gradient(currentColor,currentColor);background-position:0 100%;background-repeat:no-repeat;background-size:0 1px;font-weight:600;position:relative;transition:background-size .25s,color .25s ease}#cc-main .cc__link:hover,#cc-main a:hover{background-size:100% 1px;color:var(--cc-primary-color)}#cc-main .cc__link{color:var(--cc-link-color)}#cc-main .cm__desc,#cc-main .pm__body{overscroll-behavior:auto contain;scrollbar-width:thin}@media screen and (min-width:640px){#cc-main ::-webkit-scrollbar,#cc-main ::-webkit-scrollbar-thumb,#cc-main ::-webkit-scrollbar-track{all:revert}#cc-main ::-webkit-scrollbar-thumb{-webkit-background-clip:padding-box;background-clip:padding-box;background:var(--cc-toggle-readonly-bg);border:.25rem solid var(--cc-bg);border-radius:1rem}#cc-main ::-webkit-scrollbar-thumb:hover{background:var(--cc-toggle-off-bg)}#cc-main ::-webkit-scrollbar{background:transparent;width:12px}}html.disable--interaction.show--consent,html.disable--interaction.show--consent body{height:auto!important;overflow:hidden!important}@media (prefers-reduced-motion){#cc-main{--cc-modal-transition-duration:0s}}.cc--darkmode{--cc-bg:#161a1c;--cc-primary-color:#ebf3f6;--cc-secondary-color:#aebbc5;--cc-btn-primary-bg:#c2d0e0;--cc-btn-primary-color:var(--cc-bg);--cc-btn-primary-border-color:var(--cc-btn-primary-bg);--cc-btn-primary-hover-bg:#98a7b6;--cc-btn-primary-hover-color:#000;--cc-btn-primary-hover-border-color:var(--cc-btn-primary-hover-bg);--cc-btn-secondary-bg:#242c31;--cc-btn-secondary-color:var(--cc-primary-color);--cc-btn-secondary-border-color:var(--cc-btn-secondary-bg);--cc-btn-secondary-hover-bg:#353d43;--cc-btn-secondary-hover-color:#fff;--cc-btn-secondary-hover-border-color:var(--cc-btn-secondary-hover-bg);--cc-separator-border-color:#222a30;--cc-toggle-on-bg:var(--cc-btn-primary-bg);--cc-toggle-off-bg:#525f6b;--cc-toggle-on-knob-bg:var(--cc-btn-primary-color);--cc-toggle-off-knob-bg:var(--cc-btn-primary-color);--cc-toggle-enabled-icon-color:var(--cc-btn-primary-color);--cc-toggle-disabled-icon-color:var(--cc-btn-primary-color);--cc-toggle-readonly-bg:#343e45;--cc-toggle-readonly-knob-bg:#5f6b72;--cc-toggle-readonly-knob-icon-color:var(--cc-toggle-readonly-bg);--cc-section-category-border:#1e2428;--cc-cookie-category-block-bg:#1e2428;--cc-cookie-category-block-border:var(--cc-section-category-border);--cc-cookie-category-block-hover-bg:#242c31;--cc-cookie-category-block-hover-border:#232a2f;--cc-cookie-category-expanded-block-bg:transparent;--cc-cookie-category-expanded-block-hover-bg:var(--cc-toggle-readonly-bg);--cc-overlay-bg:rgba(0,0,0,.65);--cc-webkit-scrollbar-bg:var(--cc-section-category-border);--cc-webkit-scrollbar-hover-bg:var(--cc-btn-primary-hover-bg);--cc-footer-bg:#0c0e0f;--cc-footer-color:var(--cc-secondary-color);--cc-footer-border-color:#060809}.cc--darkmode #cc-main{color-scheme:dark}#cc-main .cm{background:var(--cc-bg);border-radius:var(--cc-modal-border-radius);box-shadow:0 .625em 1.875em rgba(0,0,2,.3);display:flex;flex-direction:column;max-width:24rem;opacity:0;overflow:hidden;position:fixed;transform:translateY(1.6em);visibility:hidden;z-index:1}#cc-main .cm--top{top:var(--cc-modal-margin)}#cc-main .cm--middle{top:50%;transform:translateY(calc(-50% + 1.6em))}#cc-main .cm--bottom{bottom:var(--cc-modal-margin)}#cc-main .cm--center{left:var(--cc-modal-margin);margin:0 auto;right:var(--cc-modal-margin);width:unset}#cc-main .cm--left{left:var(--cc-modal-margin);margin-right:var(--cc-modal-margin)}#cc-main .cm--right{margin-left:var(--cc-modal-margin);right:var(--cc-modal-margin)}#cc-main .cm__body{display:flex;flex-direction:column;justify-content:space-between;position:relative}#cc-main .cm__btns,#cc-main .cm__links{padding:1rem 1.3rem;width:unset}#cc-main .cm__texts{display:flex;flex:1;flex-direction:column;justify-content:center;padding:1rem 0 0}#cc-main .cm__desc,#cc-main .cm__title{padding:0 1.3rem}#cc-main .cm__title{font-size:1.05em}#cc-main .cm__title+.cm__desc{margin-top:1.1em}#cc-main .cm__desc{color:var(--cc-secondary-color);font-size:.9em;line-height:1.5;max-height:40vh;overflow-x:visible;overflow-y:auto;padding-bottom:1em}#cc-main .cm__btns{border-top:1px solid var(--cc-separator-border-color);display:flex;flex-direction:column;justify-content:center}#cc-main .cm__btn-group{display:grid;grid-auto-columns:minmax(0,1fr)}#cc-main .cm__btn+.cm__btn,#cc-main .cm__btn-group+.cm__btn-group{margin-top:.375rem}#cc-main .cm--flip .cm__btn+.cm__btn,#cc-main .cm--flip .cm__btn-group+.cm__btn-group{margin-bottom:.375rem;margin-top:0}#cc-main .cm--inline .cm__btn+.cm__btn{margin-left:.375rem;margin-top:0}#cc-main .cm--inline.cm--flip .cm__btn+.cm__btn{margin-bottom:0;margin-left:0;margin-right:.375rem}#cc-main .cm--inline.cm--flip .cm__btn-group+.cm__btn-group{margin-bottom:.375rem;margin-right:0}#cc-main .cm--wide .cm__btn+.cm__btn,#cc-main .cm--wide .cm__btn-group+.cm__btn-group{margin-left:.375rem;margin-top:0}#cc-main .cm--wide.cm--flip .cm__btn+.cm__btn,#cc-main .cm--wide.cm--flip .cm__btn-group+.cm__btn-group{margin-bottom:0;margin-right:.375rem}#cc-main .cm--bar:not(.cm--inline) .cm__btn-group--uneven,#cc-main .cm--wide .cm__btn-group--uneven{display:flex;flex:1;justify-content:space-between}#cc-main .cm--bar:not(.cm--inline).cm--flip .cm__btn-group--uneven,#cc-main .cm--wide.cm--flip .cm__btn-group--uneven{flex-direction:row-reverse}#cc-main .cm__btn{background:var(--cc-btn-primary-bg);border:1px solid var(--cc-btn-primary-border-color);border-radius:var(--cc-btn-border-radius);color:var(--cc-btn-primary-color);font-size:.82em;font-weight:600;min-height:42px;padding:.5em 1em;text-align:center}#cc-main .cm__btn:hover{background:var(--cc-btn-primary-hover-bg);border-color:var(--cc-btn-primary-hover-border-color);color:var(--cc-btn-primary-hover-color)}#cc-main .cm__btn--secondary{background:var(--cc-btn-secondary-bg);border-color:var(--cc-btn-secondary-border-color);color:var(--cc-btn-secondary-color)}#cc-main .cm__btn--secondary:hover{background:var(--cc-btn-secondary-hover-bg);border-color:var(--cc-btn-secondary-hover-border-color);color:var(--cc-btn-secondary-hover-color)}#cc-main .cm__btn--close{border-radius:0;border-bottom-left-radius:var(--cc-btn-border-radius);border-right:none;border-top:none;display:none;font-size:1em;height:42px;min-width:auto!important;overflow:hidden;padding:0!important;position:absolute;right:0;top:0;width:42px}#cc-main .cm__btn--close svg{stroke:var(--cc-btn-primary-color);transform:scale(.5);transition:stroke .15s ease}#cc-main .cm__btn--close:hover svg{stroke:var(--cc-btn-primary-hover-color)}#cc-main .cm__btn--close.cm__btn--secondary svg{stroke:var(--cc-btn-secondary-color)}#cc-main .cm__btn--close.cm__btn--secondary:hover svg{stroke:var(--cc-btn-secondary-hover-color)}#cc-main .cm__btn--close+.cm__texts .cm__title{padding-right:3rem}#cc-main .cm--inline .cm__btn-group{grid-auto-flow:column}#cc-main .cm__footer{background:var(--cc-footer-bg);border-top:1px solid var(--cc-footer-border-color);color:var(--cc-footer-color);padding:.4em 0 .5em}#cc-main .cm__links{display:flex;flex-direction:row;padding-bottom:0;padding-top:0}#cc-main .cm__link-group{display:flex;flex-direction:row;font-size:.8em;width:100%}#cc-main .cm__link-group>*+*{margin-left:1.3rem}#cc-main .cm--flip .cm__btn:last-child{grid-row:1}#cc-main .cm--inline.cm--flip .cm__btn:last-child{grid-column:1}#cc-main .cm--box .cm__btn--close{display:block}#cc-main .cm--box.cm--flip .cm__btns{flex-direction:column-reverse}#cc-main .cm--box.cm--wide{max-width:36em}#cc-main .cm--box.cm--wide .cm__btns{flex-direction:row;justify-content:space-between}#cc-main .cm--box.cm--wide .cm__btn-group{grid-auto-flow:column}#cc-main .cm--box.cm--wide .cm__btn{min-width:120px;padding-left:1.8em;padding-right:1.8em}#cc-main .cm--box.cm--wide.cm--flip .cm__btns{flex-direction:row-reverse}#cc-main .cm--box.cm--wide.cm--flip .cm__btn:last-child{grid-column:1}#cc-main .cm--cloud{max-width:54em;width:unset}#cc-main .cm--cloud .cm__body{flex-direction:row}#cc-main .cm--cloud .cm__texts{flex:1}#cc-main .cm--cloud .cm__desc{max-height:9.4em}#cc-main .cm--cloud .cm__btns{border-left:1px solid var(--cc-separator-border-color);border-top:none;max-width:23em}#cc-main .cm--cloud .cm__btn-group{flex-direction:column}#cc-main .cm--cloud .cm__btn{min-width:19em}#cc-main .cm--cloud.cm--flip .cm__btn-group,#cc-main .cm--cloud.cm--flip .cm__btns{flex-direction:column-reverse}#cc-main .cm--cloud.cm--inline .cm__btn-group{flex-direction:row}#cc-main .cm--cloud.cm--inline .cm__btn{min-width:10em}#cc-main .cm--cloud.cm--inline.cm--flip .cm__btn-group{flex-direction:row-reverse}#cc-main .cm--bar{border-radius:0;left:0;margin:0;max-width:unset;opacity:1;right:0;transform:translateY(0);width:100vw;--cc-modal-transition-duration:.35s}#cc-main .cm--bar.cm--top{top:0;transform:translateY(-100%)}#cc-main .cm--bar.cm--bottom{bottom:0;transform:translateY(100%)}#cc-main .cm--bar .cm__body,#cc-main .cm--bar .cm__links{margin:0 auto;max-width:55em;width:100%}#cc-main .cm--bar .cm__body{padding:.5em 0 .9em}#cc-main .cm--bar .cm__btns{border-top:none;flex-direction:row;justify-content:space-between}#cc-main .cm--bar .cm__btn-group{grid-auto-flow:column}#cc-main .cm--bar:not(.cm--inline) .cm__btn+.cm__btn,#cc-main .cm--bar:not(.cm--inline) .cm__btn-group+.cm__btn-group{margin-left:.375rem;margin-top:0}#cc-main .cm--bar .cm__btn{min-width:120px;padding-left:2em;padding-right:2em}#cc-main .cm--bar.cm--flip:not(.cm--inline) .cm__btn+.cm__btn,#cc-main .cm--bar.cm--flip:not(.cm--inline) .cm__btn-group+.cm__btn-group{margin-bottom:0;margin-left:0;margin-right:.375rem}#cc-main .cm--bar.cm--flip .cm__btns{flex-direction:row-reverse}#cc-main .cm--bar.cm--flip .cm__btn:last-child{grid-column:1}#cc-main .cm--bar.cm--inline .cm__body,#cc-main .cm--bar.cm--inline .cm__links{max-width:74em}#cc-main .cm--bar.cm--inline .cm__body{flex-direction:row;padding:0}#cc-main .cm--bar.cm--inline .cm__btns{flex-direction:column;justify-content:center;max-width:23em}#cc-main .cm--bar.cm--inline.cm--flip .cm__btns{flex-direction:column-reverse}#cc-main .cc--anim .cm,#cc-main .cc--anim.cm-wrapper:before{transition:opacity var(--cc-modal-transition-duration) ease,visibility var(--cc-modal-transition-duration) ease,transform var(--cc-modal-transition-duration) ease}#cc-main .cc--anim .cm__btn,#cc-main .cc--anim .cm__close{transition:background-color .15s ease,border-color .15s ease,color .15s ease}.disable--interaction #cc-main .cm-wrapper:before{background:var(--cc-overlay-bg);bottom:0;content:\"\";left:0;opacity:0;position:fixed;right:0;top:0;visibility:hidden;z-index:0}.show--consent #cc-main .cc--anim .cm{opacity:1;transform:translateY(0);visibility:visible!important}.show--consent #cc-main .cc--anim .cm--middle{transform:translateY(-50%)}.show--consent #cc-main .cc--anim .cm--bar{transform:translateY(0)}.show--consent #cc-main .cc--anim.cm-wrapper:before{opacity:1;visibility:visible}#cc-main.cc--rtl .cm__btn--close{border-bottom-left-radius:unset;border-bottom-right-radius:var(--cc-btn-border-radius);left:0;right:unset}#cc-main.cc--rtl .cm__btn--close+.cm__texts .cm__title{padding-left:3rem!important;padding-right:1.3rem}#cc-main.cc--rtl .cm--inline .cm__btn+.cm__btn{margin-left:0;margin-right:.375rem}#cc-main.cc--rtl .cm--inline.cm--flip .cm__btn+.cm__btn{margin-left:.375rem;margin-right:0}#cc-main.cc--rtl .cm:not(.cm--inline).cm--bar .cm__btn+.cm__btn,#cc-main.cc--rtl .cm:not(.cm--inline).cm--bar .cm__btn-group+.cm__btn-group,#cc-main.cc--rtl .cm:not(.cm--inline).cm--wide .cm__btn+.cm__btn,#cc-main.cc--rtl .cm:not(.cm--inline).cm--wide .cm__btn-group+.cm__btn-group{margin-left:0;margin-right:.375rem}#cc-main.cc--rtl .cm:not(.cm--inline).cm--bar.cm--flip .cm__btn+.cm__btn,#cc-main.cc--rtl .cm:not(.cm--inline).cm--wide.cm--flip .cm__btn+.cm__btn{margin-left:.375rem;margin-right:0}#cc-main.cc--rtl .cm__link-group>*+*{margin-left:0;margin-right:1.3rem}@media screen and (max-width:640px){#cc-main{--cc-modal-margin:.5em}#cc-main .cm{max-width:none!important;width:auto!important}#cc-main .cm__body{flex-direction:column!important;padding:0!important}#cc-main .cm__btns,#cc-main .cm__desc,#cc-main .cm__links,#cc-main .cm__title{padding-left:1.1rem!important;padding-right:1.1rem!important}#cc-main .cm__btns{border-left:none!important;border-top:1px solid var(--cc-separator-border-color)!important;flex-direction:column!important;max-width:none!important;min-width:auto!important}#cc-main .cm__btn+.cm__btn,#cc-main .cm__btn-group+.cm__btn-group{margin:.375rem 0 0!important}#cc-main .cm--flip .cm__btn+.cm__btn,#cc-main .cm--flip .cm__btn-group+.cm__btn-group{margin-bottom:.375rem!important;margin-top:0!important}#cc-main .cm__btn-group{display:flex!important;flex-direction:column!important;min-width:auto!important}#cc-main .cm__btn{flex:auto!important}#cc-main .cm__link-group{justify-content:center!important}#cc-main .cm--flip .cm__btn-group,#cc-main .cm--flip .cm__btns{flex-direction:column-reverse!important}}#cc-main .pm-wrapper{position:relative;z-index:2}#cc-main .pm{background:var(--cc-bg);border-radius:var(--cc-modal-border-radius);box-shadow:0 .625em 1.875em rgba(0,0,2,.3);display:flex;flex-direction:column;opacity:0;overflow:hidden;position:fixed;visibility:hidden;width:100%;width:unset;z-index:1}#cc-main svg{fill:none;width:100%}#cc-main .pm__body,#cc-main .pm__footer,#cc-main .pm__header{padding:1em 1.4em}#cc-main .pm__header{align-items:center;border-bottom:1px solid var(--cc-separator-border-color);display:flex;justify-content:space-between}#cc-main .pm__title{align-items:center;display:flex;flex:1;font-weight:600;margin-right:2em}#cc-main .pm__close-btn{background:var(--cc-btn-secondary-bg);border:1px solid var(--cc-btn-secondary-border-color);border-radius:var(--cc-btn-border-radius);height:40px;position:relative;transition:all .15s ease;width:40px}#cc-main .pm__close-btn span{display:flex;height:100%;width:100%}#cc-main .pm__close-btn svg{stroke:var(--cc-btn-secondary-color);transform:scale(.5);transition:stroke .15s ease}#cc-main .pm__close-btn:hover{background:var(--cc-btn-secondary-hover-bg);border-color:var(--cc-btn-secondary-hover-border-color)}#cc-main .pm__close-btn:hover svg{stroke:var(--cc-btn-secondary-hover-color)}#cc-main .pm__body{flex:1;overflow-y:auto;overflow-y:overlay}#cc-main .pm__section,#cc-main .pm__section--toggle{border-radius:var(--cc-btn-border-radius);display:flex;flex-direction:column;margin-bottom:.5em}#cc-main .pm__section--toggle .pm__section-desc-wrapper{border:1px solid var(--cc-cookie-category-block-border);border-radius:var(--cc-btn-border-radius);border-top:none;border-top-left-radius:0;border-top-right-radius:0;display:none;margin-top:0!important;overflow:hidden}#cc-main .pm__section{border:1px solid var(--cc-separator-border-color);padding:1em;transition:background-color .25s ease,border-color .25s ease}#cc-main .pm__section:first-child{border:none;margin-bottom:2em;margin-top:0;padding:0;transition:none}#cc-main .pm__section:not(:first-child):hover{background:var(--cc-cookie-category-block-bg);border-color:var(--cc-cookie-category-block-border)}#cc-main .pm__section-toggles+.pm__section{margin-top:2em}#cc-main .pm__section--toggle{background:var(--cc-cookie-category-block-bg);border-top:none;margin-bottom:.375rem}#cc-main .pm__section--toggle .pm__section-title{align-items:center;background:var(--cc-cookie-category-block-bg);border:1px solid var(--cc-cookie-category-block-border);display:flex;justify-content:space-between;min-height:58px;padding:1.1em 5.4em 1.1em 1.2em;position:relative;transition:background-color .25s ease,border-color .25s ease;width:100%}#cc-main .pm__section--toggle .pm__section-title:hover{background:var(--cc-cookie-category-block-hover-bg);border-color:var(--cc-cookie-category-block-hover-border)}#cc-main .pm__section--toggle .pm__section-desc{margin-top:0;padding:1em}#cc-main .pm__section--toggle.is-expanded{--cc-cookie-category-block-bg:var(--cc-cookie-category-expanded-block-bg);--cc-cookie-category-block-border:var(--cc-cookie-category-expanded-block-hover-bg)}#cc-main .pm__section--toggle.is-expanded .pm__section-title{border-bottom-left-radius:0;border-bottom-right-radius:0}#cc-main .pm__section--toggle.is-expanded .pm__section-arrow svg{transform:scale(.5) rotate(180deg)}#cc-main .pm__section--toggle.is-expanded .pm__section-desc-wrapper{display:flex}#cc-main .pm__section--expandable .pm__section-title{cursor:pointer;padding-left:3.4em}#cc-main .pm__section--expandable .pm__section-arrow{background:var(--cc-toggle-readonly-bg);border-radius:100%;display:flex;height:20px;justify-content:center;left:18px;pointer-events:none;position:absolute;width:20px}#cc-main .pm__section--expandable .pm__section-arrow svg{stroke:var(--cc-btn-secondary-color);transform:scale(.5)}#cc-main .pm__section-title-wrapper{align-items:center;display:flex;position:relative}#cc-main .pm__section-title-wrapper+.pm__section-desc-wrapper{margin-top:.85em}#cc-main .pm__section-title{border-radius:var(--cc-btn-border-radius);font-size:.95em;font-weight:600}#cc-main .pm__badge{align-items:center;background:var(--cc-btn-secondary-bg);border-radius:5em;color:var(--cc-secondary-color);display:flex;flex:none;font-size:.8em;font-weight:600;height:23px;justify-content:center;margin-left:1em;min-width:23px;overflow:hidden;padding:0 .6em 1px;position:relative;text-align:center;white-space:nowrap;width:auto}#cc-main .pm__service-counter{background:var(--cc-btn-primary-bg);color:var(--cc-btn-primary-color);padding:0;width:23px}#cc-main .pm__service-counter[data-counterlabel]{padding:0 .6em 1px;width:auto}#cc-main .section__toggle,#cc-main .section__toggle-wrapper,#cc-main .toggle__icon,#cc-main .toggle__label{border-radius:var(--cc-pm-toggle-border-radius);height:23px;transform:translateZ(0);width:50px}#cc-main .section__toggle-wrapper{cursor:pointer;position:absolute;right:18px;z-index:1}#cc-main .toggle-service{height:19px;position:relative;right:0;width:42px}#cc-main .toggle-service .section__toggle,#cc-main .toggle-service .toggle__icon,#cc-main .toggle-service .toggle__label{height:19px;width:42px}#cc-main .toggle-service .toggle__icon{position:relative}#cc-main .toggle-service .toggle__icon-circle{height:19px;width:19px}#cc-main .toggle-service .section__toggle:checked~.toggle__icon .toggle__icon-circle{transform:translateX(23px)}#cc-main .pm__section--toggle:nth-child(2) .section__toggle-wrapper:after{display:none!important}#cc-main .section__toggle{border:0;cursor:pointer;display:block;left:0;margin:0;position:absolute;top:0}#cc-main .section__toggle:disabled{cursor:not-allowed}#cc-main .toggle__icon{background:var(--cc-toggle-off-bg);box-shadow:0 0 0 1px var(--cc-toggle-off-bg);display:flex;flex-direction:row;pointer-events:none;position:absolute;transition:all .25s ease}#cc-main .toggle__icon-circle{background:var(--cc-toggle-off-knob-bg);border:none;border-radius:var(--cc-pm-toggle-border-radius);box-shadow:0 1px 2px rgba(24,32,3,.36);display:block;height:23px;left:0;position:absolute;top:0;transition:transform .25s ease,background-color .25s ease;width:23px}#cc-main .toggle__icon-off,#cc-main .toggle__icon-on{height:100%;position:absolute;transition:opacity .15s ease;width:100%}#cc-main .toggle__icon-on{opacity:0;transform:rotate(45deg)}#cc-main .toggle__icon-on svg{stroke:var(--cc-toggle-on-bg);transform:scale(.55) rotate(-45deg)}#cc-main .toggle__icon-off{opacity:1}#cc-main .toggle__icon-off svg{stroke:var(--cc-toggle-off-bg);transform:scale(.55)}#cc-main .section__toggle:checked~.toggle__icon{background:var(--cc-toggle-on-bg);box-shadow:0 0 0 1px var(--cc-toggle-on-bg)}#cc-main .section__toggle:checked~.toggle__icon .toggle__icon-circle{background-color:var(--cc-toggle-on-knob-bg);transform:translateX(27px)}#cc-main .section__toggle:checked~.toggle__icon .toggle__icon-on{opacity:1}#cc-main .section__toggle:checked~.toggle__icon .toggle__icon-off{opacity:0}#cc-main .section__toggle:checked:disabled~.toggle__icon{background:var(--cc-toggle-readonly-bg);box-shadow:0 0 0 1px var(--cc-toggle-readonly-bg)}#cc-main .section__toggle:checked:disabled~.toggle__icon .toggle__icon-circle{background:var(--cc-toggle-readonly-knob-bg);box-shadow:none}#cc-main .section__toggle:checked:disabled~.toggle__icon svg{stroke:var(--cc-toggle-readonly-knob-icon-color)}#cc-main .toggle__label{opacity:0;overflow:hidden;pointer-events:none;position:absolute;top:0;z-index:-1}#cc-main .pm__section-desc-wrapper{color:var(--cc-secondary-color);display:flex;flex-direction:column;font-size:.9em}#cc-main .pm__section-desc-wrapper>:not(:last-child){border-bottom:1px solid var(--cc-cookie-category-block-border)}#cc-main .pm__section-services{display:flex;flex-direction:column}#cc-main .pm__service{align-items:center;display:flex;justify-content:space-between;padding:.4em 1.2em;position:relative;transition:background-color .15s ease}#cc-main .pm__service:hover{background-color:var(--cc-cookie-category-block-hover-bg)}#cc-main .pm__service-header{align-items:center;display:flex;margin-right:1em;width:100%}#cc-main .pm__service-icon{border:2px solid;border-radius:100%;height:8px;margin-left:6px;margin-right:20px;margin-top:1px;min-width:8px}#cc-main .pm__service-title{font-size:.95em;width:100%;word-break:break-word}#cc-main .pm__section-desc{line-height:1.5em}#cc-main .pm__section-table{border-collapse:collapse;font-size:.9em;margin:0;overflow:hidden;padding:0;text-align:left;width:100%}#cc-main .pm__table-caption{text-align:left}#cc-main .pm__table-caption,#cc-main .pm__table-head>tr{border-bottom:1px dashed var(--cc-separator-border-color);color:var(--cc-primary-color);font-weight:600}#cc-main .pm__table-tr{transition:background-color .15s ease}#cc-main .pm__table-tr:hover{background:var(--cc-cookie-category-block-hover-bg)}#cc-main .pm__table-caption,#cc-main .pm__table-td,#cc-main .pm__table-th{padding:.625em .625em .625em 1.2em;vertical-align:top}#cc-main .pm__footer{border-top:1px solid var(--cc-separator-border-color);display:flex;justify-content:space-between}#cc-main .pm__btn-group{display:flex}#cc-main .pm__btn+.pm__btn,#cc-main .pm__btn-group+.pm__btn-group{margin-left:.375rem}#cc-main .pm--flip .pm__btn+.pm__btn,#cc-main .pm--flip .pm__btn-group+.pm__btn-group{margin-left:0;margin-right:.375rem}#cc-main .pm__btn{background:var(--cc-btn-primary-bg);border:1px solid var(--cc-btn-primary-border-color);border-radius:var(--cc-btn-border-radius);color:var(--cc-btn-primary-color);flex:auto;font-size:.82em;font-weight:600;min-height:42px;min-width:110px;padding:.5em 1.5em;text-align:center;transition:background-color .15s ease,border-color .15s ease,color .15s ease}#cc-main .pm__btn:hover{background:var(--cc-btn-primary-hover-bg);border-color:var(--cc-btn-primary-hover-border-color);color:var(--cc-btn-primary-hover-color)}#cc-main .pm__btn--secondary{background:var(--cc-btn-secondary-bg);border-color:var(--cc-btn-secondary-border-color);color:var(--cc-btn-secondary-color)}#cc-main .pm__btn--secondary:hover{background:var(--cc-btn-secondary-hover-bg);border-color:var(--cc-btn-secondary-hover-border-color);color:var(--cc-btn-secondary-hover-color)}#cc-main .pm--box{height:calc(100% - 2em);left:var(--cc-modal-margin);margin:0 auto;max-height:37.5em;max-width:43em;right:var(--cc-modal-margin);top:50%;transform:translateY(calc(-50% + 1.6em))}#cc-main .pm--box.pm--flip .pm__btn-group,#cc-main .pm--box.pm--flip .pm__footer{flex-direction:row-reverse}#cc-main .pm--bar{border-radius:0;bottom:0;height:100%;margin:0;max-height:none;max-width:29em;opacity:1;top:0;width:100%;--cc-modal-transition-duration:.35s}#cc-main .pm--bar .pm__section-table,#cc-main .pm--bar .pm__table-body,#cc-main .pm--bar .pm__table-td,#cc-main .pm--bar .pm__table-th,#cc-main .pm--bar .pm__table-tr{display:block}#cc-main .pm--bar .pm__table-head{display:none}#cc-main .pm--bar .pm__table-caption{display:block}#cc-main .pm--bar .pm__table-tr:not(:last-child){border-bottom:1px solid var(--cc-separator-border-color)}#cc-main .pm--bar .pm__table-td{display:flex;justify-content:space-between}#cc-main .pm--bar .pm__table-td:before{color:var(--cc-primary-color);content:attr(data-column);flex:1;font-weight:600;min-width:100px;overflow:hidden;padding-right:2em;text-overflow:ellipsis}#cc-main .pm--bar .pm__table-td>div{flex:3}#cc-main .pm--bar:not(.pm--wide) .pm__body,#cc-main .pm--bar:not(.pm--wide) .pm__footer,#cc-main .pm--bar:not(.pm--wide) .pm__header{padding:1em 1.3em}#cc-main .pm--bar:not(.pm--wide) .pm__btn-group,#cc-main .pm--bar:not(.pm--wide) .pm__footer{flex-direction:column}#cc-main .pm--bar:not(.pm--wide) .pm__btn+.pm__btn,#cc-main .pm--bar:not(.pm--wide) .pm__btn-group+.pm__btn-group{margin:.375rem 0 0}#cc-main .pm--bar:not(.pm--wide).pm--flip .pm__btn-group,#cc-main .pm--bar:not(.pm--wide).pm--flip .pm__footer{flex-direction:column-reverse}#cc-main .pm--bar:not(.pm--wide).pm--flip .pm__btn+.pm__btn,#cc-main .pm--bar:not(.pm--wide).pm--flip .pm__btn-group+.pm__btn-group{margin-bottom:.375rem;margin-top:0}#cc-main .pm--bar:not(.pm--wide) .pm__badge{display:none}#cc-main .pm--bar.pm--left{left:0;transform:translateX(-100%)}#cc-main .pm--bar.pm--right{right:0;transform:translateX(100%)}#cc-main .pm--bar.pm--wide{max-width:35em}#cc-main .pm--bar.pm--wide .pm__body,#cc-main .pm--bar.pm--wide .pm__footer,#cc-main .pm--bar.pm--wide .pm__header{padding:1em 1.4em}#cc-main .pm--bar.pm--wide.pm--flip .pm__btn-group,#cc-main .pm--bar.pm--wide.pm--flip .pm__footer{flex-direction:row-reverse}#cc-main .pm-overlay{background:var(--cc-overlay-bg);bottom:0;content:\"\";left:0;opacity:0;position:fixed;right:0;top:0;visibility:hidden;z-index:1}#cc-main .cc--anim .pm,#cc-main .cc--anim .pm-overlay{transition:opacity var(--cc-modal-transition-duration) ease,visibility var(--cc-modal-transition-duration) ease,transform var(--cc-modal-transition-duration) ease}.show--preferences #cc-main .cc--anim .pm{opacity:1;visibility:visible!important}.show--preferences #cc-main .cc--anim .pm--box{transform:translateY(-50%)}.show--preferences #cc-main .cc--anim .pm--bar{transform:translateX(0)}.show--preferences #cc-main .cc--anim .pm-overlay{opacity:1;visibility:visible}#cc-main.cc--rtl .pm__service-header{margin-left:1em;margin-right:0}#cc-main.cc--rtl .pm__section-arrow{left:unset;right:18px}#cc-main.cc--rtl .section__toggle-wrapper{left:18px;right:unset;transform-origin:left}#cc-main.cc--rtl .toggle-service{left:0}#cc-main.cc--rtl .pm__service-icon{margin-left:20px;margin-right:5px}#cc-main.cc--rtl .pm__section--toggle .pm__section-title{padding-left:5.4em;padding-right:1.2em}#cc-main.cc--rtl .pm__section--expandable .pm__section-title{padding-right:3.4em}#cc-main.cc--rtl .pm__badge{margin-left:unset;margin-right:1em}#cc-main.cc--rtl .toggle__icon-circle{transform:translateX(27px)}#cc-main.cc--rtl .toggle-service .toggle__icon-circle{transform:translateX(23px)}#cc-main.cc--rtl .section__toggle:checked~.toggle__icon .toggle__icon-circle{transform:translateX(0)}#cc-main.cc--rtl .pm__table-td,#cc-main.cc--rtl .pm__table-th{padding-left:unset;padding-right:1.2em;text-align:right}#cc-main.cc--rtl .pm__table-td{padding-left:unset;padding-right:1.2em}#cc-main.cc--rtl .pm__table-td:before{padding-left:2em;padding-right:unset}#cc-main.cc--rtl .pm__btn+.pm__btn,#cc-main.cc--rtl .pm__btn-group+.pm__btn-group{margin-left:0;margin-right:.375rem}#cc-main.cc--rtl .pm--flip .pm__btn+.pm__btn,#cc-main.cc--rtl .pm--flip .pm__btn-group+.pm__btn-group{margin-left:.375rem;margin-right:0}#cc-main.cc--rtl .pm--flip.pm--bar:not(.pm--wide) .pm__btn+.pm__btn,#cc-main.cc--rtl .pm--flip.pm--bar:not(.pm--wide) .pm__btn-group+.pm__btn-group{margin-left:0}@media screen and (max-width:640px){#cc-main .pm{border-radius:0;bottom:0;height:auto;left:0;max-height:100%;max-width:none!important;right:0;top:0;transform:translateY(1.6em)}#cc-main .pm__body,#cc-main .pm__footer,#cc-main .pm__header{padding:.9em!important}#cc-main .pm__badge{display:none}#cc-main .pm__section-table,#cc-main .pm__table-body,#cc-main .pm__table-caption,#cc-main .pm__table-td,#cc-main .pm__table-th,#cc-main .pm__table-tr{display:block}#cc-main .pm__table-head{display:none}#cc-main .pm__table-tr:not(:last-child){border-bottom:1px solid var(--cc-separator-border-color)}#cc-main .pm__table-td{display:flex;justify-content:space-between}#cc-main .pm__table-td:before{color:var(--cc-primary-color);content:attr(data-column);flex:1;font-weight:600;min-width:100px;overflow:hidden;padding-right:2em;text-overflow:ellipsis}#cc-main .pm__table-td>div{flex:3}#cc-main .pm__btn-group,#cc-main .pm__footer{flex-direction:column!important}#cc-main .pm__btn-group{display:flex!important}#cc-main .pm__btn+.pm__btn,#cc-main .pm__btn-group+.pm__btn-group{margin:.375rem 0 0!important}#cc-main .pm--flip .pm__btn+.pm__btn,#cc-main .pm--flip .pm__btn-group+.pm__btn-group{margin-bottom:.375rem!important;margin-top:0!important}#cc-main .pm--flip .pm__btn-group,#cc-main .pm--flip .pm__footer{flex-direction:column-reverse!important}.show--preferences #cc-main .cc--anim .pm{transform:translateY(0)!important}}"}],"page":{"pagePath":"rc/user-guide/deploy-and-call","slug":"/rc/user-guide/deploy-and-call","pageMetadata":{"title":"Deploy a release and call it","description":"Release a Lab project, deploy it to a runtime cluster, create an evaluation key, and call a blueprint with curl.","href":"/rc/user-guide/deploy-and-call"},"description":{"compiledSource":"\"use strict\";\nconst {jsx: _jsx} = arguments[0];\nconst {useMDXComponents: _provideComponents} = arguments[0];\nfunction _createMdxContent(props) {\n const _components = {\n p: \"p\",\n ..._provideComponents(),\n ...props.components\n };\n return _jsx(_components.p, {\n children: \"Release a Lab project, deploy it to a runtime cluster, create an evaluation key, and call a blueprint with curl.\"\n });\n}\nfunction MDXContent(props = {}) {\n const {wrapper: MDXLayout} = {\n ..._provideComponents(),\n ...props.components\n };\n return MDXLayout ? _jsx(MDXLayout, {\n ...props,\n children: _jsx(_createMdxContent, {\n ...props\n })\n }) : _createMdxContent(props);\n}\nreturn {\n default: MDXContent\n};\n","frontmatter":{},"scope":{}},"pageType":"default","mdx":{"mdxSource":{"compiledSource":"\"use strict\";const{Fragment:_Fragment,jsx:_jsx,jsxs:_jsxs}=arguments[0];const{useMDXComponents:_provideComponents}=arguments[0];function _createMdxContent(props){const _components={a:`a`,code:`code`,li:`li`,p:`p`,pre:`pre`,span:`span`,strong:`strong`,ul:`ul`,..._provideComponents(),...props.components},{CodeBlock,Frame,Heading,Note,OptimizedImage,Step,Steps}=_components;if(!CodeBlock)_missingMdxReference(`CodeBlock`,true);if(!Frame)_missingMdxReference(`Frame`,true);if(!Heading)_missingMdxReference(`Heading`,true);if(!Note)_missingMdxReference(`Note`,true);if(!OptimizedImage)_missingMdxReference(`OptimizedImage`,true);if(!Step)_missingMdxReference(`Step`,true);if(!Steps)_missingMdxReference(`Steps`,true);return _jsxs(_Fragment,{children:[_jsxs(_components.p,{children:[`In this tutorial you take a project from the Lab to a runtime cluster and call it from a terminal. You create a release, deploy it to an environment, create an evaluation key in the Admin UI, and run a blueprint with `,_jsx(_components.code,{children:`curl`}),`. Afterwards, any system that can send an HTTP request can use your blueprint.`]}),`\n`,_jsxs(_components.p,{children:[`The tutorial uses the Pizza Pricing Calculator project. Its blueprint `,_jsx(_components.strong,{children:`Pizza Pricing`}),` calculates the price of a pizza from its size, toppings, crust and day of the week. You can follow the same steps with your own project: the names on your screen will be different.`]}),`\n`,_jsx(Heading,{level:`2`,id:`before-you-start`,children:`Before you start`}),`\n`,_jsxs(_components.ul,{children:[`\n`,_jsx(_components.li,{children:`A Lab account and a project with at least one public blueprint that was never deployed. The Pizza Pricing Calculator project comes from the Leapter examples.`}),`\n`,_jsxs(_components.li,{children:[`The right to deploy to an environment of your runtime cluster, and to create evaluation keys there. `,_jsx(_components.a,{href:`/rc/user-guide/concepts#who-may-do-what`,children:`Who may do what`}),` explains the rights.`]}),`\n`,_jsxs(_components.li,{children:[`A terminal with `,_jsx(_components.code,{children:`curl`}),`.`]}),`\n`]}),`\n`,_jsx(Heading,{level:`2`,id:`steps`,children:`Steps`}),`\n`,_jsxs(Steps,{children:[_jsxs(Step,{title:`Open the Deploy dialog`,children:[_jsxs(_components.p,{children:[`Open the project in the Lab and click `,_jsx(_components.strong,{children:`Deploy`}),` in the toolbar.`]}),_jsxs(_components.p,{children:[`You should see the `,_jsx(_components.strong,{children:`Deploy`}),` dialog. `,_jsx(_components.strong,{children:`Version name`}),` is filled in with the next version, for example `,_jsx(_components.code,{children:`v1`}),`. Under `,_jsx(_components.strong,{children:`Callable on the cluster`}),` you see the public blueprints that callers can run.`]}),_jsx(Frame,{caption:`The Deploy dialog with the version name and Create release.`,children:_jsx(OptimizedImage,{src:`https://mintcdn.com/leapter/3NthIZmfsFFgUhyn/rc/user-guide/images/lab-deploy-create-release.png?fit=max\u0026auto=format\u0026n=3NthIZmfsFFgUhyn\u0026q=85\u0026s=c8e52fdb298c382fccae1a3c6046f199`,alt:`The Lab's Deploy dialog. Version name is v1, Description is empty, Callable on the cluster lists Pizza Pricing. The Create release button has a green ring.`,\"data-og-width\":`1920`,width:`1920`,\"data-og-height\":`1280`,height:`1280`,\"data-path\":`rc/user-guide/images/lab-deploy-create-release.png`,\"data-optimize\":`true`,\"data-opv\":`3`,srcset:`https://mintcdn.com/leapter/3NthIZmfsFFgUhyn/rc/user-guide/images/lab-deploy-create-release.png?w=280\u0026fit=max\u0026auto=format\u0026n=3NthIZmfsFFgUhyn\u0026q=85\u0026s=3d3f434ce038d6060a2c53419ccc1a79 280w, https://mintcdn.com/leapter/3NthIZmfsFFgUhyn/rc/user-guide/images/lab-deploy-create-release.png?w=560\u0026fit=max\u0026auto=format\u0026n=3NthIZmfsFFgUhyn\u0026q=85\u0026s=4664ee4bb2a1344826f9130bad7a91d2 560w, https://mintcdn.com/leapter/3NthIZmfsFFgUhyn/rc/user-guide/images/lab-deploy-create-release.png?w=840\u0026fit=max\u0026auto=format\u0026n=3NthIZmfsFFgUhyn\u0026q=85\u0026s=4e33e40c8a7d285f0410ee2bafd26abe 840w, https://mintcdn.com/leapter/3NthIZmfsFFgUhyn/rc/user-guide/images/lab-deploy-create-release.png?w=1100\u0026fit=max\u0026auto=format\u0026n=3NthIZmfsFFgUhyn\u0026q=85\u0026s=821ee0c7c3b8959ab3895ee573e73c59 1100w, https://mintcdn.com/leapter/3NthIZmfsFFgUhyn/rc/user-guide/images/lab-deploy-create-release.png?w=1650\u0026fit=max\u0026auto=format\u0026n=3NthIZmfsFFgUhyn\u0026q=85\u0026s=82b201791cc43d48327d8e41867a2463 1650w, https://mintcdn.com/leapter/3NthIZmfsFFgUhyn/rc/user-guide/images/lab-deploy-create-release.png?w=2500\u0026fit=max\u0026auto=format\u0026n=3NthIZmfsFFgUhyn\u0026q=85\u0026s=05fc1c7a8a7f88af5081f42218764b93 2500w`})})]}),_jsxs(Step,{title:`Create the release`,children:[_jsxs(_components.p,{children:[`Click `,_jsx(_components.strong,{children:`Create release`}),`.`]}),_jsxs(_components.p,{children:[`You should see `,_jsx(_components.strong,{children:`Release created`}),` and “v1 is ready.” Below it, under `,_jsx(_components.strong,{children:`Deploy to an environment`}),`, the dialog says where the release goes:`]}),_jsxs(_components.ul,{children:[`\n`,_jsxs(_components.li,{children:[`When your workspace uses only Leapter Cloud, it says `,_jsx(_components.strong,{children:`Deploys to Leapter Cloud`}),`, with the address of the runtime cluster below it, for example `,_jsx(_components.code,{children:`https://cluster.example.com`}),`.`]}),`\n`,_jsxs(_components.li,{children:[`When your workspace has runtime clusters of its own, it shows `,_jsx(_components.strong,{children:`Runtime Cluster`}),` with `,_jsx(_components.strong,{children:`Choose a cluster`}),`. Choose yours in the list, and its address appears below it.`]}),`\n`]}),_jsx(Frame,{caption:`After Create release, the dialog offers to deploy to the runtime cluster.`,children:_jsx(OptimizedImage,{src:`https://mintcdn.com/leapter/3NthIZmfsFFgUhyn/rc/user-guide/images/lab-deploy-sign-in.png?fit=max\u0026auto=format\u0026n=3NthIZmfsFFgUhyn\u0026q=85\u0026s=2eb60833480fda8705af84058dd02457`,alt:`The dialog now says Release created and v1 is ready. Under Deploy to an environment, Runtime Cluster shows Leapter Cloud with the address https://cluster.example.com. The Sign in and deploy button has a green ring.`,\"data-og-width\":`1920`,width:`1920`,\"data-og-height\":`1280`,height:`1280`,\"data-path\":`rc/user-guide/images/lab-deploy-sign-in.png`,\"data-optimize\":`true`,\"data-opv\":`3`,srcset:`https://mintcdn.com/leapter/3NthIZmfsFFgUhyn/rc/user-guide/images/lab-deploy-sign-in.png?w=280\u0026fit=max\u0026auto=format\u0026n=3NthIZmfsFFgUhyn\u0026q=85\u0026s=922efff1c75a3e1fc6643f37fbd3c5ab 280w, https://mintcdn.com/leapter/3NthIZmfsFFgUhyn/rc/user-guide/images/lab-deploy-sign-in.png?w=560\u0026fit=max\u0026auto=format\u0026n=3NthIZmfsFFgUhyn\u0026q=85\u0026s=2e3e88273cf86059dc62af47da5315f3 560w, https://mintcdn.com/leapter/3NthIZmfsFFgUhyn/rc/user-guide/images/lab-deploy-sign-in.png?w=840\u0026fit=max\u0026auto=format\u0026n=3NthIZmfsFFgUhyn\u0026q=85\u0026s=852064cd930e87a1cfc2ce7817741a13 840w, https://mintcdn.com/leapter/3NthIZmfsFFgUhyn/rc/user-guide/images/lab-deploy-sign-in.png?w=1100\u0026fit=max\u0026auto=format\u0026n=3NthIZmfsFFgUhyn\u0026q=85\u0026s=5bbfb906c6bf6f699ec908545bb6fea0 1100w, https://mintcdn.com/leapter/3NthIZmfsFFgUhyn/rc/user-guide/images/lab-deploy-sign-in.png?w=1650\u0026fit=max\u0026auto=format\u0026n=3NthIZmfsFFgUhyn\u0026q=85\u0026s=4eec357f312472f6f268e64421b0023e 1650w, https://mintcdn.com/leapter/3NthIZmfsFFgUhyn/rc/user-guide/images/lab-deploy-sign-in.png?w=2500\u0026fit=max\u0026auto=format\u0026n=3NthIZmfsFFgUhyn\u0026q=85\u0026s=b2bd968c7322e50eb09e5d337840d4bf 2500w`})})]}),_jsxs(Step,{title:`Sign in to the runtime cluster and deploy`,children:[_jsx(_components.p,{children:`The button below says what it does:`}),_jsxs(_components.ul,{children:[`\n`,_jsxs(_components.li,{children:[_jsx(_components.strong,{children:`Deploy to playground`}),` (or another environment): the Lab has already signed you in to the runtime cluster. Click it.`]}),`\n`,_jsxs(_components.li,{children:[_jsx(_components.strong,{children:`Sign in and deploy`}),`: click it. A sign-in window opens. If it asks you to allow the runtime cluster to sign you in, click `,_jsx(_components.strong,{children:`Allow`}),`. The window closes by itself. When you are already signed in to the Lab, it can close before you see it.`]}),`\n`]}),_jsxs(_components.p,{children:[`If you may deploy to only one environment, the Lab deploys to it. On Leapter Cloud the line above the button then names it, for example `,_jsx(_components.strong,{children:`Deploys to Leapter Cloud · playground`}),`. If you may deploy to more than one, choose the one your callers should use in `,_jsx(_components.strong,{children:`Environment`}),`, for example the environment for trying things out (here `,_jsx(_components.code,{children:`playground`}),`). Then click the button `,_jsx(_components.strong,{children:`Deploy to`}),` with the environment’s name.`]}),_jsxs(_components.p,{children:[`On Leapter’s own runtime cluster, the Lab first prepares `,_jsx(_components.code,{children:`playground`}),` for your project, so `,_jsx(_components.code,{children:`playground`}),` is always in the list there. While it does this, the dialog shows `,_jsx(_components.strong,{children:`Preparing playground access…`}),`. The first deploy of a project to `,_jsx(_components.code,{children:`playground`}),` gives you the rights on that application in `,_jsx(_components.code,{children:`playground`}),`, so you need no one to give them to you. If the project’s name is already used in `,_jsx(_components.code,{children:`playground`}),` by another workspace, the dialog says that the name is already in use and asks you to rename the project. The Lab then sends nothing to `,_jsx(_components.code,{children:`playground`}),`, but you can still sign in and deploy to another environment.`]}),_jsx(_components.p,{children:`You should see three lines like these:`}),_jsx(Frame,{caption:`The release is deployed. The dialog names the application and says that callers need a key.`,children:_jsx(OptimizedImage,{src:`https://mintcdn.com/leapter/3NthIZmfsFFgUhyn/rc/user-guide/images/lab-deploy-deployed.png?fit=max\u0026auto=format\u0026n=3NthIZmfsFFgUhyn\u0026q=85\u0026s=bbaf3f891611a0dd1cce780c3c7daa99`,alt:`The end of the Deploy dialog: This project is called pizza-pricing-calculator-180269 there. A green check mark and v1 is deployed to playground. Callers need an evaluation key for playground before they can run it.`,\"data-og-width\":`960`,width:`960`,\"data-og-height\":`300`,height:`300`,\"data-path\":`rc/user-guide/images/lab-deploy-deployed.png`,\"data-optimize\":`true`,\"data-opv\":`3`,srcset:`https://mintcdn.com/leapter/3NthIZmfsFFgUhyn/rc/user-guide/images/lab-deploy-deployed.png?w=280\u0026fit=max\u0026auto=format\u0026n=3NthIZmfsFFgUhyn\u0026q=85\u0026s=aadd4a6bb0fdaf1ebb32d66330e1889b 280w, https://mintcdn.com/leapter/3NthIZmfsFFgUhyn/rc/user-guide/images/lab-deploy-deployed.png?w=560\u0026fit=max\u0026auto=format\u0026n=3NthIZmfsFFgUhyn\u0026q=85\u0026s=12ed6037d3274a0b83cef7618f6f303b 560w, https://mintcdn.com/leapter/3NthIZmfsFFgUhyn/rc/user-guide/images/lab-deploy-deployed.png?w=840\u0026fit=max\u0026auto=format\u0026n=3NthIZmfsFFgUhyn\u0026q=85\u0026s=00e0f5a0ca5153cc4143f4291a10e480 840w, https://mintcdn.com/leapter/3NthIZmfsFFgUhyn/rc/user-guide/images/lab-deploy-deployed.png?w=1100\u0026fit=max\u0026auto=format\u0026n=3NthIZmfsFFgUhyn\u0026q=85\u0026s=5b35d50f415834009b2a7c2acd315851 1100w, https://mintcdn.com/leapter/3NthIZmfsFFgUhyn/rc/user-guide/images/lab-deploy-deployed.png?w=1650\u0026fit=max\u0026auto=format\u0026n=3NthIZmfsFFgUhyn\u0026q=85\u0026s=cb6439f3852e9ece7233dcef5117caf0 1650w, https://mintcdn.com/leapter/3NthIZmfsFFgUhyn/rc/user-guide/images/lab-deploy-deployed.png?w=2500\u0026fit=max\u0026auto=format\u0026n=3NthIZmfsFFgUhyn\u0026q=85\u0026s=a32779644070c9fdb777744e945d462d 2500w`})}),_jsxs(_components.p,{children:[`Click `,_jsx(_components.strong,{children:`Create an evaluation key`}),` below the last line. The Admin UI of your runtime cluster opens in a new tab.`]})]}),_jsxs(Step,{title:`Open your application in the Admin UI`,children:[_jsxs(_components.p,{children:[`If the Admin UI asks you to sign in, click `,_jsx(_components.strong,{children:`Sign in with Leapter`}),`. Your application’s page opens.`]}),_jsxs(_components.p,{children:[`If you closed the Lab dialog, open the Admin UI yourself. Its address is the cluster address followed by `,_jsx(_components.code,{children:`/runtime-management/ui/`}),`, for example `,_jsx(_components.code,{children:`https://cluster.example.com/runtime-management/ui/`}),`. Click `,_jsx(_components.strong,{children:`Sign in with Leapter`}),`. The `,_jsx(_components.strong,{children:`Status`}),` page opens. At the bottom of the sidebar, choose your environment in the environment list. Your application is in the table. `,_jsx(_components.strong,{children:`Serving now`}),` says “Not served yet: this application has no evaluation key in playground.”, and `,_jsx(_components.strong,{children:`Drift`}),` says `,_jsx(_components.strong,{children:`Not served`}),`. In your application’s row, click `,_jsx(_components.strong,{children:`Create an evaluation key`}),`.`]}),_jsx(Frame,{caption:`The Status page before the application has a key.`,children:_jsx(OptimizedImage,{src:`https://mintcdn.com/leapter/3NthIZmfsFFgUhyn/rc/user-guide/images/admin-status-no-key.png?fit=max\u0026auto=format\u0026n=3NthIZmfsFFgUhyn\u0026q=85\u0026s=67a0353269e2a5d20e3a522a7b9b3dd0`,alt:`The Admin UI Status page for the playground environment. The row for pizza-pricing-calculator-180269 shows release v1, Not served yet: this application has no evaluation key in playground, and Not served in the Drift column. The Create an evaluation key link has a green ring.`,\"data-og-width\":`2880`,width:`2880`,\"data-og-height\":`1800`,height:`1800`,\"data-path\":`rc/user-guide/images/admin-status-no-key.png`,\"data-optimize\":`true`,\"data-opv\":`3`,srcset:`https://mintcdn.com/leapter/3NthIZmfsFFgUhyn/rc/user-guide/images/admin-status-no-key.png?w=280\u0026fit=max\u0026auto=format\u0026n=3NthIZmfsFFgUhyn\u0026q=85\u0026s=2a63befec04946f24129be6869624eeb 280w, https://mintcdn.com/leapter/3NthIZmfsFFgUhyn/rc/user-guide/images/admin-status-no-key.png?w=560\u0026fit=max\u0026auto=format\u0026n=3NthIZmfsFFgUhyn\u0026q=85\u0026s=843429bed6e813364421996c6996426a 560w, https://mintcdn.com/leapter/3NthIZmfsFFgUhyn/rc/user-guide/images/admin-status-no-key.png?w=840\u0026fit=max\u0026auto=format\u0026n=3NthIZmfsFFgUhyn\u0026q=85\u0026s=1e20a62f7c07d554e2e4d6514351ac07 840w, https://mintcdn.com/leapter/3NthIZmfsFFgUhyn/rc/user-guide/images/admin-status-no-key.png?w=1100\u0026fit=max\u0026auto=format\u0026n=3NthIZmfsFFgUhyn\u0026q=85\u0026s=1a302b9c0e14e1fdaac80fa48d053428 1100w, https://mintcdn.com/leapter/3NthIZmfsFFgUhyn/rc/user-guide/images/admin-status-no-key.png?w=1650\u0026fit=max\u0026auto=format\u0026n=3NthIZmfsFFgUhyn\u0026q=85\u0026s=e5f395a4a25ed4216018e6a4eb93c83a 1650w, https://mintcdn.com/leapter/3NthIZmfsFFgUhyn/rc/user-guide/images/admin-status-no-key.png?w=2500\u0026fit=max\u0026auto=format\u0026n=3NthIZmfsFFgUhyn\u0026q=85\u0026s=042246cc487d9aca1d8b90d7de1f7b81 2500w`})})]}),_jsxs(Step,{title:`Create an evaluation key`,children:[_jsxs(_components.p,{children:[`On your application’s page, go to the last card, `,_jsx(_components.strong,{children:`Keys`}),`, and click `,_jsx(_components.strong,{children:`Create key`}),`.`]}),_jsx(Frame,{caption:`The Keys card of the application, before it has a key.`,children:_jsx(OptimizedImage,{src:`https://mintcdn.com/leapter/3NthIZmfsFFgUhyn/rc/user-guide/images/admin-keys-create.png?fit=max\u0026auto=format\u0026n=3NthIZmfsFFgUhyn\u0026q=85\u0026s=5a9f087ce07bff935b083d47a26f47e0`,alt:`The application page of pizza-pricing-calculator-180269. The Keys card says This application has no key in this environment. The Create key button has a green ring.`,\"data-og-width\":`2880`,width:`2880`,\"data-og-height\":`1800`,height:`1800`,\"data-path\":`rc/user-guide/images/admin-keys-create.png`,\"data-optimize\":`true`,\"data-opv\":`3`,srcset:`https://mintcdn.com/leapter/3NthIZmfsFFgUhyn/rc/user-guide/images/admin-keys-create.png?w=280\u0026fit=max\u0026auto=format\u0026n=3NthIZmfsFFgUhyn\u0026q=85\u0026s=da4747f86cecf501c7d2ec02a81a47f5 280w, https://mintcdn.com/leapter/3NthIZmfsFFgUhyn/rc/user-guide/images/admin-keys-create.png?w=560\u0026fit=max\u0026auto=format\u0026n=3NthIZmfsFFgUhyn\u0026q=85\u0026s=2a49d1add2b363c432fe94801cddc5da 560w, https://mintcdn.com/leapter/3NthIZmfsFFgUhyn/rc/user-guide/images/admin-keys-create.png?w=840\u0026fit=max\u0026auto=format\u0026n=3NthIZmfsFFgUhyn\u0026q=85\u0026s=1c5b1c74545f555543b9e92f65507a5f 840w, https://mintcdn.com/leapter/3NthIZmfsFFgUhyn/rc/user-guide/images/admin-keys-create.png?w=1100\u0026fit=max\u0026auto=format\u0026n=3NthIZmfsFFgUhyn\u0026q=85\u0026s=c6166bb736c36e8d0fde8c444cc034f9 1100w, https://mintcdn.com/leapter/3NthIZmfsFFgUhyn/rc/user-guide/images/admin-keys-create.png?w=1650\u0026fit=max\u0026auto=format\u0026n=3NthIZmfsFFgUhyn\u0026q=85\u0026s=31cb4d41efe359d6d6d1dcd28fe4a76d 1650w, https://mintcdn.com/leapter/3NthIZmfsFFgUhyn/rc/user-guide/images/admin-keys-create.png?w=2500\u0026fit=max\u0026auto=format\u0026n=3NthIZmfsFFgUhyn\u0026q=85\u0026s=8673fe129bb1856856da5c1504b29b37 2500w`})}),_jsxs(_components.p,{children:[`In the dialog `,_jsx(_components.strong,{children:`Create an evaluation key`}),`, type the system that will call in `,_jsx(_components.strong,{children:`Used by`}),`, for example `,_jsx(_components.code,{children:`pizza-shop`}),`. Type why it needs the key in `,_jsx(_components.strong,{children:`Reason`}),`, for example `,_jsx(_components.code,{children:`The pizza shop shows prices from this release`}),`. Click `,_jsx(_components.strong,{children:`Create`}),`.`]}),_jsx(Frame,{caption:`Used by names the calling system, Reason says why it needs the key.`,children:_jsx(OptimizedImage,{src:`https://mintcdn.com/leapter/3NthIZmfsFFgUhyn/rc/user-guide/images/admin-keys-create-dialog.png?fit=max\u0026auto=format\u0026n=3NthIZmfsFFgUhyn\u0026q=85\u0026s=24c7681ca2ee4651550c1eef554f454d`,alt:`The dialog Create an evaluation key with Used by pizza-shop and Reason The pizza shop shows prices from this release. The Create button has a green ring.`,\"data-og-width\":`960`,width:`960`,\"data-og-height\":`960`,height:`960`,\"data-path\":`rc/user-guide/images/admin-keys-create-dialog.png`,\"data-optimize\":`true`,\"data-opv\":`3`,srcset:`https://mintcdn.com/leapter/3NthIZmfsFFgUhyn/rc/user-guide/images/admin-keys-create-dialog.png?w=280\u0026fit=max\u0026auto=format\u0026n=3NthIZmfsFFgUhyn\u0026q=85\u0026s=371c891150ccb8faa0602fcc348f9485 280w, https://mintcdn.com/leapter/3NthIZmfsFFgUhyn/rc/user-guide/images/admin-keys-create-dialog.png?w=560\u0026fit=max\u0026auto=format\u0026n=3NthIZmfsFFgUhyn\u0026q=85\u0026s=1cfeb7e90680357686fd7acc8750b660 560w, https://mintcdn.com/leapter/3NthIZmfsFFgUhyn/rc/user-guide/images/admin-keys-create-dialog.png?w=840\u0026fit=max\u0026auto=format\u0026n=3NthIZmfsFFgUhyn\u0026q=85\u0026s=7a8e707c9d18b54334e4f7c00ca3215f 840w, https://mintcdn.com/leapter/3NthIZmfsFFgUhyn/rc/user-guide/images/admin-keys-create-dialog.png?w=1100\u0026fit=max\u0026auto=format\u0026n=3NthIZmfsFFgUhyn\u0026q=85\u0026s=2c42a3f7458a9a53ab5d01b97d55ea88 1100w, https://mintcdn.com/leapter/3NthIZmfsFFgUhyn/rc/user-guide/images/admin-keys-create-dialog.png?w=1650\u0026fit=max\u0026auto=format\u0026n=3NthIZmfsFFgUhyn\u0026q=85\u0026s=52206609f2c22f1a06e5bb6c0ef3a61c 1650w, https://mintcdn.com/leapter/3NthIZmfsFFgUhyn/rc/user-guide/images/admin-keys-create-dialog.png?w=2500\u0026fit=max\u0026auto=format\u0026n=3NthIZmfsFFgUhyn\u0026q=85\u0026s=0bfcbb62e0c4d5e2c2c0f6262c29ae42 2500w`})})]}),_jsxs(Step,{title:`Copy the key`,children:[_jsxs(_components.p,{children:[`The dialog `,_jsx(_components.strong,{children:`Copy this key now`}),` shows the start of the key. Click the copy button next to it. `,_jsx(_components.strong,{children:`Copied`}),` appears below the key.`]}),_jsx(Frame,{caption:`The key is shown only once. The copy button puts it on your clipboard.`,children:_jsx(OptimizedImage,{src:`https://mintcdn.com/leapter/3NthIZmfsFFgUhyn/rc/user-guide/images/admin-keys-copy.png?fit=max\u0026auto=format\u0026n=3NthIZmfsFFgUhyn\u0026q=85\u0026s=99c9c10e76188b8314cab5a0a2505541`,alt:`The dialog Copy this key now. The key field shows lk_dev_ followed by dots. The copy button next to it has a green ring, and Copied is shown below the field.`,\"data-og-width\":`960`,width:`960`,\"data-og-height\":`666`,height:`666`,\"data-path\":`rc/user-guide/images/admin-keys-copy.png`,\"data-optimize\":`true`,\"data-opv\":`3`,srcset:`https://mintcdn.com/leapter/3NthIZmfsFFgUhyn/rc/user-guide/images/admin-keys-copy.png?w=280\u0026fit=max\u0026auto=format\u0026n=3NthIZmfsFFgUhyn\u0026q=85\u0026s=2e77d93b77b64c013a7c1ab189e2f45c 280w, https://mintcdn.com/leapter/3NthIZmfsFFgUhyn/rc/user-guide/images/admin-keys-copy.png?w=560\u0026fit=max\u0026auto=format\u0026n=3NthIZmfsFFgUhyn\u0026q=85\u0026s=45cadeba0c936b4e7d77e147988e2021 560w, https://mintcdn.com/leapter/3NthIZmfsFFgUhyn/rc/user-guide/images/admin-keys-copy.png?w=840\u0026fit=max\u0026auto=format\u0026n=3NthIZmfsFFgUhyn\u0026q=85\u0026s=fea597e7a4f62d87590216d374146cf3 840w, https://mintcdn.com/leapter/3NthIZmfsFFgUhyn/rc/user-guide/images/admin-keys-copy.png?w=1100\u0026fit=max\u0026auto=format\u0026n=3NthIZmfsFFgUhyn\u0026q=85\u0026s=2c3cc85434cfdcd656e4f7f0f62f85fb 1100w, https://mintcdn.com/leapter/3NthIZmfsFFgUhyn/rc/user-guide/images/admin-keys-copy.png?w=1650\u0026fit=max\u0026auto=format\u0026n=3NthIZmfsFFgUhyn\u0026q=85\u0026s=ba1e188b668aead0d996bee3e8d6e7b5 1650w, https://mintcdn.com/leapter/3NthIZmfsFFgUhyn/rc/user-guide/images/admin-keys-copy.png?w=2500\u0026fit=max\u0026auto=format\u0026n=3NthIZmfsFFgUhyn\u0026q=85\u0026s=a5090f7560fb38308f280503a34e243e 2500w`})}),_jsxs(_components.p,{children:[`Paste the key into a safe place now. The Admin UI never shows it again. Then click `,_jsx(_components.strong,{children:`Done`}),`.`]})]}),_jsxs(Step,{title:`Copy the run address`,children:[_jsxs(_components.p,{children:[`Scroll up to the card `,_jsx(_components.strong,{children:`Connect to`}),` with your application’s name. Under `,_jsx(_components.strong,{children:`Blueprints`}),`, find `,_jsx(_components.strong,{children:`Pizza Pricing`}),`. Next to `,_jsx(_components.strong,{children:`Run address`}),`, click `,_jsx(_components.strong,{children:`Copy`}),`.`]}),_jsx(Frame,{caption:`Each callable blueprint has its own run address.`,children:_jsx(OptimizedImage,{src:`https://mintcdn.com/leapter/3NthIZmfsFFgUhyn/rc/user-guide/images/admin-connect-rest.png?fit=max\u0026auto=format\u0026n=3NthIZmfsFFgUhyn\u0026q=85\u0026s=cf93796d2e5eaf439d07d4ba9ff57ec5`,alt:`The card Connect to pizza-pricing-calculator-180269. Under Blueprints, Pizza Pricing has the run address https://cluster.example.com/runtime/api/v1/playground/pizza-pricing-calculator-180269/models/pizza_pricing/runs. Its Copy button has a green ring.`,\"data-og-width\":`2880`,width:`2880`,\"data-og-height\":`1800`,height:`1800`,\"data-path\":`rc/user-guide/images/admin-connect-rest.png`,\"data-optimize\":`true`,\"data-opv\":`3`,srcset:`https://mintcdn.com/leapter/3NthIZmfsFFgUhyn/rc/user-guide/images/admin-connect-rest.png?w=280\u0026fit=max\u0026auto=format\u0026n=3NthIZmfsFFgUhyn\u0026q=85\u0026s=4fe391e3ef3a55afcd819d800bb122a1 280w, https://mintcdn.com/leapter/3NthIZmfsFFgUhyn/rc/user-guide/images/admin-connect-rest.png?w=560\u0026fit=max\u0026auto=format\u0026n=3NthIZmfsFFgUhyn\u0026q=85\u0026s=cfb0ed13e79c2f4a6837f2435925802c 560w, https://mintcdn.com/leapter/3NthIZmfsFFgUhyn/rc/user-guide/images/admin-connect-rest.png?w=840\u0026fit=max\u0026auto=format\u0026n=3NthIZmfsFFgUhyn\u0026q=85\u0026s=e89adc799ebdc42ae8395116cfad08f8 840w, https://mintcdn.com/leapter/3NthIZmfsFFgUhyn/rc/user-guide/images/admin-connect-rest.png?w=1100\u0026fit=max\u0026auto=format\u0026n=3NthIZmfsFFgUhyn\u0026q=85\u0026s=3caefc212013ac21da0b40479fe4d1b3 1100w, https://mintcdn.com/leapter/3NthIZmfsFFgUhyn/rc/user-guide/images/admin-connect-rest.png?w=1650\u0026fit=max\u0026auto=format\u0026n=3NthIZmfsFFgUhyn\u0026q=85\u0026s=b877d2c9c2beff6be94c468615cfbad2 1650w, https://mintcdn.com/leapter/3NthIZmfsFFgUhyn/rc/user-guide/images/admin-connect-rest.png?w=2500\u0026fit=max\u0026auto=format\u0026n=3NthIZmfsFFgUhyn\u0026q=85\u0026s=5dd937a667b267256a6b67bba1b69da8 2500w`})})]}),_jsxs(Step,{title:`Call the blueprint`,children:[_jsx(_components.p,{children:`In a terminal, store the run address and the key in two variables. Replace the two values with the ones you copied:`}),_jsx(CodeBlock,{filename:``,numberOfLines:`2`,language:`shellscript`,children:_jsx(_components.pre,{className:`shiki shiki-themes github-light-default dark-plus`,style:{backgroundColor:`#ffffff`,\"--shiki-dark-bg\":`#0B0C0E`,color:`#1f2328`,\"--shiki-dark\":`#D4D4D4`},language:`shellscript`,children:_jsxs(_components.code,{language:`shellscript`,numberOfLines:`2`,children:[_jsxs(_components.span,{className:`line`,children:[_jsx(_components.span,{style:{color:`#CF222E`,\"--shiki-dark\":`#569CD6`},children:`export`}),_jsx(_components.span,{style:{color:`#1F2328`,\"--shiki-dark\":`#9CDCFE`},children:` RUN_ADDRESS`}),_jsx(_components.span,{style:{color:`#CF222E`,\"--shiki-dark\":`#D4D4D4`},children:`=`}),_jsx(_components.span,{style:{color:`#0A3069`,\"--shiki-dark\":`#CE9178`},children:`'\u003crun-address>'`})]}),`\n`,_jsxs(_components.span,{className:`line`,children:[_jsx(_components.span,{style:{color:`#CF222E`,\"--shiki-dark\":`#569CD6`},children:`export`}),_jsx(_components.span,{style:{color:`#1F2328`,\"--shiki-dark\":`#9CDCFE`},children:` LEAPTER_EVALUATION_KEY`}),_jsx(_components.span,{style:{color:`#CF222E`,\"--shiki-dark\":`#D4D4D4`},children:`=`}),_jsx(_components.span,{style:{color:`#0A3069`,\"--shiki-dark\":`#CE9178`},children:`'\u003cyour-evaluation-key>'`})]}),`\n`]})})}),_jsxs(_components.p,{children:[`Then call the blueprint with a large thin-crust pizza with two toppings on a Friday. The body is a JSON object with the blueprint’s inputs. For your own project, use your blueprint’s inputs: `,_jsx(_components.a,{href:`/rc/user-guide/call-rest`,children:`Call a release over REST`}),` shows where to read them.`]}),_jsx(CodeBlock,{filename:``,numberOfLines:`4`,language:`shellscript`,children:_jsx(_components.pre,{className:`shiki shiki-themes github-light-default dark-plus`,style:{backgroundColor:`#ffffff`,\"--shiki-dark-bg\":`#0B0C0E`,color:`#1f2328`,\"--shiki-dark\":`#D4D4D4`},language:`shellscript`,children:_jsxs(_components.code,{language:`shellscript`,numberOfLines:`4`,children:[_jsxs(_components.span,{className:`line`,children:[_jsx(_components.span,{style:{color:`#953800`,\"--shiki-dark\":`#DCDCAA`},children:`curl`}),_jsx(_components.span,{style:{color:`#0550AE`,\"--shiki-dark\":`#569CD6`},children:` -X`}),_jsx(_components.span,{style:{color:`#0A3069`,\"--shiki-dark\":`#CE9178`},children:` POST`}),_jsx(_components.span,{style:{color:`#0A3069`,\"--shiki-dark\":`#CE9178`},children:` \"`}),_jsx(_components.span,{style:{color:`#1F2328`,\"--shiki-dark\":`#9CDCFE`},children:`$RUN_ADDRESS`}),_jsx(_components.span,{style:{color:`#0A3069`,\"--shiki-dark\":`#CE9178`},children:`\"`}),_jsx(_components.span,{style:{color:`#CF222E`,\"--shiki-dark\":`#D7BA7D`},children:` \\\\`})]}),`\n`,_jsxs(_components.span,{className:`line`,children:[_jsx(_components.span,{style:{color:`#0550AE`,\"--shiki-dark\":`#569CD6`},children:` -H`}),_jsx(_components.span,{style:{color:`#0A3069`,\"--shiki-dark\":`#CE9178`},children:` 'Content-Type: application/json'`}),_jsx(_components.span,{style:{color:`#CF222E`,\"--shiki-dark\":`#D7BA7D`},children:` \\\\`})]}),`\n`,_jsxs(_components.span,{className:`line`,children:[_jsx(_components.span,{style:{color:`#0550AE`,\"--shiki-dark\":`#569CD6`},children:` -H`}),_jsx(_components.span,{style:{color:`#0A3069`,\"--shiki-dark\":`#CE9178`},children:` \"X-API-Key: `}),_jsx(_components.span,{style:{color:`#1F2328`,\"--shiki-dark\":`#9CDCFE`},children:`$LEAPTER_EVALUATION_KEY`}),_jsx(_components.span,{style:{color:`#0A3069`,\"--shiki-dark\":`#CE9178`},children:`\"`}),_jsx(_components.span,{style:{color:`#CF222E`,\"--shiki-dark\":`#D7BA7D`},children:` \\\\`})]}),`\n`,_jsxs(_components.span,{className:`line`,children:[_jsx(_components.span,{style:{color:`#0550AE`,\"--shiki-dark\":`#569CD6`},children:` -d`}),_jsx(_components.span,{style:{color:`#0A3069`,\"--shiki-dark\":`#CE9178`},children:` '{\"pizzaSize\":\"large\",\"toppings\":[\"mushroom\",\"olive\"],\"crustType\":\"thin\",\"dayOfWeek\":\"friday\"}'`})]}),`\n`]})})}),_jsx(_components.p,{children:`You should see the blueprint’s outputs:`}),_jsx(CodeBlock,{filename:``,numberOfLines:`1`,language:`json`,children:_jsx(_components.pre,{className:`shiki shiki-themes github-light-default dark-plus`,style:{backgroundColor:`#ffffff`,\"--shiki-dark-bg\":`#0B0C0E`,color:`#1f2328`,\"--shiki-dark\":`#D4D4D4`},language:`json`,children:_jsxs(_components.code,{language:`json`,numberOfLines:`1`,children:[_jsxs(_components.span,{className:`line`,children:[_jsx(_components.span,{style:{color:`#1F2328`,\"--shiki-dark\":`#D4D4D4`},children:`{`}),_jsx(_components.span,{style:{color:`#116329`,\"--shiki-dark\":`#9CDCFE`},children:`\"outputData\"`}),_jsx(_components.span,{style:{color:`#1F2328`,\"--shiki-dark\":`#D4D4D4`},children:`:{`}),_jsx(_components.span,{style:{color:`#116329`,\"--shiki-dark\":`#9CDCFE`},children:`\"basePrice\"`}),_jsx(_components.span,{style:{color:`#1F2328`,\"--shiki-dark\":`#D4D4D4`},children:`:`}),_jsx(_components.span,{style:{color:`#0550AE`,\"--shiki-dark\":`#B5CEA8`},children:`16`}),_jsx(_components.span,{style:{color:`#1F2328`,\"--shiki-dark\":`#D4D4D4`},children:`,`}),_jsx(_components.span,{style:{color:`#116329`,\"--shiki-dark\":`#9CDCFE`},children:`\"crustUpcharge\"`}),_jsx(_components.span,{style:{color:`#1F2328`,\"--shiki-dark\":`#D4D4D4`},children:`:`}),_jsx(_components.span,{style:{color:`#0550AE`,\"--shiki-dark\":`#B5CEA8`},children:`0`}),_jsx(_components.span,{style:{color:`#1F2328`,\"--shiki-dark\":`#D4D4D4`},children:`,`}),_jsx(_components.span,{style:{color:`#116329`,\"--shiki-dark\":`#9CDCFE`},children:`\"dayMultiplier\"`}),_jsx(_components.span,{style:{color:`#1F2328`,\"--shiki-dark\":`#D4D4D4`},children:`:`}),_jsx(_components.span,{style:{color:`#0550AE`,\"--shiki-dark\":`#B5CEA8`},children:`1.1`}),_jsx(_components.span,{style:{color:`#1F2328`,\"--shiki-dark\":`#D4D4D4`},children:`,`}),_jsx(_components.span,{style:{color:`#116329`,\"--shiki-dark\":`#9CDCFE`},children:`\"subtotal\"`}),_jsx(_components.span,{style:{color:`#1F2328`,\"--shiki-dark\":`#D4D4D4`},children:`:`}),_jsx(_components.span,{style:{color:`#0550AE`,\"--shiki-dark\":`#B5CEA8`},children:`19`}),_jsx(_components.span,{style:{color:`#1F2328`,\"--shiki-dark\":`#D4D4D4`},children:`,`}),_jsx(_components.span,{style:{color:`#116329`,\"--shiki-dark\":`#9CDCFE`},children:`\"toppingsCost\"`}),_jsx(_components.span,{style:{color:`#1F2328`,\"--shiki-dark\":`#D4D4D4`},children:`:`}),_jsx(_components.span,{style:{color:`#0550AE`,\"--shiki-dark\":`#B5CEA8`},children:`3`}),_jsx(_components.span,{style:{color:`#1F2328`,\"--shiki-dark\":`#D4D4D4`},children:`,`}),_jsx(_components.span,{style:{color:`#116329`,\"--shiki-dark\":`#9CDCFE`},children:`\"totalPrice\"`}),_jsx(_components.span,{style:{color:`#1F2328`,\"--shiki-dark\":`#D4D4D4`},children:`:`}),_jsx(_components.span,{style:{color:`#0550AE`,\"--shiki-dark\":`#B5CEA8`},children:`20.9`}),_jsx(_components.span,{style:{color:`#1F2328`,\"--shiki-dark\":`#D4D4D4`},children:`,`}),_jsx(_components.span,{style:{color:`#116329`,\"--shiki-dark\":`#9CDCFE`},children:`\"weeklyPrices\"`}),_jsx(_components.span,{style:{color:`#1F2328`,\"--shiki-dark\":`#D4D4D4`},children:`:[`}),_jsx(_components.span,{style:{color:`#0550AE`,\"--shiki-dark\":`#B5CEA8`},children:`19`}),_jsx(_components.span,{style:{color:`#1F2328`,\"--shiki-dark\":`#D4D4D4`},children:`,`}),_jsx(_components.span,{style:{color:`#0550AE`,\"--shiki-dark\":`#B5CEA8`},children:`15.2`}),_jsx(_components.span,{style:{color:`#1F2328`,\"--shiki-dark\":`#D4D4D4`},children:`,`}),_jsx(_components.span,{style:{color:`#0550AE`,\"--shiki-dark\":`#B5CEA8`},children:`17.1`}),_jsx(_components.span,{style:{color:`#1F2328`,\"--shiki-dark\":`#D4D4D4`},children:`,`}),_jsx(_components.span,{style:{color:`#0550AE`,\"--shiki-dark\":`#B5CEA8`},children:`19`}),_jsx(_components.span,{style:{color:`#1F2328`,\"--shiki-dark\":`#D4D4D4`},children:`,`}),_jsx(_components.span,{style:{color:`#0550AE`,\"--shiki-dark\":`#B5CEA8`},children:`20.9`}),_jsx(_components.span,{style:{color:`#1F2328`,\"--shiki-dark\":`#D4D4D4`},children:`,`}),_jsx(_components.span,{style:{color:`#0550AE`,\"--shiki-dark\":`#B5CEA8`},children:`21.85`}),_jsx(_components.span,{style:{color:`#1F2328`,\"--shiki-dark\":`#D4D4D4`},children:`,`}),_jsx(_components.span,{style:{color:`#0550AE`,\"--shiki-dark\":`#B5CEA8`},children:`19`}),_jsx(_components.span,{style:{color:`#1F2328`,\"--shiki-dark\":`#D4D4D4`},children:`]}}`})]}),`\n`]})})}),_jsx(Note,{children:_jsxs(_components.p,{children:[`The first key of an application needs about a minute to reach the cluster. Until then, the call answers `,_jsx(_components.code,{children:`404 page not found`}),`. Wait a minute and call again.`]})})]})]}),`\n`,_jsx(Heading,{level:`2`,id:`result`,children:`Result`}),`\n`,_jsxs(_components.p,{children:[`Release v1 of your project runs in an environment of your runtime cluster, and a system that holds the evaluation key can call it. The total price for the pizza is `,_jsx(_components.code,{children:`20.9`}),`. Click `,_jsx(_components.strong,{children:`Status`}),` in the sidebar of the Admin UI: after a short time, `,_jsx(_components.strong,{children:`Drift`}),` for your application says `,_jsx(_components.strong,{children:`No drift`}),`.`]}),`\n`,_jsx(Heading,{level:`2`,id:`what-to-do-next`,children:`What to do next`}),`\n`,_jsxs(_components.ul,{children:[`\n`,_jsxs(_components.li,{children:[_jsx(_components.a,{href:`/rc/user-guide/call-rest`,children:`Call a release over REST`}),`: headers, errors and the OpenAPI document.`]}),`\n`,_jsxs(_components.li,{children:[_jsx(_components.a,{href:`/rc/user-guide/connect-mcp`,children:`Connect an MCP client to a release`}),`: use the blueprint as a tool for an AI agent.`]}),`\n`,_jsxs(_components.li,{children:[_jsx(_components.a,{href:`/rc/user-guide/evaluation-keys`,children:`Create and revoke an evaluation key`}),`: give more systems access, or take it back.`]}),`\n`,_jsxs(_components.li,{children:[_jsx(_components.a,{href:`/rc/user-guide/runs-and-usage`,children:`Find a run and read usage`}),`: see the call you just made.`]}),`\n`]})]})}function MDXContent(props={}){const{wrapper:MDXLayout}={..._provideComponents(),...props.components};return MDXLayout?_jsx(MDXLayout,{...props,children:_jsx(_createMdxContent,{...props})}):_createMdxContent(props)}return{default:MDXContent};function _missingMdxReference(id,component){throw new Error(`Expected `+(component?`component`:`object`)+\" `\"+id+\"` to be defined: you likely forgot to import, pass, or provide it.\")}","frontmatter":{},"scope":{"config":{},"pageMetadata":{"title":"Deploy a release and call it","description":"Release a Lab project, deploy it to a runtime cluster, create an evaluation key, and call a blueprint with curl.","href":"/rc/user-guide/deploy-and-call"}}},"mdxSourceWithNoJs":null},"mdxExtracts":{"tableOfContents":[{"title":"Before you start","slug":"before-you-start","depth":2,"children":[]},{"title":"Steps","slug":"steps","depth":2,"children":[]},{"title":"Result","slug":"result","depth":2,"children":[]},{"title":"What to do next","slug":"what-to-do-next","depth":2,"children":[]}],"codeExamples":{}},"jsLinks":["/_mintlify/custom/leapter/64a27696885a464d/userback.js","/_mintlify/custom/leapter/bc6e2f2e6381fc02/cookieconsent.umd.js"],"subdomain":"leapter","siteName":"Leapter Documentation","title":"Deploy a release and call it - Leapter Documentation","navMaps":{"firstHrefInVersion":{},"firstHrefInLanguage":{}},"lastModified":"2026-11-05T09:20:58.662Z","originalFileLocation":"rc/user-guide/deploy-and-call.mdx"},"headHtml":"\u003cscript data-mint-head>(function(){var d=document.documentElement,p=null;if(!p){try{p=localStorage.getItem(\"isDarkMode\")}catch(e){}if(p==='true')p='dark';else if(p==='false')p='light';if(p!=='light'\u0026\u0026p!=='dark'\u0026\u0026p!=='system')p=\"system\"}var r=p==='system'?(matchMedia(\"(prefers-color-scheme: dark)\").matches?'dark':'light'):p;d.classList.remove(r==='dark'?'light':'dark');d.classList.add(r);d.setAttribute(\"data-theme-preference\",p)})();\u003c/script>\u003cmeta data-mint-head name=\"description\" content=\"Release a Lab project, deploy it to a runtime cluster, create an evaluation key, and call a blueprint with curl.\">\u003cmeta data-mint-head name=\"application-name\" content=\"Leapter Documentation\">\u003cmeta data-mint-head name=\"generator\" content=\"Mintlify\">\u003clink data-mint-head rel=\"icon\" type=\"image/png\" sizes=\"192x192\" href=\"/mintlify-assets/_mintlify/favicons/leapter/4YjeVL3ot7I33F1v/_generated/favicon/android-chrome-192x192.png\" media=\"(prefers-color-scheme: light)\">\u003clink data-mint-head rel=\"apple-touch-icon\" type=\"image/png\" sizes=\"180x180\" href=\"/mintlify-assets/_mintlify/favicons/leapter/4YjeVL3ot7I33F1v/_generated/favicon/apple-touch-icon.png\">\u003clink data-mint-head rel=\"icon\" type=\"image/png\" sizes=\"16x16\" href=\"/mintlify-assets/_mintlify/favicons/leapter/4YjeVL3ot7I33F1v/_generated/favicon/favicon-16x16.png\" media=\"(prefers-color-scheme: light)\">\u003clink data-mint-head rel=\"icon\" type=\"image/png\" sizes=\"32x32\" href=\"/mintlify-assets/_mintlify/favicons/leapter/4YjeVL3ot7I33F1v/_generated/favicon/favicon-32x32.png\" media=\"(prefers-color-scheme: light)\">\u003clink data-mint-head rel=\"shortcut icon\" type=\"image/x-icon\" href=\"/mintlify-assets/_mintlify/favicons/leapter/4YjeVL3ot7I33F1v/_generated/favicon/favicon.ico\" media=\"(prefers-color-scheme: light)\">\u003clink data-mint-head rel=\"icon\" type=\"image/png\" sizes=\"192x192\" href=\"/mintlify-assets/_mintlify/favicons/leapter/4YjeVL3ot7I33F1v/_generated/favicon-dark/android-chrome-192x192.png\" media=\"(prefers-color-scheme: dark)\">\u003clink data-mint-head rel=\"icon\" type=\"image/png\" sizes=\"16x16\" href=\"/mintlify-assets/_mintlify/favicons/leapter/4YjeVL3ot7I33F1v/_generated/favicon-dark/favicon-16x16.png\" media=\"(prefers-color-scheme: dark)\">\u003clink data-mint-head rel=\"icon\" type=\"image/png\" sizes=\"32x32\" href=\"/mintlify-assets/_mintlify/favicons/leapter/4YjeVL3ot7I33F1v/_generated/favicon-dark/favicon-32x32.png\" media=\"(prefers-color-scheme: dark)\">\u003clink data-mint-head rel=\"shortcut icon\" type=\"image/x-icon\" href=\"/mintlify-assets/_mintlify/favicons/leapter/4YjeVL3ot7I33F1v/_generated/favicon-dark/favicon.ico\" media=\"(prefers-color-scheme: dark)\">\u003cmeta data-mint-head property=\"og:title\" content=\"Deploy a release and call it - Leapter Documentation\">\u003cmeta data-mint-head property=\"og:description\" content=\"Release a Lab project, deploy it to a runtime cluster, create an evaluation key, and call a blueprint with curl.\">\u003cmeta data-mint-head property=\"og:site_name\" content=\"Leapter Documentation\">\u003cmeta data-mint-head property=\"og:url\" content=\"https://docs.leapter.com/rc/user-guide/deploy-and-call\">\u003cmeta data-mint-head property=\"og:type\" content=\"website\">\u003cmeta data-mint-head property=\"og:image\" content=\"https://leapter.mintlify.app/_mintlify/api/og/v2?division=Deploy\u0026amp;title=Deploy+a+release+and+call+it\u0026amp;description=Release+a+Lab+project%2C+deploy+it+to+a+runtime+cluster%2C+create+an+evaluation+key%2C+and+call+a+blueprint+with+curl.\u0026amp;theme=6278f51e7a2c745d557cb7fa\u0026amp;signature=6c0e69b9d69d85c5c9a41ab7996dbf227b11e067ce775e6c04b77759b776bc7b\">\u003cmeta data-mint-head property=\"og:image:width\" content=\"1200\">\u003cmeta data-mint-head property=\"og:image:height\" content=\"630\">\u003cmeta data-mint-head name=\"twitter:card\" content=\"summary_large_image\">\u003cmeta data-mint-head name=\"twitter:title\" content=\"Deploy a release and call it - Leapter Documentation\">\u003cmeta data-mint-head name=\"twitter:description\" content=\"Release a Lab project, deploy it to a runtime cluster, create an evaluation key, and call a blueprint with curl.\">\u003cmeta data-mint-head name=\"twitter:image\" content=\"https://leapter.mintlify.app/_mintlify/api/og/v2?division=Deploy\u0026amp;title=Deploy+a+release+and+call+it\u0026amp;description=Release+a+Lab+project%2C+deploy+it+to+a+runtime+cluster%2C+create+an+evaluation+key%2C+and+call+a+blueprint+with+curl.\u0026amp;theme=6278f51e7a2c745d557cb7fa\u0026amp;signature=6c0e69b9d69d85c5c9a41ab7996dbf227b11e067ce775e6c04b77759b776bc7b\">\u003cmeta data-mint-head name=\"twitter:image:width\" content=\"1200\">\u003cmeta data-mint-head name=\"twitter:image:height\" content=\"630\">\u003cmeta data-mint-head name=\"msapplication-config\" content=\"/mintlify-assets/_mintlify/favicons/leapter/4YjeVL3ot7I33F1v/_generated/favicon/browserconfig.xml\">\u003cmeta data-mint-head name=\"apple-mobile-web-app-title\" content=\"Leapter Documentation\">\u003cmeta data-mint-head name=\"msapplication-TileColor\" content=\"#FA4B00\">\u003clink data-mint-head rel=\"canonical\" href=\"https://docs.leapter.com/rc/user-guide/deploy-and-call\">\u003clink data-mint-head rel=\"alternate\" type=\"application/xml\" href=\"/sitemap.xml\">\u003clink data-mint-head rel=\"alternate\" type=\"text/markdown\" href=\"/rc/user-guide/deploy-and-call.md\">\u003cscript data-mint-head type=\"application/ld+json\">{\"@context\":\"https://schema.org\",\"@graph\":[{\"@type\":\"Organization\",\"@id\":\"https://docs.leapter.com/#organization\",\"name\":\"Leapter Documentation\",\"url\":\"https://docs.leapter.com\",\"logo\":{\"@type\":\"ImageObject\",\"url\":\"https://mintcdn.com/leapter/n-gCe0s55i-T1r4S/logo/leapter-logo-horizontal-dark.svg?fit=max\u0026auto=format\u0026n=n-gCe0s55i-T1r4S\u0026q=85\u0026s=aa6ff0318f24b8562163ccbe2c6d72f1\"}},{\"@type\":\"WebSite\",\"@id\":\"https://docs.leapter.com#website\",\"name\":\"Leapter Documentation\",\"url\":\"https://docs.leapter.com\",\"publisher\":{\"@id\":\"https://docs.leapter.com/#organization\"}},{\"@type\":\"WebPage\",\"@id\":\"https://docs.leapter.com/rc/user-guide/deploy-and-call#webpage\",\"url\":\"https://docs.leapter.com/rc/user-guide/deploy-and-call\",\"name\":\"Deploy a release and call it\",\"description\":\"Release a Lab project, deploy it to a runtime cluster, create an evaluation key, and call a blueprint with curl.\",\"dateModified\":\"2026-11-05T09:20:58.662Z\",\"isPartOf\":{\"@id\":\"https://docs.leapter.com#website\"},\"breadcrumb\":{\"@id\":\"https://docs.leapter.com/rc/user-guide/deploy-and-call#breadcrumb\"}},{\"@type\":\"BreadcrumbList\",\"@id\":\"https://docs.leapter.com/rc/user-guide/deploy-and-call#breadcrumb\",\"itemListElement\":[{\"@type\":\"ListItem\",\"position\":1,\"name\":\"Leapter Documentation\",\"item\":\"https://docs.leapter.com\"},{\"@type\":\"ListItem\",\"position\":2,\"name\":\"Deploy a release and call it\",\"item\":\"https://docs.leapter.com/rc/user-guide/deploy-and-call\"}]},{\"@type\":[\"Article\",\"TechArticle\"],\"@id\":\"https://docs.leapter.com/rc/user-guide/deploy-and-call#article\",\"headline\":\"Deploy a release and call it\",\"name\":\"Deploy a release and call it\",\"description\":\"Release a Lab project, deploy it to a runtime cluster, create an evaluation key, and call a blueprint with curl.\",\"url\":\"https://docs.leapter.com/rc/user-guide/deploy-and-call\",\"mainEntityOfPage\":{\"@id\":\"https://docs.leapter.com/rc/user-guide/deploy-and-call#webpage\"},\"dateModified\":\"2026-11-05T09:20:58.662Z\",\"publisher\":{\"@id\":\"https://docs.leapter.com/#organization\"},\"isPartOf\":{\"@id\":\"https://docs.leapter.com#website\"}}]}\u003c/script>\u003cscript data-mint-head type=\"application/ld+json\">{\"@context\":\"https://schema.org\",\"@type\":\"WebSite\",\"name\":\"Leapter Documentation\",\"creator\":{\"@type\":\"Organization\",\"name\":\"Mintlify\",\"url\":\"https://mintlify.com\"}}\u003c/script>","siteName":"Leapter Documentation","nav":{"global":{"anchors":[{"anchor":"Homepage","icon":"book-open-cover","href":"https://www.leapter.com"},{"anchor":"Blog","icon":"newspaper","href":"https://www.leapter.com/blog"}]},"tabs":[{"tab":"Lab User Guide","pages":[{"title":"Lab User Guide","href":"/get-started/what-is-leapter"}]},{"tab":"Runtime Cluster User Guide","groups":[{"group":"Get Started","pages":[{"title":"Runtime cluster guide","href":"/rc/user-guide"},{"title":"What is Leapter","href":"/rc/user-guide/what-is-leapter"},{"title":"Runtime clusters, environments and releases","description":"How a release gets from the Lab to a runtime cluster, what callers need to run it, and which role may do what.","href":"/rc/user-guide/concepts"}]},{"group":"Deploy","pages":[{"title":"Deploy a release and call it","href":"/rc/user-guide/deploy-and-call"},{"title":"Create and revoke an evaluation key","description":"Give a calling system its own key for one application, and revoke the key when the system no longer calls.","href":"/rc/user-guide/evaluation-keys"}]},{"group":"Call Blueprints","pages":[{"title":"Call a release over REST","href":"/rc/user-guide/call-rest"},{"title":"Connect an MCP client to a release","href":"/rc/user-guide/connect-mcp"}]},{"group":"n8n","pages":[{"title":"Call a release from n8n with the Leapter node","sidebarTitle":"Leapter node","href":"/rc/user-guide/n8n-node"},{"title":"Call a release from n8n","href":"/rc/user-guide/call-from-n8n"},{"title":"Run a blueprint inside n8n","href":"/rc/user-guide/n8n-code"},{"title":"Use your blueprints in an n8n AI agent","href":"/rc/user-guide/n8n-mcp-agent"}]},{"group":"Runs","pages":[{"title":"Find a run and read usage","href":"/rc/user-guide/runs-and-usage"}]}]},{"tab":"Changelog \u0026 Features","pages":[{"title":"Changelog \u0026 Features","href":"/changelog"}]}]},"basePath":"","title":"Deploy a release and call it - Leapter Documentation","buildId":"dpl_9VVk5y1P8k1ATeJguVngy9Q3cmbD","deploymentId":"dpl_9VVk5y1P8k1ATeJguVngy9Q3cmbD","dynamics":["10e4515597","07c022d89b","a74be98ba7"],"chunks":["BannerMarkdown-DicSZcaX.js","dist-CIQkMg3R.js","lib-DuNMoZ05.js","lib-B8HbPgcC.js","clsx-ClVdStUn.js","html-void-elements-mCSPHezU.js","katex-YMM-FMeD.js","marked.esm-CZWythHk.js","Frame-BdiBGm0H.js","DynamicMarkdown-CbqEDjbV.js","zoom-image-lightbox-CvtNkYOX.js","lightbox-handle-r17bVUz3.js"]}