

Where decision tables appear
A decision table is a type of element inside a Blueprint, shown as a grid with a table icon in the Blueprint’s diagram — both in the Specification view and in the Diagram view.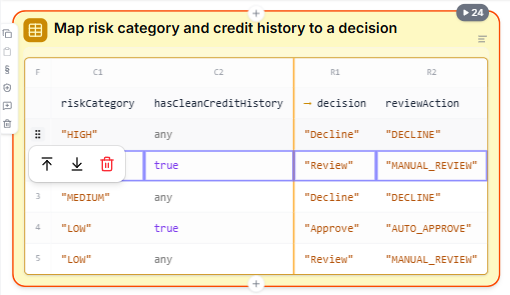
How to read a decision table
The F in the table’s top-left corner stands for first match and is a reminder that order matters: rules are evaluated top to bottom, and evaluation stops at the first row that matches. A row full of
any at the bottom is a common way to provide a catch-all default.
An input cell matches when the input equals the cell’s value (for example a value of a Choice Type or a boolean), or when the cell is any. Output cells are expressions, so an outcome can be a fixed value or a small calculation.
Creating a decision table
The quickest way to add a decision table is to ask the Lab Agent. Describe the rule as a mapping — for example “map the risk category and the credit history to a decision” — and the agent builds the table for you. When a rule is a straightforward lookup, the agent prefers a decision table over a chain of decisions. To add one yourself, click a connection point in the diagram and choose Create a decision table in the element palette.Editing a decision table
Edit a cell by clicking it and typing a new value, or switch it to or fromany. You can do this directly in the diagram or on the maximized table.
To change the table’s shape, maximize it: click its maximize icon to open the full-width view. Rulers above the columns and next to the rows hold the structural actions:
To rename a column, click its header and type the new name.
Edits go through the same save path as any other change, so they appear in the Timeline, can be undone, and show up in review just like edits to any other element.
Running a decision table
When you run your Blueprint, the row that fired lights up in the table, so you can see exactly which rule applied for a given set of inputs. This makes it easy to confirm that the right rule won — especially useful when several rows could plausibly match and first-match order decides between them.What to do next
- Controlling the Flow — the other elements that make up a Blueprint
- Lab Agent — build and edit decision tables by describing the rules
- Test your Blueprint — run your logic and see which row fires