

Four kinds of type
Value Type
A Value Type gives a basic value a name and rules, so the same rules apply everywhere the value is used. You can set Value bounds (Min / Max) for a number, Length bounds (Min length / Max length) for a text, and a Default. Bounds are inclusive: Min 0 means 0 or more.Choice Type
A Choice Type is a value that must be one of a fixed list — a status, a category, or a tier. Its base is text or a number, and you list its Allowed values. Use a Choice Type whenever an input can only take a few known values: callers that send anything else are rejected before your logic runs.Data Type
A Data Type is a structured record — a named group of fields. A field can be a basic type, a Value Type, a Choice Type, another Data Type, or a list of any of these. Fields can carry their own rules and defaults.Error
An Error describes a way your logic can fail. Every error has amessage field, and you add the fields a caller needs to react — for example, which input was wrong. See Error Handling for how to raise and handle errors.
Basic types
Besides your own types, every type picker offers the basic types: text, number, boolean (yes/no), date, date-time, percent, and any.- percent is a number shown with a % sign. It is stored as a fraction:
0.2is shown as 20 %. - any accepts any value. Leapter doesn’t check it, so prefer a specific type whenever you know the shape of the data.
The Type Definitions chapter
The chapter lists your types grouped by kind — Value Types, Choice Types, Data Types, and Errors — with their Name, Type, and Details (description, rules, allowed values). To add a type, click the + line below a group (for example Add a choice type) and give it a name. Type names are unique within a project. To change a type, click the chevron (Edit definition) at the end of its row. A card opens where you edit the Label, Type, Description, Default, and the rules for this kind of type — and where you can comment on the type or delete it.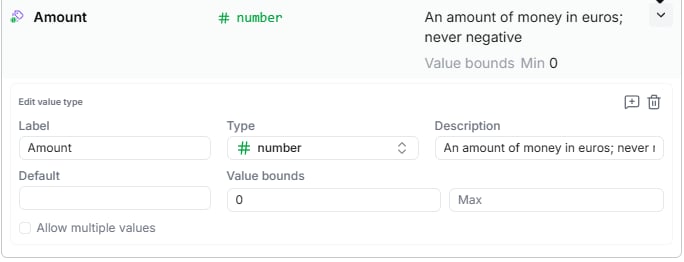
The type canvas
To see all types and how they relate, click the Maximize icon in the chapter heading. The type canvas shows each type as a card, colored by kind, with arrows from a type to the types its fields use.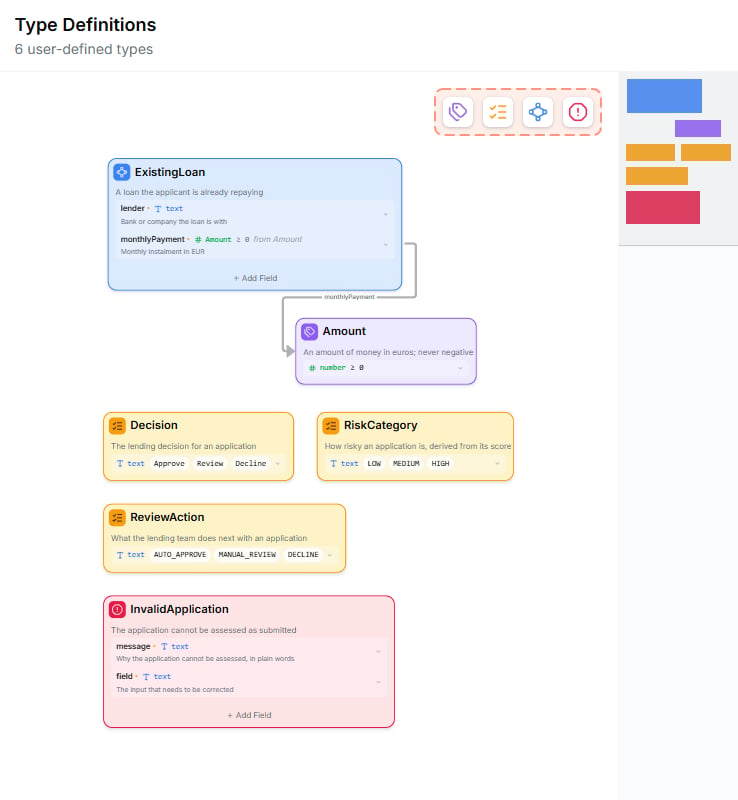
- Create a type with the toolbar in the top-right corner: Value Type, Choice Type, Data Type, or Error.
- Add a field to a Data Type or an Error with + Add Field.
- Rearrange the cards — choose Layout: compact or Layout: columns in the Settings popover of the top toolbar.
Deleting and renaming types
When you delete a type that is still in use, Leapter tells you how many places use it — “N references across M resources” — and that they will break until you update or remove them. Click Delete anyway only if you are sure.Using a type
Once defined, a type appears in every type picker in the project:- When you set the type of an input, output, or local.
- When you add a field to a Data Type or an Error.
- In Call nodes, when the called Blueprint expects an input or returns an output of this type.
Why types help
- One source of truth — change the rules once and every input, output, and field that uses the type follows.
- Validation for free — Leapter checks every input against its type before any logic runs. A value outside a Choice Type’s list, a number outside its bounds, or a record with a missing field is rejected, so you don’t need to write those checks yourself.
- Better AI results — when you ask AI to create or edit a Blueprint, named types let it reason about your domain (“an
ExistingLoanhas amonthlyPayment”) rather than guess from basic types. - Better readability — a Specification view that mentions
DecisionandExistingLoanreads like business prose.
Tips
- Start without types. New projects don’t need them — basic inputs work fine. Reach for Type Definitions when you notice the same shape or the same rule repeating.
- Use a Choice Type for every “one of” value. It documents the allowed values and enforces them.
- Name types after domain concepts, not implementation.
Customeris better thanCustomerObject; name errors after the situation, such asInvalidApplication.
What to do next
- Inputs and Outputs — apply your types to a Blueprint’s parameters
- Error Handling — raise and handle the errors you defined
- Calling Other Blueprints — pass typed values between Blueprints