

Per-Blueprint signature
Each Blueprint has:- Inputs — the values it receives when it runs
- Outputs — the values it returns when it finishes
- Local variables — internal scratch space, not visible to callers
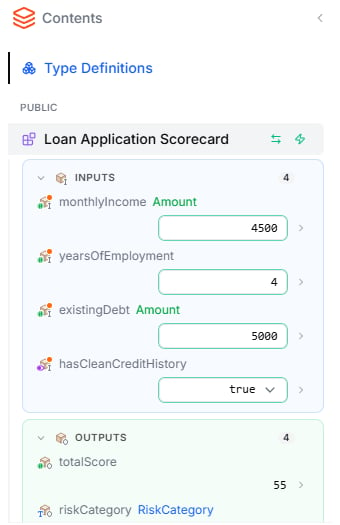
- Label — the name used to reference this value in your logic (e.g.,
monthlyIncome,existingDebt) - Type — what kind of data it holds: a basic type such as
text,number,boolean,date,date-time, orpercent, or one of your project’s Type Definitions - Description — explains what the value represents
- Default — the value used when a caller leaves the input out
- Required — for inputs only: whether the caller must provide the value
- Allow multiple values — whether the parameter holds a list of values instead of a single value
- Rules — depending on the type: Allowed values for a fixed list, Value bounds (Min / Max) for a number, or Length bounds for a text
Outputs are never required
Only inputs can be required. An output that a run does not set is simply left out of the result, and the editor shows it as not set. Give an output a Default if callers should always receive a value.List parameters
When you check Allow multiple values, the parameter accepts a list of values. This is useful when your Blueprint needs to process multiple items — like a list of order amounts or customer names. Use Loop elements to iterate over list inputs.Local variables
Local variables are internal to the Blueprint that defines them. Use them for intermediate calculations, counters, or temporary values. They aren’t visible to other Blueprints and aren’t part of any signature. You don’t have to declare a local before you use it. When you assign a value to a name the Blueprint doesn’t know yet, Leapter asks what the name should hold — What does name hold? — and offers Create variable. If the name looks like a typo of an existing one, it asks Did you mean name? instead. Expression tooltips and autocomplete label every name as Input, Output, or Local.Public Blueprints and the project’s external interface
When someone calls your project through the REST API or MCP, they call one of its public Blueprints in the latest release. Each public Blueprint’s signature is an external interface:- The inputs a caller sends are this Blueprint’s inputs
- The outputs a caller receives are this Blueprint’s outputs
The Execution Scope in the editor
The Blueprint marked with a green spark icon (⚡) in the Contents sidebar is the Execution Scope. It decides which Blueprint runs when you work in Live mode in the editor. To change it, click the spark icon next to another Blueprint (Set as execution scope). The Execution Scope only affects runs in the editor. It doesn’t change what callers can reach — that is decided by which Blueprints are public.Why per-Blueprint signatures matter
Tips
- Use descriptive names —
cartValueis better thanval1 - Write descriptions as if explaining to someone who’s never seen the project — they show up in the API surface and in any public share
- Only mark inputs as required if the Blueprint truly cannot function without them
- Reach for Type Definitions when several inputs or outputs share the same shape — define the type once and reuse it across Blueprints
What to do next
- Type Definitions — define reusable Value Types and Data Types
- Calling Other Blueprints — pass typed values between Blueprints
- Test your Blueprint — set values and run from the Contents sidebar