

Per-Blueprint signature
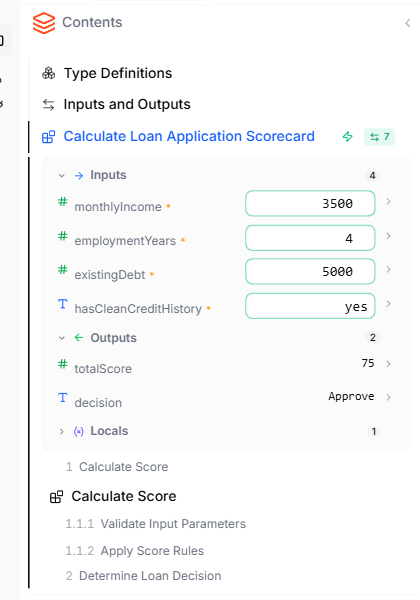
Each Blueprint has:- Inputs — the values it receives when it runs
- Outputs — the values it returns when it finishes
- Local variables — internal scratch space, not visible to callers
- Name — the identifier used to reference this value in your logic (e.g.,
monthlyIncome,existingDebt) - Type — what kind of data it holds:
string,number,boolean,date, anenum, or one of your project’s Type Definitions - Description — explains what the value represents
- Required — whether the input must be provided or is optional
- Multiple — whether the parameter accepts a list of values instead of a single value
List parameters
When you check the Multiple option, the parameter accepts a list of values. This is useful when your Blueprint needs to process multiple items — like a list of order amounts or customer names. Use Loop elements to iterate over list inputs.Local variables
Local variables are internal to the Blueprint that defines them. Use them for intermediate calculations, counters, or temporary values. They aren’t visible to other Blueprints and aren’t part of any signature.Execution Scope and the project’s external interface
When a project runs — whether you click run in the editor, call it via the REST API, or invoke it via MCP — execution starts from one Blueprint: the Execution Scope. The Blueprint marked as the active Execution Scope shows a green spark icon (⚡) in the Contents sidebar. Its signature is the project’s external interface:- The inputs the project receives are this Blueprint’s inputs
- The outputs the project returns are this Blueprint’s outputs
Switching the Execution Scope
You can change which Blueprint is the active Execution Scope. This is useful when you want to test a sub-Blueprint in isolation, or restructure your project so a different Blueprint becomes the entry point. Other Blueprints remain in the project and can still be called via Call nodes.Why per-Blueprint signatures matter
Tips
- Use descriptive names —
cartValueis better thanval1 - Write descriptions as if explaining to someone who’s never seen the project — they show up in the API surface and in any public share
- Only mark inputs as required if the Blueprint truly cannot function without them
- Reach for Type Definitions when several inputs or outputs share the same shape — define the type once and reuse it across Blueprints
What to do next
- Type Definitions — define reusable Value Types and Data Types
- Calling Other Blueprints — pass typed values between Blueprints
- Test your Blueprint — set values and run from the Contents sidebar